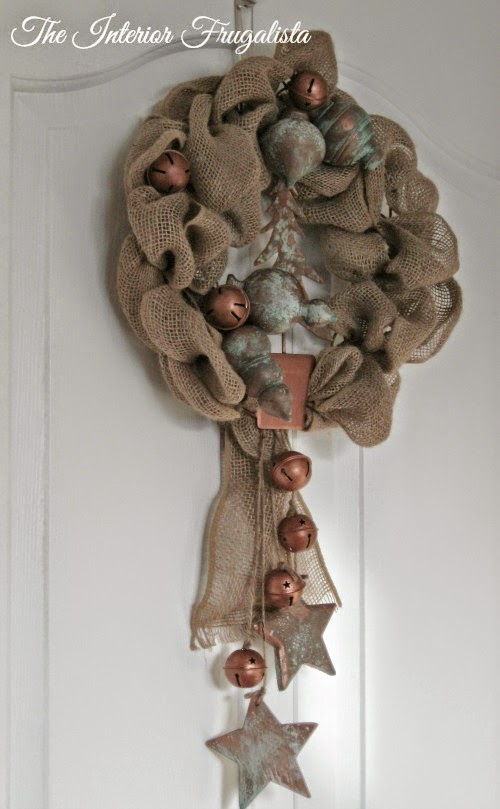
Repurposed Metal Christmas Card Holder Wreath
Remember those metal greeting cardholders that were so popular in the day? Perhaps like me, you still have one. Did you know they make a perfect wreath form for creating ribbon wreaths? Wire wreath forms are so expensive to buy but these old metal greeting card holders are a dime a dozen at the thrift store. I found mine for a whopping $1.50. The wreaths are so easy to make using holiday ribbon, colored mesh ribbon or burlap like I used to make a Rustic Burlap Holiday Wreath with oxidized copper embellishments.
This is the metal greeting card holder I found for $1.50.
I've included a Materials List at the bottom of this post for your convenience should you want to try a non-traditional oxidized copper and burlap wreath for the holidays.
This post contains affiliate links so you can see what products I used or recommend to complete this project. What that means is that if you click on one of the product links, I may receive a small portion of any sales at no additional cost to you to support the costs of running this site. See my disclosure policy page.
While the metal greeting card holder I found is just fine the way it is, I wanted to put a non-traditional spin on my wreath with copper elements - specifically oxidized copper.
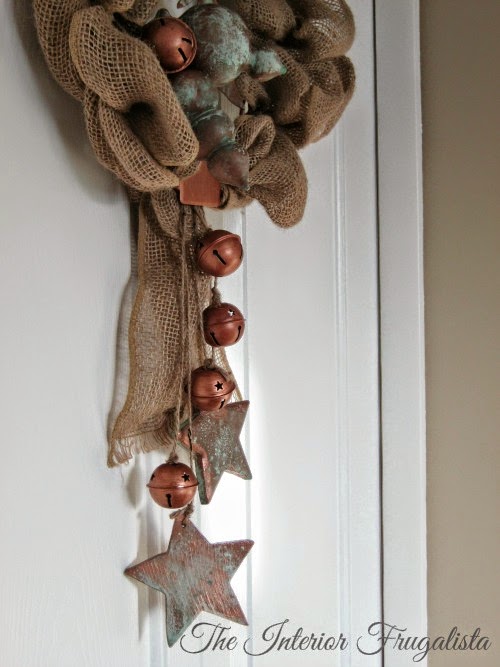
Using jute twine, I strung two oxidized star ornaments and four copper bells at varying lengths to the bottom of the wreath.
This wreath was finished, including painting the ornaments, in an afternoon. I love the non-traditional look of this wreath using oxidized copper elements.
Wide Burlap Ribbon
Wooden Ornaments
Sleigh Bells
Jute Twine
Modern Masters Metal Effects Copper Kit
Instead of oxidized copper elements, you could use rustic woodland ornaments like wooden stars or birdhouses with the burlap ribbon. The possibilities for making holiday wreaths using a metal greeting card holder are endless.
Bright and colorful mesh ribbon with candy ornaments is one idea. Or pretty holiday ribbon with mercury glass or shiny ornaments to embellish. You don't have to spend a ton of money making them either.
If you'd like to see some other projects where I used the Modern Masters Metal Effects Kit you can find them here in my 5-Panel Door Repurposed Into Flower Planter or Faux Oxidized Copper Topped Table or Tin Pumpkin Art for Fall.
Here is another non-traditional wreath idea for the holidays using small inexpensive picture frames and old brooches. You can find that tutorial here in my DIY Christmas Door Hanger post.
If you like my tip for repurposing a metal greeting cardholder or like the idea of a non-traditional oxidized copper burlap wreath, please save it on Pinterest and/or share this post with a friend.
Repurposed Metal Christmas Card Holder Wreath
This is the metal greeting card holder I found for $1.50.
I've included a Materials List at the bottom of this post for your convenience should you want to try a non-traditional oxidized copper and burlap wreath for the holidays.
This post contains affiliate links so you can see what products I used or recommend to complete this project. What that means is that if you click on one of the product links, I may receive a small portion of any sales at no additional cost to you to support the costs of running this site. See my disclosure policy page.
While the metal greeting card holder I found is just fine the way it is, I wanted to put a non-traditional spin on my wreath with copper elements - specifically oxidized copper.
How to achieve an oxidized copper patina
It is so easy to turn metal or wood into oxidized copper with the Modern Masters Metal Effects Kit. The first thing I did was paint the entire greeting card holder with Copper Metal Effects Primer.
On just the Christmas Tree on the bottom, I painted it with Copper Reactive Metallic Paint. Following the instructions with the kit, I sprayed the tree with Green Patina Aging Solution before the reactive paint dried. The fun is watching the oxidization process happen before your eyes.
Next, I simply weaved a roll of burlap ribbon loosely in and out of the cardholder loops, wrapping it about three times around for fullness, with two long strands on both ends.Oxidizing wooden ornaments
I did the same oxidization process with four wooden finial ornaments and two wooden stars. Wiring the finials onto the greeting card holder beneath.Painted Copper Sleigh Bells
I painted seven inexpensive brass colored sleigh bells with Metal Effects Copper Primer only and wired three onto the cardholder beneath.Using jute twine, I strung two oxidized star ornaments and four copper bells at varying lengths to the bottom of the wreath.
This wreath was finished, including painting the ornaments, in an afternoon. I love the non-traditional look of this wreath using oxidized copper elements.
Materials List
Metal Greeting Card HolderWide Burlap Ribbon
Wooden Ornaments
Sleigh Bells
Jute Twine
Modern Masters Metal Effects Copper Kit
Instead of oxidized copper elements, you could use rustic woodland ornaments like wooden stars or birdhouses with the burlap ribbon. The possibilities for making holiday wreaths using a metal greeting card holder are endless.
Bright and colorful mesh ribbon with candy ornaments is one idea. Or pretty holiday ribbon with mercury glass or shiny ornaments to embellish. You don't have to spend a ton of money making them either.
If you'd like to see some other projects where I used the Modern Masters Metal Effects Kit you can find them here in my 5-Panel Door Repurposed Into Flower Planter or Faux Oxidized Copper Topped Table or Tin Pumpkin Art for Fall.
Here is another non-traditional wreath idea for the holidays using small inexpensive picture frames and old brooches. You can find that tutorial here in my DIY Christmas Door Hanger post.
If you like my tip for repurposing a metal greeting cardholder or like the idea of a non-traditional oxidized copper burlap wreath, please save it on Pinterest and/or share this post with a friend.
You'll find this project shared with these fabulous Link Parties.

By: Marie | Interior Frugalista
Tag:
Christmas
Wreaths


.jpg)


Comments
Post a Comment
Don't be shy, I love reading your comments and reply to every single one! If you want to be notified when I reply back to you, click the "Notify Me" button below the comment box.