Vintage Waterfall Vanity Hollywood Glam Makeover
Last October I found this beat-up vintage art deco vanity at a local thrift store. They had just put it on the floor and three of us were hovering over it hoping to take it home. At $50, it was a steal, and because I had a vehicle that could take it home that day, I won the bidding war.
The funny thing is that we had just come from the dealership and our spanking new Mazda 5 was on its maiden voyage when we decided to stop. Finally, a vehicle that can haul furniture!
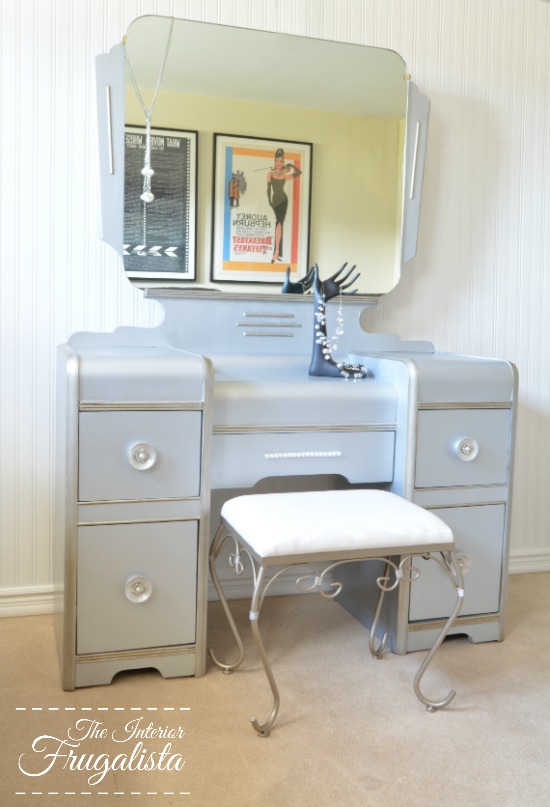
After getting it home this 1940s vintage waterfall vanity got a Hollywood glam makeover inspired by a Breakfast At Tiffany's poster.
Vintage Waterfall Vanity Hollywood Glam Makeover
This is what the 1940s vanity with mirror looked like before the makeover. I apologize for the poor quality photo taken with a cell phone.
Other than a couple of wonky drawers, a well-used top, and missing the original bench, the vanity was in fairly good condition. It does have the original mirror which we set aside.
Are you ready to see the drab to fab Hollywood glam transformation?
I happened to have a metal vanity bench in my stash. It isn't vintage but painted to match the vanity, it pairs nicely. Pictured above, you can see the poster this furniture makeover was inspired by reflected in the vanity mirror.
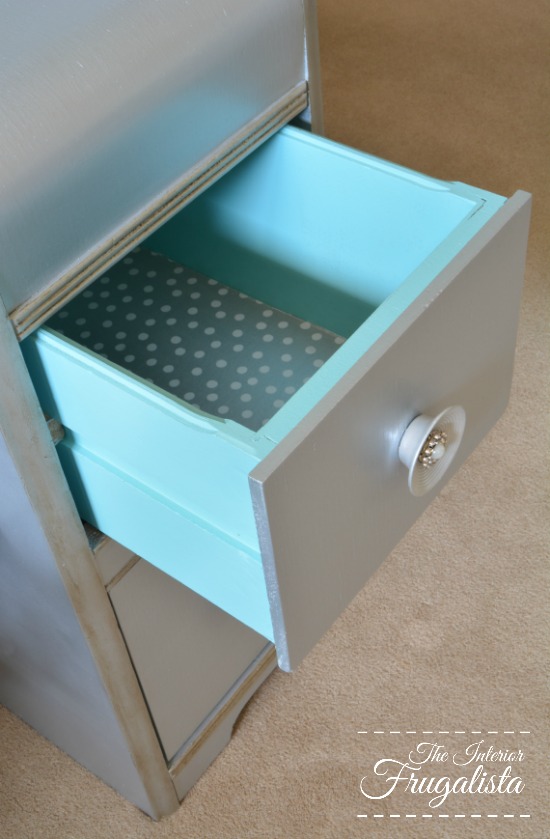
Painted metallic with elegant pearl knob detail adds the glam but wait until you see the surprise inside!
Similar to Tiffany blue, the painted drawers with metallic polka dot liners add more feminine touches to the art deco vanity.
Before we get into the nitty-gritty of the Hollywood glam makeover, almost all of the DIY projects shared here at Interior Frugalista have step-by-step tutorials so why not get your budget DIY on and subscribe. You can also follow us on Pinterest, Facebook, Instagram, and YouTube.
This post contains affiliate links so you can see what products I used or recommend for this project. As an Amazon Associate, I earn a small commission from qualifying purchases at no extra cost to you.
Painting The Vintage Vanity
Because the metallic silver paint is semi-opaque, the vanity required a base coat of paint first. The entire vanity was painted with two coats of light gray chalky paint in the color Pebble Beach.
After the last coat of paint was dry I sanded it with 220-grit sandpaper for a smooth finish before applying the first coat of matte metallic platinum silver paint. You can apply it with either a brush, paint sprayer, or roller.
I chose to roll the metallic paint on with a 4-inch foam roller. The paint went on like butter and I was surprised at how much coverage I got on the first coat, especially considering it is a semi-opaque paint.
Rolled with light pressure to avoid any roller lap marks with long even strokes while keeping a wet edge. A wet edge means overlapping the previous row of wet paint. I was surprised by how quickly the metallic paint dried.
I applied three coats for a high metallic finish, sanding lightly between each coat. After letting the last coat dry overnight, the paint was protected with two coats of satin polyacrylic. Unfortunately, it dulled the metallic sheen a little. In hindsight, I should have used the recommended master protective clear coat formulated for metallic paint.
But none-the-less, look how gorgeous the metallic sheen is on the vanity top.
To add a little vintage contrast, dark wax was applied on all the trim detail, especially the ridges of the trim.
Pro-Tip
The easiest way to apply dark wax in tight spaces (like ridges) is to cut the bristles of an inexpensive chip brush to approximately half an inch long. Make sure to run your fingers through the brush to remove any loose bristles before applying the wax.
Updating The Original Knobs
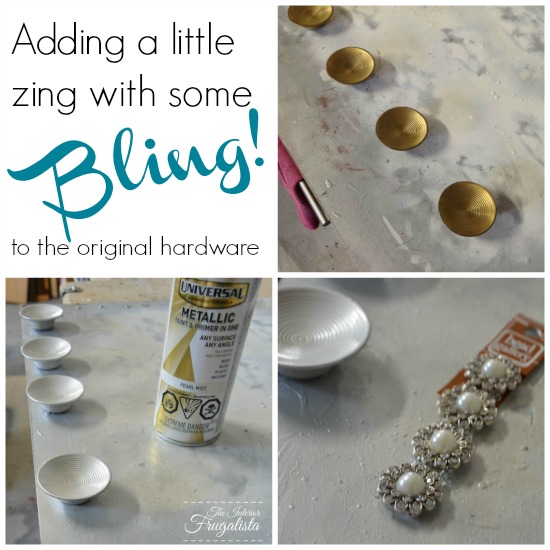
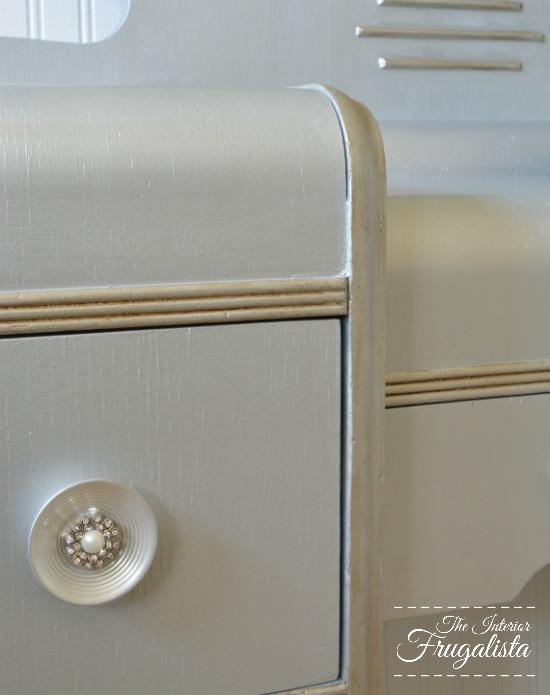
What's a Hollywood Glam makeover without some bling! I cleaned the original brass knobs with a toothbrush and Barkeeper's friend. Once dry I painted them with metallic pearl mist spray paint.
I found a set of four pearl and crystal beaded buttons and with E6000 glue, attached them to the center of each painted knob.
Don't they add an elegant touch to the makeup vanity?
The middle drawer was looking rather plain. It has a curved notch to open the drawer and rather than add another pearl knob, I attached a pearl bead strand to the center instead.
To do this I took the drawer out of the vanity and set it on the floor. I marked the center of the drawer front with a pencil line and ran a bead of E6000 glue on top.
With the pearls still on the strand (making it easier to keep them straight), I set them in place. Once the glue dried, I cut the clear thread from the strand so it wouldn't be visible.
Don't Forget The Vanity Drawers
Like they say, beauty comes from within so I painted the drawers with a pop of Tiffany Blue-ish color both inside and out. I also lined them with pretty metallic polka dot wrapping paper.
Pro-Tip
Here's a tip for lining drawers that eliminates those nasty air bubbles and wrinkles. Decoupage the paper with wallpaper paste. It gives you more playtime for lining the paper straight and there are fewer air bubbles.
A New Vanity Bench
Like I mentioned earlier, the vanity was missing the original bench. After an unsuccessful attempt to find one online, I paired the vanity with a newer metal bench instead.
It's hard to see in the photos but the fabric has a pearlized damask pattern. To unify the stool with the vanity I rubbed the metal straps joining the curly cues (for lack of a better word) with silver gilding wax.
I think the waterfall vanity and new metal stool pair well together plus the stool slides underneath when not in use.
Sometimes inspiration can come from the most unexpected places. When we brought the vanity home and hauled it through our media room to the adjacent bedroom to store, inspiration struck. A quick glance at the Breakfast At Tiffany's movie poster on the wall immediately inspired the direction for the makeover.
More Waterfall Furniture Makeover Inspirations
Black Painted Waterfall HutchRepurposed Waterfall Headboard Bench
Pink Ombre Waterfall Dresser
Decoupage Burlap Waterfall Dresser
Thanks for stopping by the Interior Frugalista today! I hope you were inspired by this vintage vanity makeover.
If you have any questions, please leave them in the comment section below or the Contact Me tab at the top to drop me an email. I love hearing from you!
If you enjoyed this Hollywood glam makeover, I'd be so thankful if you shared it with a friend and pinned it to your Makeup Vanity Ideas or Furniture Makeover Ideas board on Pinterest.

I share my projects at these inspiring link parties.


Your dresser is really beautiful Marie, you did a fabulous job.
ReplyDeleteThank you Anita! If only I could find another vintage vanity at that price because they are such fun to give pretty feminine makeovers.
DeleteAbsolutely spot on . Ever detail is perfect. I'm sending this on to my sister who has our childhood vanity that is very similar
ReplyDeleteThank you Sandy, I'm glad you like the makeover! I'd love to hear what your sister thinks of the makeover too. How lucky to have one of these vanities!
DeleteI love, love the make over. Gorgeous.
ReplyDeleteThank you very much, Rebecca! It is one of my favorites out of all the furniture makeovers I've done over the years. I'm glad you like it and thanks for popping by for a visit. 😀
DeleteHey Marie - I have that exact same poster from Breakfast at Tiffany's. I once used it as the inspiration for a trendy loft design while in interior design school so my sisters bought it for me for my birthday that same year. Too funny. I still have it and love it. And I absolutely love what you did with this makeover. Gorgeous! I would love for you to share it over at Home Matters Linky Party this week at www.modernonmonticello. com. You need to share this one!
ReplyDeleteThat is too funny! We have had the poster hanging in our media room for several years and I never grow tired of it. I'm glad you like the vanity makeover and thanks for the invite to your party!
DeleteWhat an outstanding makeover! Much much improved! So glam! Thank you for sharing with us at EH&F!
ReplyDeleteThank you Jenn, I'm glad you feel this way about the results!
DeleteMarie, I love this makeover! It's gorgeous. I'm not usually an art deco fan, but this project is so pretty and you did such a great job explaining the process. The knobs are amazing. Thank you for sharing at Tuesday Turn About Link Party.
ReplyDeleteThank you very much, Carol, I'm glad you like the makeover! I'm keeping my eyes open for another vintage vanity to makeover because it was so much fun.
DeleteThank you for the pin and share, Marilyn, it's much appreciated! xo
ReplyDeleteMarie,
ReplyDeleteI love this makeover. You did a fantastic job. Love all of the bling. Congratulations, you are being featured on Over The Moon Party. See you there. https://www.eclecticredbarn.com/2021/02/over-moon-linky-party.html
Hugs,
Bev
I'm glad you like the makeover, Bev, and I'm thrilled to have it featured. Thank you so much! xo
DeleteI still love this furniture makeover. It is beautiful. I am so glad you decided to come over to our party and share it with us. #HomeMattersParty I will be featuring your post this week on the new party.
ReplyDeleteThrilled to be featured this week, Donna, thank you!
Delete