Upcycled Mail Sorter Family Command Center
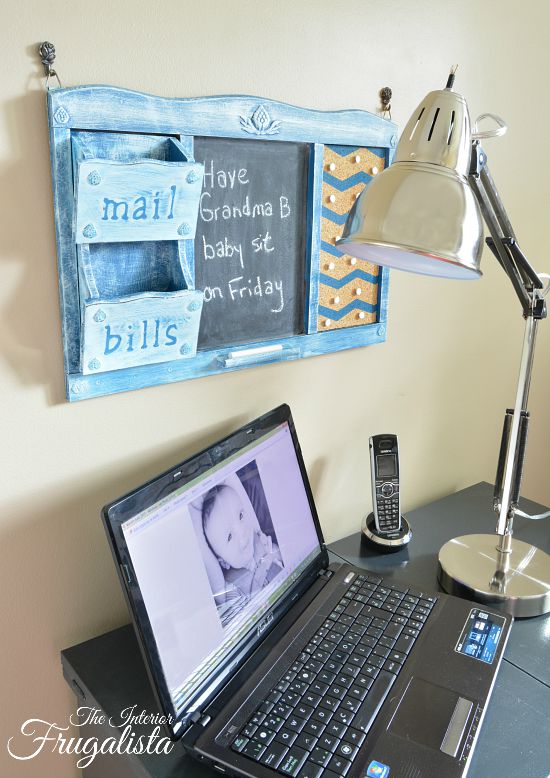
In need of a way to keep the family organized? You may find the perfect budget-friendly option at your local thrift store. With just a little paint, this upcycled mail sorter is perfect for a family command center, kitchen command center, or home office organization. The mail slots, chalkboard, and corkboard give it a multi-function for wall organization in a small space. This one is going in my daughter's apartment kitchen. No more mail accumulating on her kitchen counter or worse, getting lost.
It is rewarding to rescue a thrift store find and give it a new life as a DIY kitchen command center for less than $10. It's solid wood and you'd pay a lot more money for wall organization with a chalkboard and bulletin board of lesser quality. Plus instead of a cookie-cutter box store command center, you have a one-of-a-kind that is customized to suit your decor.
This is what the thrift store wall organizer looked like before except I forgot to take a photo before taping the chalkboard and corkboard in prep for paint.
There were also gold hooks along the bottom that I assume were for hanging keys that I removed. In hindsight, I wish I had removed the dated pineapple tacks too but they do look better painted.
Blue and White Chalk Style Paint
Chevron Shape Tape
Self-Adhesive Letters
Black Chalkboard Paint (Black Chalk Type Paint or Flat Black Latex Paint)
Dip just the tips of your brush into the paint and offload the excess onto a paper towel so very little paint remains on the brush. With light pressure, swipe the brush across the command center with long brush strokes. You still want to see the blue paint underneath.
You want to apply the white paint thicker over the mail slots so when the self-adhesive letters are removed, the blue paint is more pronounced. Before the paint dries, carefully remove the letters with tweezers.
Once the paint is completely dry, it's important that you season the chalkboard before using it for the first time. To do this you simply rub the side of a stick of chalk all over the board and wipe with a clean rag or paper towel.
That's it, what a difference a little paint made to the dated thrift store mail sorter. Such an easy peasy update and what a difference! Here is another I also made a
Some of you asked about the cute baby on my laptop. That's my adorable grandson and that smile melts my heart every time I see it. When I arrived at my daughter's to deliver the family command center he was screaming like a wild man. Grandma B. had him smiling ear-to-ear and blowing mouth bubbles within minutes, cuz that's just what us Grandma's do.
If you have any questions about this thrift store upcycle, please leave them in the comment section below or the Contact Me tab at the top. I love hearing from you!
If you enjoyed this family command center idea, I'd be so thankful if you shared it with a friend and pinned it to your upcycled home decor board or wall organization ideas board on Pinterest.

I share my projects at these inspiring link parties.
Upcycled Mail Sorter Family Command Center
It is rewarding to rescue a thrift store find and give it a new life as a DIY kitchen command center for less than $10. It's solid wood and you'd pay a lot more money for wall organization with a chalkboard and bulletin board of lesser quality. Plus instead of a cookie-cutter box store command center, you have a one-of-a-kind that is customized to suit your decor.
This is what the thrift store wall organizer looked like before except I forgot to take a photo before taping the chalkboard and corkboard in prep for paint.
There were also gold hooks along the bottom that I assume were for hanging keys that I removed. In hindsight, I wish I had removed the dated pineapple tacks too but they do look better painted.
What you'll need to upcycle the command center
This post contains affiliate links so you can see what products I used or recommend for this project. As an Amazon Associate, I earn a small commission from qualifying purchases at no extra cost to you.Supplies
Wooden Mail Sorter (thrift store find)Blue and White Chalk Style Paint
Chevron Shape Tape
Self-Adhesive Letters
Black Chalkboard Paint (Black Chalk Type Paint or Flat Black Latex Paint)
Step 1 - First layer of paint
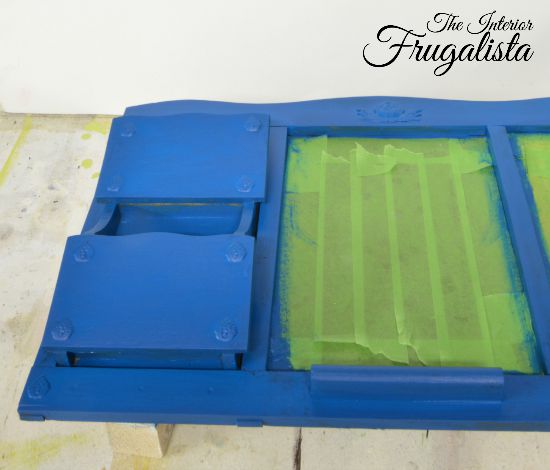
The command center was painted in layers with the first layer being a pretty Moon Dew color from Country Chic Paint.Step 2 - Adding Chevron stripes to the cork bulletin board
I added some fun chevron stripes to the rather plain cork bulletin board with Chevron shape tape. It's easy peasy to do by leaving a small gap in between each row of tape and painting the cork the same color as the command center. Remove the chevron tape before the paint dries.Step 3 - Reverse transfer mail sorter labels
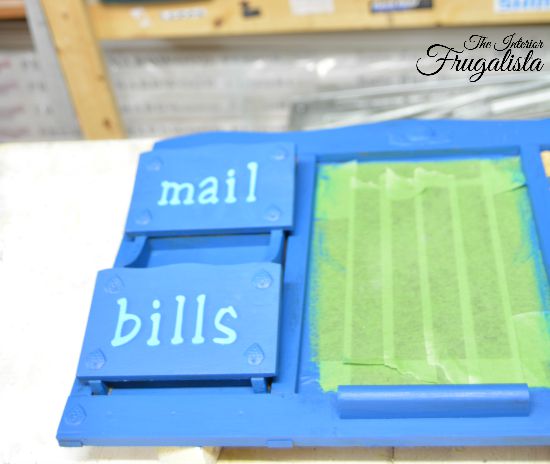
To label the wooden pockets on the mail sorter I used a reverse transfer stencil method. Simply spell out the words Mail and Bills with self-adhesive letters onto each mail slot and we'll be painting over the letters with a layer of white paint in the next step.Step 4 - Dry brushed layer of white paint
Now we're going to dry brush a layer of white paint over the blue paint to soften the blue and give the command center a rustic farmhouse look.Dip just the tips of your brush into the paint and offload the excess onto a paper towel so very little paint remains on the brush. With light pressure, swipe the brush across the command center with long brush strokes. You still want to see the blue paint underneath.
You want to apply the white paint thicker over the mail slots so when the self-adhesive letters are removed, the blue paint is more pronounced. Before the paint dries, carefully remove the letters with tweezers.
Step 5 - Refreshing the chalkboard
The final step was refreshing the black chalkboard with paint. I used black chalkboard paint that I had on hand but you can use black chalk type paint or flat black latex paint for chalkboards.Once the paint is completely dry, it's important that you season the chalkboard before using it for the first time. To do this you simply rub the side of a stick of chalk all over the board and wipe with a clean rag or paper towel.
That's it, what a difference a little paint made to the dated thrift store mail sorter. Such an easy peasy update and what a difference! Here is another I also made a
More DIY Command Center Ideas
Here are a couple more command center ideas that I thought you might like. I made this Chalkboard Command Center with repurposed cabinet doors. I also made Repurposed Vintage Window Wall Organization dry erase boards and calendars as well as a chicken wire message board.Some of you asked about the cute baby on my laptop. That's my adorable grandson and that smile melts my heart every time I see it. When I arrived at my daughter's to deliver the family command center he was screaming like a wild man. Grandma B. had him smiling ear-to-ear and blowing mouth bubbles within minutes, cuz that's just what us Grandma's do.
If you have any questions about this thrift store upcycle, please leave them in the comment section below or the Contact Me tab at the top. I love hearing from you!
If you enjoyed this family command center idea, I'd be so thankful if you shared it with a friend and pinned it to your upcycled home decor board or wall organization ideas board on Pinterest.

I share my projects at these inspiring link parties.


Comments
Post a Comment
Don't be shy, I love reading your comments and reply to every single one! If you want to be notified when I reply back to you, click the "Notify Me" button below the comment box.