Mid-Century Modern Headboard Entry Bench With Shoe Storage
A big thank you to HomeRight for sponsoring this post. All opinions, project choice, and products used are 100% that of my own. Affiliate links are also included in this post so you can source the products I used.
Earlier this summer a client asked me to keep my eyes open for a mid-century modern twin headboard with clean and simple lines to transform into an entry bench with shoe storage. It took a few months before finding the perfect headboard set but we found one and couldn't be more happy with the results.
Today I'm sharing a tutorial on how to DIY a Mid-Century Modern Headboard Entry Bench with shoe storage underneath.
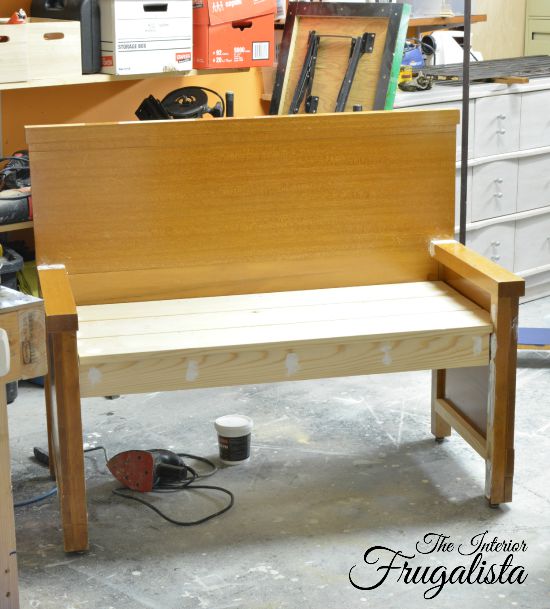
This is what the head and footboard looked like before...
The stamp on the back shows that it was made in 1950 and the finish is called Almond.
You can see how I turn headboards and footboards into benches HERE.
Now for the pretty! Benches, like dining room chairs, are a beast to paint with a brush. The job is so much quicker using a sprayer. My workshop is in the basement of our home and so using spray paint, especially in the winter, is not an option unless I can do it outdoors.
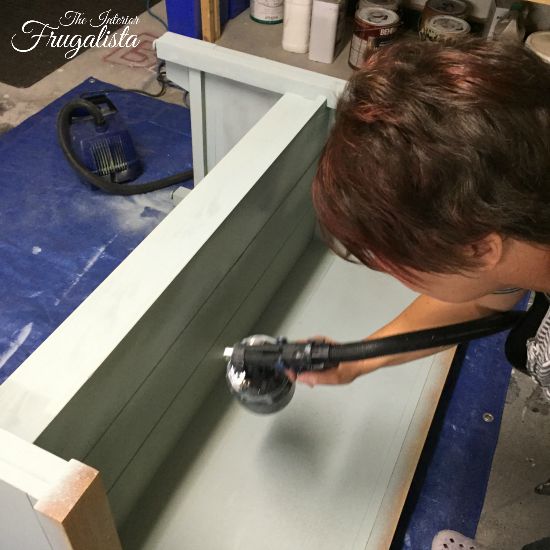
Last year the good folks at HomeRight sent me a Finish Max Pro Fine Finish Sprayer to try out. The first time I used it was on an MCM Dresser Makeover and instantly fell in love. The finish comes out smooth as buttah and cuts the painting time down to mere minutes. Gotta love that!

I filled the canister halfway with Annie Sloan Chalk Paint™ in the color Duck Egg Blue and diluted it a little with water. Next, I ran a flow test using the Viscosity Cup provided with the sprayer to ensure the paint wasn't too thick.

Then I started spraying that pretty color all over that bench. It took three thin coats for full coverage.
To add some contrast I brushed the arms and top of the back with Annie Sloan Chalk Paint™ in French Linen.
My client wanted their surname on the back of the bench and so I incorporated their name into a tree branch with three birds representing each member of their family.
I created the graphic in Microsoft Word and printed it out using the Poster setting on my computer so it would be enlarged. Using graphite paper *(affiliate link) behind the graphic, I traced it onto the bench. Afterward, I painted it using a script liner art brush *(affiliate link) and more of the French Linen chalk paint.
As I mentioned above, my client's wanted shoe storage on the bottom. 1" x 2" lumber was cut to size to create slats that fit on top of wooden brackets on either side (see picture below).
Before installation, I stained them with Minwax Wood Finish Stain in Dark Walnut*(affiliate link).
The plan was to use a brad nailer to attach them, but it decided it needed a day off. How dare it! On to plan B - drilling small pilot holes so the slats wouldn't split and screwing them in place from the bottom.
Here is where the HomeRight Paint Sprayer *(affiliate link) came in handy again. I sprayed two coats of Minwax Polycrylic in a clear satin finish *(affiliate link) to protect the bench. Normally I wax or oil over chalk painted finishes but considering this bench would be a utilitarian piece, I wanted added water-resistant protection.
Whenever I use a poly finish on my furniture pieces, I ALWAYS use my Finish Max Pro Fine Finish Sprayer to apply it. Goes on like glass with no brush strokes!
Patience is a virtue that went missing in my DNA and so when I choose products for my shop they better be easy to use and operate. I can honestly say that this paint sprayer is a breeze to operate and easy peasy to clean. I cannot say enough about this little powerhouse machine in my workshop.
I'm quite pleased with how the entry bench turned out. Thankfully, so were my clients and that makes me VERY happy.
If you found this tutorial on how to build a Mid-Century Modern Headboard Entry Bench with shoe storage helpful, please share it with a friend and/or save it on Pinterest.
I share my projects at these inspiring LINK PARTIES.
Earlier this summer a client asked me to keep my eyes open for a mid-century modern twin headboard with clean and simple lines to transform into an entry bench with shoe storage. It took a few months before finding the perfect headboard set but we found one and couldn't be more happy with the results.
Today I'm sharing a tutorial on how to DIY a Mid-Century Modern Headboard Entry Bench with shoe storage underneath.
Mid-Century Modern Headboard Entry Bench With Shoe Storage
This is what the head and footboard looked like before...
The stamp on the back shows that it was made in 1950 and the finish is called Almond.
You can see how I turn headboards and footboards into benches HERE.
Now for the pretty! Benches, like dining room chairs, are a beast to paint with a brush. The job is so much quicker using a sprayer. My workshop is in the basement of our home and so using spray paint, especially in the winter, is not an option unless I can do it outdoors.
Last year the good folks at HomeRight sent me a Finish Max Pro Fine Finish Sprayer to try out. The first time I used it was on an MCM Dresser Makeover and instantly fell in love. The finish comes out smooth as buttah and cuts the painting time down to mere minutes. Gotta love that!

I filled the canister halfway with Annie Sloan Chalk Paint™ in the color Duck Egg Blue and diluted it a little with water. Next, I ran a flow test using the Viscosity Cup provided with the sprayer to ensure the paint wasn't too thick.

Then I started spraying that pretty color all over that bench. It took three thin coats for full coverage.
To add some contrast I brushed the arms and top of the back with Annie Sloan Chalk Paint™ in French Linen.
My client wanted their surname on the back of the bench and so I incorporated their name into a tree branch with three birds representing each member of their family.
I created the graphic in Microsoft Word and printed it out using the Poster setting on my computer so it would be enlarged. Using graphite paper *(affiliate link) behind the graphic, I traced it onto the bench. Afterward, I painted it using a script liner art brush *(affiliate link) and more of the French Linen chalk paint.
As I mentioned above, my client's wanted shoe storage on the bottom. 1" x 2" lumber was cut to size to create slats that fit on top of wooden brackets on either side (see picture below).
Before installation, I stained them with Minwax Wood Finish Stain in Dark Walnut*(affiliate link).
The plan was to use a brad nailer to attach them, but it decided it needed a day off. How dare it! On to plan B - drilling small pilot holes so the slats wouldn't split and screwing them in place from the bottom.
Here is where the HomeRight Paint Sprayer *(affiliate link) came in handy again. I sprayed two coats of Minwax Polycrylic in a clear satin finish *(affiliate link) to protect the bench. Normally I wax or oil over chalk painted finishes but considering this bench would be a utilitarian piece, I wanted added water-resistant protection.
Whenever I use a poly finish on my furniture pieces, I ALWAYS use my Finish Max Pro Fine Finish Sprayer to apply it. Goes on like glass with no brush strokes!
Patience is a virtue that went missing in my DNA and so when I choose products for my shop they better be easy to use and operate. I can honestly say that this paint sprayer is a breeze to operate and easy peasy to clean. I cannot say enough about this little powerhouse machine in my workshop.
I'm quite pleased with how the entry bench turned out. Thankfully, so were my clients and that makes me VERY happy.
If you found this tutorial on how to build a Mid-Century Modern Headboard Entry Bench with shoe storage helpful, please share it with a friend and/or save it on Pinterest.
I share my projects at these inspiring LINK PARTIES.


This is beautiful Marie! I love the color :-) My plan is to take some time to work on my blog as well, so I know the feeling. Everything looks great!
ReplyDeleteHi Christina, I'm glad you like the headboard bench! Wishing you the best with your blog updates. Sometimes it was like going down the rabbit hole and overwhelming but feels so good to come up on the otherside.
Delete