Milk And Cookies Tray For Santa - Repurposed Folding Bed Table
Have you ever seen something at the thrift store and thought, "that could be turned into (fill in the blank)? That's exactly what happened when I saw this wooden folding breakfast table in the Spring. The trim detail reminded me of holly and the gold scalloped edges, Santa's sleigh. I've been itching to repurpose the folding bed table into an adorable Milk and Cookies Tray For Santa for months now to delight the little ones on December 24th.
DIY Christmas Countdown - Christmas Countdown Santa Cottage
DIY Kid's Crafts - Easy Snowflake Craft To Make With Your Grandkids
Holiday Party Food - Spicy Cheese Ball For The Holidays
DIY Ornament Ideas - Three Unique Recycled Sweater Ornaments
Holiday Decor Ideas - Milk and Cookies Tray For Santa (You Are Here)
Christmas In A Jar - Retro North Pole Christmas Diorama
Pretty Gift Wrapping Ideas - Eco-Friendly Holiday Gift Wrap and DIY Gift Tags
Christmas Trees - Sparkly Red Burlap Tabletop Christmas Trees
Something Sweet - Family Holiday Favorite Walnut Strudel Cookies
Stockings - Unique High Heel Christmas Stocking For A Fashionista
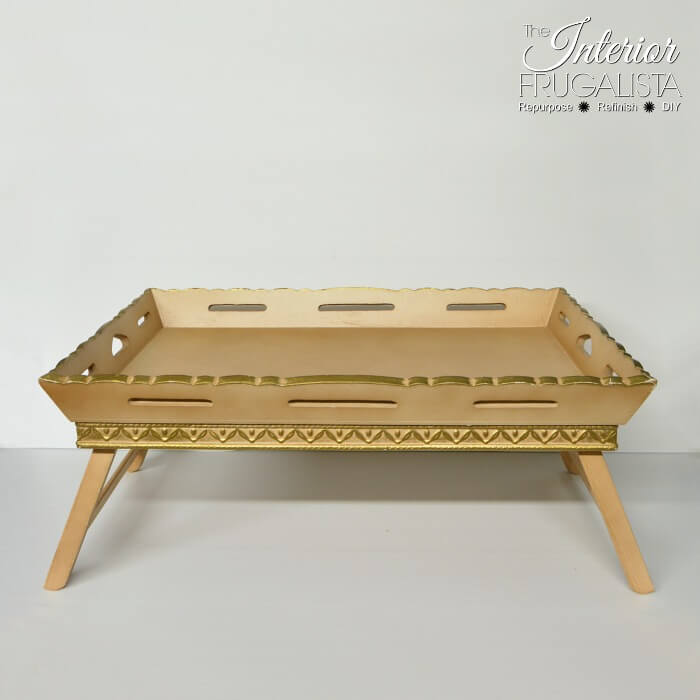
This is what the tray used to look like. See what I mean about the trim looking like holly?
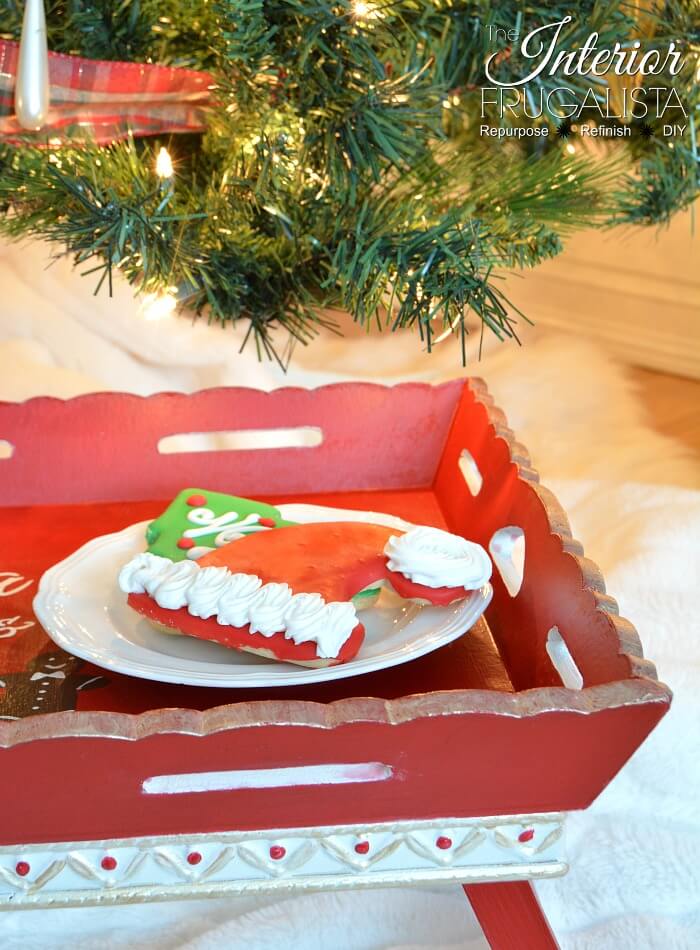
This is the breakfast tray now after a little holiday magic. So easy to do with a little paint and fun DIY graphic and I'm going to show you how.
That trim was just begging for some holly berries, don't you think? My grandson and I debated over white or chocolate milk. Personally, if I were Santa I'd go for coffee and baileys.
But I'd never resist the cookies...to dunk in the coffee and baileys.
The first thing I did was dismantle the folding feet and give the tray a good scrub with vinegar & water.
Next, I painted the trim white with Fusion Mineral Paint Raw Silk.
With a small art brush, I painted the top of the scalloped edge and the raised parts of the now white painted trim with DecoArt Bright Gold Metallic Paint.
And I went back and dabbed a little red paint onto the berries.
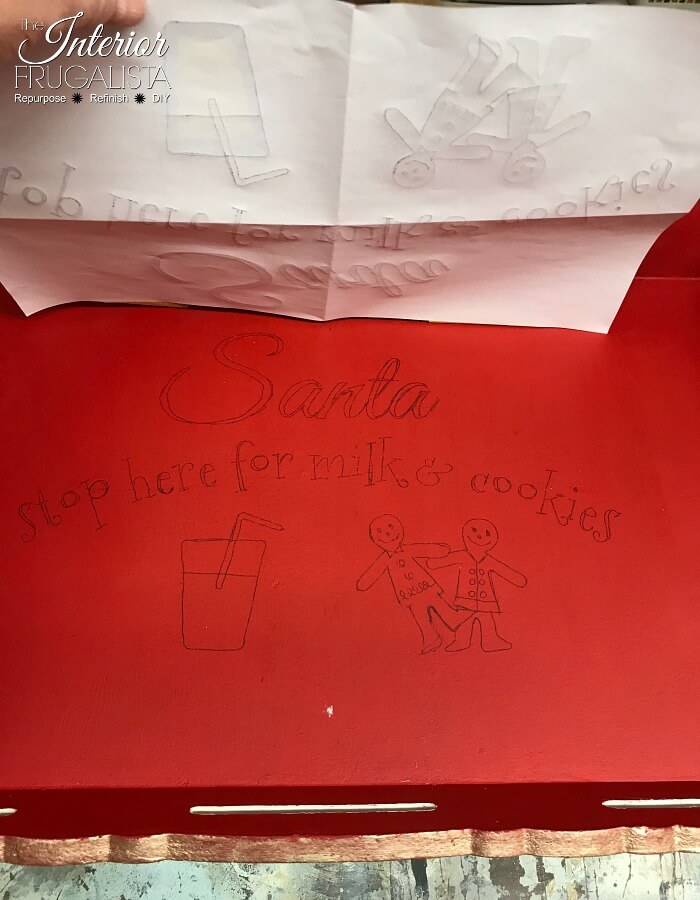
I've included a visual pictorial below on how to transfer the graphic onto the tray BUT I share a detailed tutorial in this image transfer method post.
Here is the graphic after being transferred onto the painted tray with graphite paper.
I painted over the graphic with a script liner art brush and white & brown acrylic craft paint.
You'll notice the gingerbread men in the photo above are different than the ones from the graphic that I transferred onto the tray. That's because I decided I prefer a more traditional gingerbread man shape and modified the design with a pencil before painting.
I've included affiliate links for your convenience so you can see what products I used or recommend to make this Santa tray. See my full disclosure policy.
The Santa Cookie Tray doesn't have to be used only on Christmas Eve, it looks adorable sitting under the tree after the presents have been unwrapped.

Scroll down for many more Holiday Decor Ideas to create a festive atmosphere in your home!
I share my projects at these inspiring link parties.
Upcycled Milk And Cookies Tray For Santa
Welcome to Day 7 of the Fourth Annual 12 Days of Christmas Series!

We have teamed up with 50 plus bloggers to bring you oodles of DIY Ideas and Recipes to make your holiday season merrier. There are 12 different posts in the series and we have spread them out over a four week period with three posts per week. Now is the time to subscribe!
GO HERE for the complete list of Dates and Topics plus a collection of most popular holiday ideas including ornaments, games, recipes, and more from all 50 plus talented bloggers!
It's Day 7 and we are sharing Holiday Decor Ideas!
12 Days of Christmas recap
DIY Gift Ideas - Upcycled Basket Holiday Hostess GiftDIY Christmas Countdown - Christmas Countdown Santa Cottage
DIY Kid's Crafts - Easy Snowflake Craft To Make With Your Grandkids
Holiday Party Food - Spicy Cheese Ball For The Holidays
DIY Ornament Ideas - Three Unique Recycled Sweater Ornaments
Holiday Decor Ideas - Milk and Cookies Tray For Santa (You Are Here)
Christmas In A Jar - Retro North Pole Christmas Diorama
Pretty Gift Wrapping Ideas - Eco-Friendly Holiday Gift Wrap and DIY Gift Tags
Christmas Trees - Sparkly Red Burlap Tabletop Christmas Trees
Something Sweet - Family Holiday Favorite Walnut Strudel Cookies
Stockings - Unique High Heel Christmas Stocking For A Fashionista
This is what the tray used to look like. See what I mean about the trim looking like holly?
This is the breakfast tray now after a little holiday magic. So easy to do with a little paint and fun DIY graphic and I'm going to show you how.
That trim was just begging for some holly berries, don't you think? My grandson and I debated over white or chocolate milk. Personally, if I were Santa I'd go for coffee and baileys.
But I'd never resist the cookies...to dunk in the coffee and baileys.
Here's how I did it...
The first thing I did was dismantle the folding feet and give the tray a good scrub with vinegar & water.
Painting the Santa tray
I gave the tray three coats of festive Red Barchetta FAT chalk paint.Next, I painted the trim white with Fusion Mineral Paint Raw Silk.
With a small art brush, I painted the top of the scalloped edge and the raised parts of the now white painted trim with DecoArt Bright Gold Metallic Paint.
And I went back and dabbed a little red paint onto the berries.
Typography for Santa tray
First I went to PicMonkey and created the graphic. Press HERE or on the image below for a printable unwatermarked copy of the graphic.I've included a visual pictorial below on how to transfer the graphic onto the tray BUT I share a detailed tutorial in this image transfer method post.
Here is the graphic after being transferred onto the painted tray with graphite paper.
I painted over the graphic with a script liner art brush and white & brown acrylic craft paint.
You'll notice the gingerbread men in the photo above are different than the ones from the graphic that I transferred onto the tray. That's because I decided I prefer a more traditional gingerbread man shape and modified the design with a pencil before painting.
Protecting the Santa Tray
Once the paint was completely dry overnight, I protected the entire tray with two coats of Dixie Belle Gator Hide, a water-repellent clear coat finish.I've included affiliate links for your convenience so you can see what products I used or recommend to make this Santa tray. See my full disclosure policy.
To make the Santa cookie tray you will need:
- Wood Folding Breakfast Bed Tray
- Festive Red Chalk Paint
- Winter White Chalk Paint
- Bright Gold Metallic Paint
- Brown & White Acrylic Craft Paint
- Script Liner Art Brush
- Graphite Paper
- Water-Repellent Clear Coat
The Santa Cookie Tray doesn't have to be used only on Christmas Eve, it looks adorable sitting under the tree after the presents have been unwrapped.

Scroll down for many more Holiday Decor Ideas to create a festive atmosphere in your home!
I share my projects at these inspiring link parties.


Coffee and Baileys is a yes! Santa needs something to keep the chill off. ;) This scalloped edge tray is perfect for the Christmas red.
ReplyDeleteGlad you agree on the coffee and baileys for Santa, Audra! LOL Thanks for your sweet comments and the visit. 😊
DeleteWhat bed tray? My gosh... this is completely adorable Marie! I can't believe that design is hand done!
ReplyDeleteI'm featuring this beauty this weekend on DIY Salvaged Junk 502. Thanks for bringing it over!
Hi Donna! So glad you like my Santa tray! My grandkids are taking it home with them tomorrow to put under their tree. Thank you so much for featuring it this weekend, I'm thrilled. xo
Delete