No Measure Tip For Hanging Art With Double Hooks
Do you cringe when you have to hang wall art that has two picture hooks? All that measuring to get both nails lined up perfectly on the wall, much less getting it level. In my former life as a home stager, I learned a way to get the job done faster and hung perfectly level EVERY.SINGLE.TIME. If you've never heard of this No measure tip for hanging art with double hooks be prepared to have your mind blown!
You're welcome 😉
When I learned these three simple steps it rocked my home staging world. It cut the time to hang dozens of wall art every day in half!
But first, before we get into how to hang the art, here's a helpful bonus tip for how to mount D-hooks so they don't move.
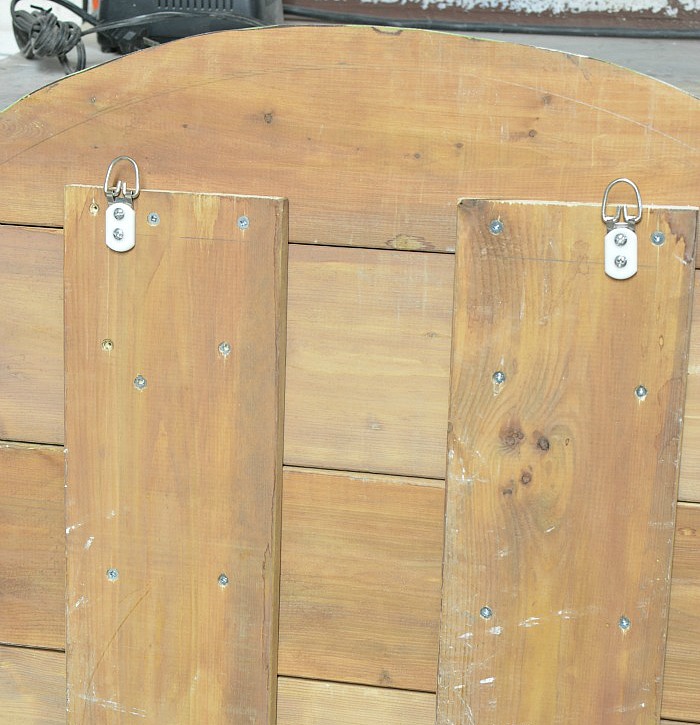
Using the example in the picture above, position the D-hook so the bottom of the loop rests against the upright on the back of the art.
Alternatively, if the art is flat on the back, then put a piece of masking tape over the bottom of the loop and pull the loop towards you slightly to hold in position while you hang the art.
Run a piece of painter's tape (for fresh painted walls) or masking tape across the back of the art and over the loops of the D-hooks. Make sure it's nice and straight. Mark the top center of both D-rings - where the nail will rest on the hook when hanging on the wall (as pictured above).
Remove the tape from the back of the art and place it on the wall. Use a level to make sure the tape is straight (as pictured above).
With an Awl, punch holes into the wall where you've marked the dots on the tape. Now remove the tape.
If you're lucky enough to hit a stud, then hammer picture hanging nails into the punched holes. More likely than not you didn't hit a stud and will need to mount drywall anchors, especially if your art is heavy (as pictured above).
Voila, perfectly straight wall art hung without that pesky time-consuming measuring!
I've included a supply list for hanging wall art below. It contains affiliate links for products I used or recommend for this project. As an Amazon Associate, I earn a small commission from qualifying purchases at no extra cost to you.
Painters Tape
Pen or Pencil
Awl
48-inch Level
Drywall Anchors
Power Drill or Screwdriver (for anchors)
Hammer and Picture Hanging Nails
I hope you found these tips helpful and that next time you have to hang art with two picture hooks that you walk away doing the happy dance at how easy it was using these simple tricks.
I'd be so thankful if you pinned this idea or shared it with a friend. With gratitude! -Marie
If you have any questions about this tutorial, please leave them in the comment section below or press the Contact Me button at the top of the blog to drop me an email. I love hearing from you!
I share my projects at these inspiring link parties.
NO MEASURE TIP FOR HANGING ART WITH DOUBLE HOOKS
Your picture hanging headaches are over with these 3 simple no-measure steps!
You're welcome 😉
When I learned these three simple steps it rocked my home staging world. It cut the time to hang dozens of wall art every day in half!
But first, before we get into how to hang the art, here's a helpful bonus tip for how to mount D-hooks so they don't move.
Bonus Tip - How to mount D-hook picture hangers so they don't flop up and down
If you want those D-hooks to stay in position as you're hanging vicariously on a ladder trying to catch the nails on the wall, then remember this simple tip.Using the example in the picture above, position the D-hook so the bottom of the loop rests against the upright on the back of the art.
Alternatively, if the art is flat on the back, then put a piece of masking tape over the bottom of the loop and pull the loop towards you slightly to hold in position while you hang the art.
Tip 1 - Tape is your new best friend when hanging art
Run a piece of painter's tape (for fresh painted walls) or masking tape across the back of the art and over the loops of the D-hooks. Make sure it's nice and straight. Mark the top center of both D-rings - where the nail will rest on the hook when hanging on the wall (as pictured above).
Tip 2 - Move the tape to the wall
Remove the tape from the back of the art and place it on the wall. Use a level to make sure the tape is straight (as pictured above).
Tip 3 - Mark the holes on the wall
With an Awl, punch holes into the wall where you've marked the dots on the tape. Now remove the tape.
If you're lucky enough to hit a stud, then hammer picture hanging nails into the punched holes. More likely than not you didn't hit a stud and will need to mount drywall anchors, especially if your art is heavy (as pictured above).
Voila, perfectly straight wall art hung without that pesky time-consuming measuring!
Bonus Tip 2 - Scratch Resistant Ladder
I've had a few of you mention how you think our idea of wrapping the top of the ladder with foam so the walls don't get scratched is brilliant. If you plan on using this idea, it is very important that you use something that provides friction so the ladder isn't slippery against the wall.I've included a supply list for hanging wall art below. It contains affiliate links for products I used or recommend for this project. As an Amazon Associate, I earn a small commission from qualifying purchases at no extra cost to you.
Supply List
D-hook picture hangersPainters Tape
Pen or Pencil
Awl
48-inch Level
Drywall Anchors
Power Drill or Screwdriver (for anchors)
Hammer and Picture Hanging Nails
I hope you found these tips helpful and that next time you have to hang art with two picture hooks that you walk away doing the happy dance at how easy it was using these simple tricks.
I'd be so thankful if you pinned this idea or shared it with a friend. With gratitude! -Marie
If you have any questions about this tutorial, please leave them in the comment section below or press the Contact Me button at the top of the blog to drop me an email. I love hearing from you!
I share my projects at these inspiring link parties.

By: Marie | Interior Frugalista
Tag:
Helpful Tips


Tips for hanging wall art are ALWAYS so useful, Marie! I feel like I've tried so many methods, and this one is very helpful. Thanks for sharing!
ReplyDeleteYou're welcome, Crissy, glad you found this one helpful!
DeleteOMG! You're a genius!!
ReplyDeleteTania
LOL, that's exactly what I said when I learned this trick! Happy picture hanging, Tania 😉
DeleteGreat tip! My frustrations are over. XOXO
ReplyDeleteGlad to hear you found this tip helpful, Susie! I've been meaning to write this tutorial for months.
DeleteOh my goodness Marie these are awesome tips! Thank you! We had a great Halloween. Glad to hear yours was awesome as well.
ReplyDeleteYou're welcome, Christina, glad you liked the picture hanging tips!
DeleteI am pinning this for sure. I always have trouble getting the pictures to line up. This will help.
ReplyDeleteSo glad you found these tips helpful, Debra. You will be amazed how quick and easy it is next time you hang wall art. Thanks for the pin 😄
DeleteWHAT!!!!!! I hate those darn hooks and here's the thing, most of the portraits I paint for exhibitions, they specify that you need to add those bloody D-Hooks. Whyyyyyyyyyyy, but these tips will make it so much easier. I may just slip a note on the back of the portraits for when someone buys one, so they don't have to struggle.
ReplyDeleteGood idea Michelle, I'm sure they'd appreciate the helpful tip! I knew you were an artist but had no idea you painted portraits and sold at art exhibits. You're amazing!!!
DeleteThank you, Thank you, Thank YOU!!! I am sooo happy I saw this because I hate, hate, hate these wretched hooks and now....NOT anymore!!! Genius, just genius!
ReplyDeleteLOL, you sound as excited as I was when I learned this trick! So glad I've made your picture hanging days easier, Karolyn. 😄
DeleteEasy Peasy. Same way I hang my item on the wall that have double hangers.
ReplyDeleteI did pick up a tip in the photo with your ladder; taping on foam to keep from making marks on the wall. I do think I have some pool noodles around here somewhere that I can use. Pool noodles are great for having around for projects just like this. I have used the pool noodles to wrap around the legs of our bed cause it seemed like I was always stubbing my toe on the corner leg of the bed. Works like a charm.
Hi Colleen, glad to hear you already knew about this handy picture hanging tip, and happy to hear you took away another handy tip instead! Pool noodles should work great too. As long as there is some friction in whatever you use so the ladder doesn't slide easily against the wall. Gotta love the pool noodles for so many purposes.
DeletePerfect! Love this hack to make those kinds of life struggles avoidable. Pinning!
ReplyDeleteGlad you like this trick and thank you for the pin! 😊
DeleteThanks a bunch, Marilyn! xo
ReplyDeleteGreat tip and great pictures!
ReplyDeleteThanks Kathy, I hope the tips were helpful!
Delete