Upcycled Flannel Shirt Lined Santa Christmas Box
When I saw the challenge for our Int'l Bloggers Club this month is flannel, it was just the motivation I needed to put some of my thrift store stash to good use. With the holidays in mind, I was inspired to make a festive upcycled flannel shirt-lined Christmas box.
But it's not just any ordinary wooden vintage-style Christmas box to have on display during the holidays. It can also be used as a special Christmas Eve Box for Santa filled with post-delivery essentials that Dad...ahem...Santa will surely enjoy before settling for his long winter's nap.
Flannel Shirt Lined Christmas Eve Box For Santa
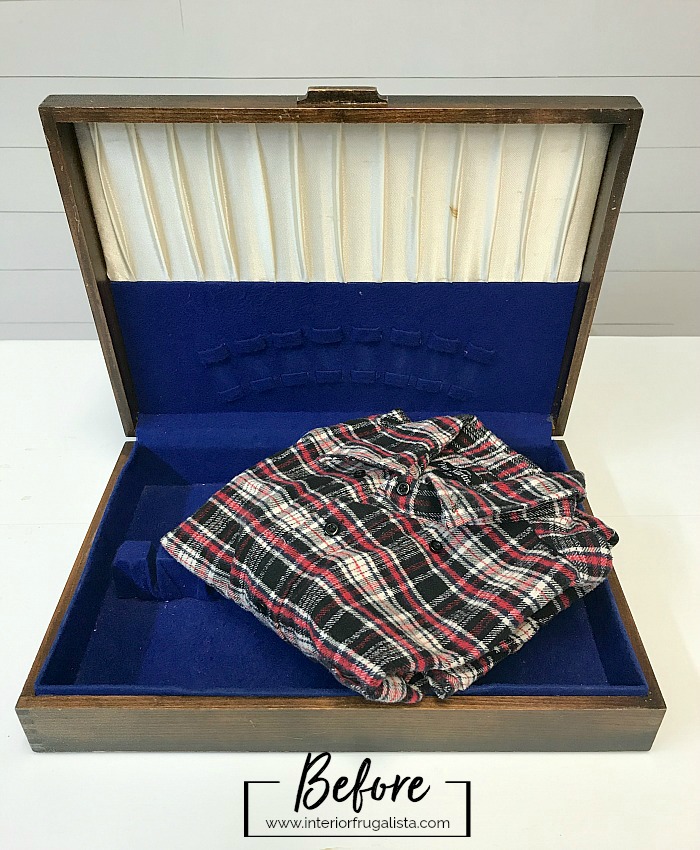
If you're a regular here you know how much I love breathing new life into second-hand finds. So here is where we started with this flatware box and men's flannel shirt that I found at Goodwill last year.
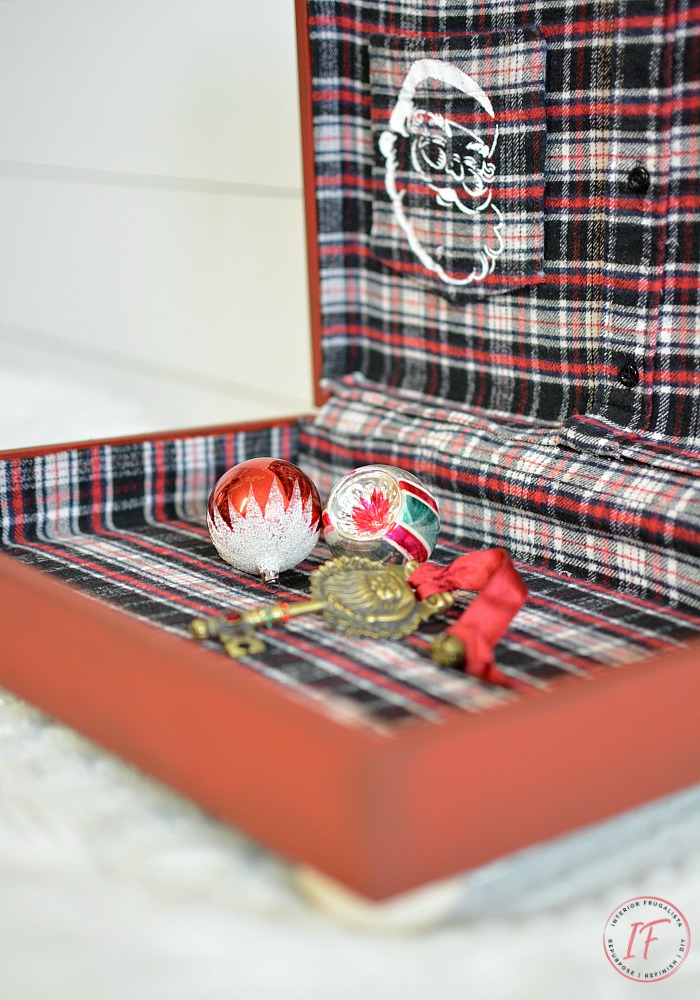
Doesn't it look like Mrs. Claus lined Santa's "special" Christmas Eve box with one of his old flannel shirts?
One would never know it used to be a tattered old flatware box now that it's been upcycled in a pretty festive red.
I love it when I already have just what I need on hand for our Int'l Bloggers Club challenges. We are a group of blogging friends from South Africa, Australia, Spain, the USA, and Canada who come together on the third Monday of every month to share a themed DIY project.
Last month for our Halloween challenge I recycled an old garden light into a Wicked Halloween Lantern. I've included links to our talented member's flannel ideas further down in the post.
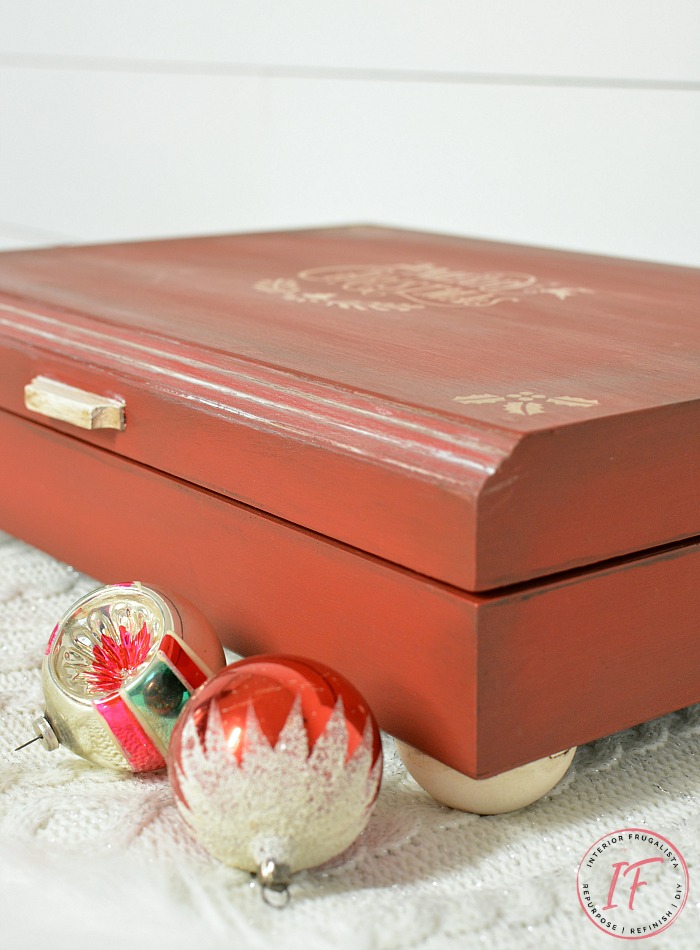
I gave the exterior of the wooden Christmas box a distressed timeworn patina so it looks like it's been used for many years.
But I honestly had more fun finding items to place inside. What would "Santa" 😏 want after a long night delivering presents around the world after the kids are asleep, the milk and cookies devoured, and he (or she) finally has some chill time in front of the fire?
Finding things to place inside was far more challenging given that most stores don't have all their Christmas stuff out yet. I searched all over for peppermint foot soak, candy cane lip balm...you get the picture.
Santa Christmas Eve Box Essentials
Santa's Christmas Eve box is filled with these post-delivery essentials to help Santa unwind.
- Old Spice Body Wash to remove all the soot and smell nice for Mrs. Claus.
- Back and muscle pain ointment because climbing up and down chimney's all night ain't easy.
- Antacid tablets from eating all those darn cookies.
- Sleep mask to help the old fella with his long winter nap.
- An Apple gift card to upload a book or two for unwinding by the fire.
- The adult drink essentials are self-explanatory. I mean who wouldn't want a drink or two after one crazy busy night!
- And of course, his magic golden key is safely tucked away for another year.
But the upcycled flatware box doesn't have to be used as a Santa survival kit box. There are so many uses for the festive Christmas box.
Festive Christmas Box Ideas
I've included some ideas for the wooden Christmas box below.
- A pretty hostess gift filled with the recipient's favorite treats. Perhaps a couple bottles of wine, fine chocolate, and a selection of assorted gourmet cheese.
- Filled with goodies for the coffee lover, the pasta lover, the popcorn lover, the tea lover...you get the idea.
- A family Christmas Eve box filled with things like a holiday movie, microwave popcorn, hot chocolate-making supplies, special treats, and a fun game.
- Place holiday pajamas inside to be opened on Christmas Eve.
- Display it on a coffee table to hide remote controls when not in use, store extra holiday drink holders, extra tree light bulbs and ornament hangers, or assorted chocolates reserved for guests.
- Use it for a Christmas card and/or holiday letterbox.
- Or simply display the pretty box on a fireplace mantel or bookcase. The possibilities are endless!
Pair it with this fun Santa milk & cookie tray and you're all set for Christmas Eve!
What You'll Need To Make It
This post contains affiliate links so you can see what products I used or recommend for this project. As an Amazon Associate, I earn a small commission from any qualifying purchases at no extra cost to you. Thank you for your support!
Supply List
Wooden Flatware Box (thrift store)
Old Flannel Shirt (thrift store)
Wooden Feet (alternative)
Red Chalk Paint
White Chalk Paint
White Fabric Paint
Christmas Stencils
Stencil Adhesive
Brown Wax
White Wax
Sewing Scissors
Spring Clamps
Mod Podge
Hot Glue Gun
E6000 Glue
How To Upcycle Flatware Box For Christmas
First I gutted the old flatware box and gave it a good scrub inside.
Next, it was sanded lightly with 150-grit sandpaper to give the paint some bite. The exterior is painted with three coats of Emperor's Silk Annie Sloan Chalk Paint.
The lid of the box is stenciled with the number four Merry Christmas stencil and the corners with the number two Holly stencil. I have links to the stencils in the supply list. You'll see how I used stencil number three on the shirt pocket further down in the post.
Adding Feet To The Flatware Christmas Box
I found some wooden half rounds in my stash that were salvaged from the ombre waterfall dresser makeover. I'm glad I saved them because they are perfect to use for feet on the Christmas box.
I lightly sanded with 150-grit sandpaper to remove any ridges and peeling paint and painted them with the same white chalk paint used to stencil the outside of the box. I also painted the handle on the box with white paint while I was at it.
Once dry, they were attached to the box with E6000 glue.
How To Give Christmas Box A Time-Worn Patina
To give the box a time-worn patina, I used brown wax. First I brushed it all over the exterior of the box, including the round feet. Then I buffed it with a lint-free rag to remove any excess wax.
Next, I took my round wax brush and applied more wax around the edges without removing the excess. To highlight the ridge detail on the front and back of the lid I applied white wax with my fingers.
How To Line Christmas Box With A Flannel Shirt
Now that the exterior of the box is finished, time to get busy recycling the flannel shirt.
Shirt Pocket And Buttonholes
The first thing I did was remove the pocket because no matter how I situated the shirt, the pocket didn't line up where I wanted it. Here's where I used the Santa stencil that I mentioned earlier and stenciled it on the front of the pocket with white fabric paint.
Once stenciled, I put the pocket aside for later and got busy measuring the box for cutting the liner pattern on the shirt.
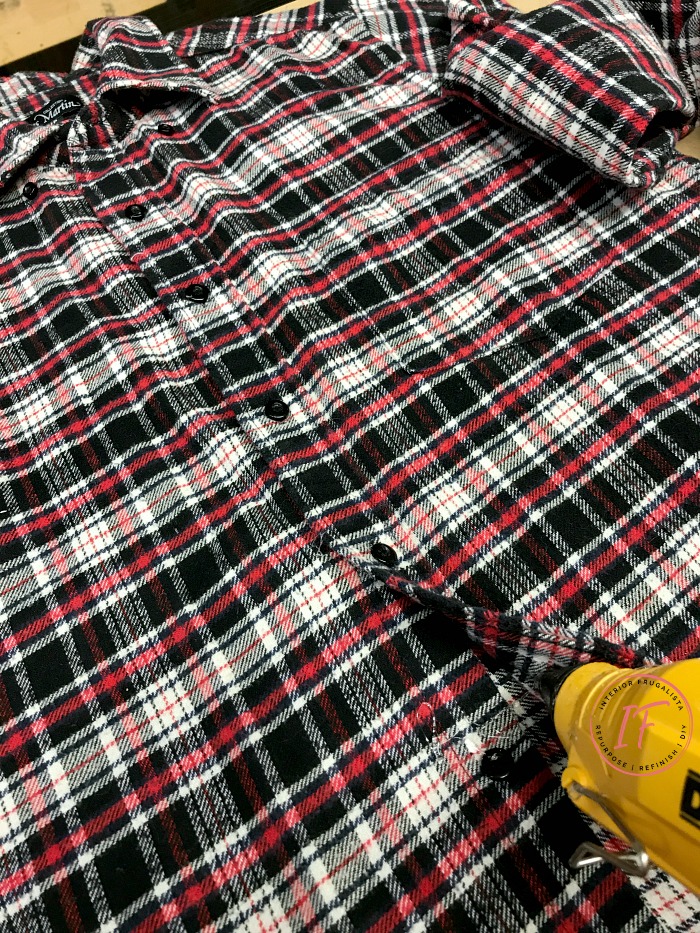
The front of the shirt will line the lid and the back of the shirt will line the bottom of the box. But first, the buttoned placket down the center of the shirt needs to be closed with a hot glue gun (as pictured below).
How To Cut Flannel Shirt To Line Christmas Box
I was so engrossed in this step that I forgot to take photos. I hope you find the detailed written instructions below helpful and that they make sense.
First, cut off the sleeves and shirt collar and keep them for future crafting potential. Nothing goes to waste around here. You can see how I recycled them on a flannel shirt sleeve fall wreath.
I'm not going to lie, this next step made my head hurt because math isn't one of my strong suits.
Shirt Front - Measurements For Lining Lid
Measure this piece from the center of the shirt so the buttonholes line up on the center of the lid. These measurements are specific to my particular flatware box but this gives you an idea of how to measure yours.
Lid Liner Length: 14 1/4-inches (length of the lid) + 1-inch (one side) + 1-inch (opposite side) + 1-inch (1/2-inch fold on each side) = 17 1/4-inches long.
Lid Liner Width: 10-inches (width of the lid) + 1-inch (front) + 1-inch (back) + 1-inch (1/2-inch folds) = 13-inches wide.
Lid Pattern Measurement: 17 1/4" x 13"
Shirt Back - Measurements For Lining Bottom
Make sure the pattern is lined up with the lid fabric when measuring.
Bottom Liner Length: 14 1/4-inches (length of bottom) + 1 3/4-inches (one side) + 1 3/4-inches (opposite side) + 1-inch (1/2-inch folds on each side) = 18 3/4-inches long.
Bottom Liner Width: 10-inches (width of bottom) + 1 3/4-inches (front) + 1 3/4-inches (back) + 1-inch (1/2-inch folds) = 14 1/2-inches wide.
Bottom Pattern Measurement: 18 3/4" x 14 1/2"
Hinge Fabric Measurements
- Make sure to match the hinged fabric with the pattern on both the lid and bottom of the box.
- Use the piece of fabric you cut from the top of the shirt back for this piece.
- The fabric hinge on the box is 10-inches long by 3-inches wide.
- This piece was cut 11-inches long to allow for 1/2-inch folds on each end.
- Don't worry about finishing the top and bottom pieces because they will be covered by the lid and bottom lining.
Are you still with me? We're almost there but first, the corners need to be mitered.
Cutting Mitered Corners
Mitered Lid Corners
- For the lid piece, mark a box corner with chalk on all four corners.
- To do this draw a 1-inch square and then draw a 1/2-inch square.
- Cut the 1/2-inch square out (see the previous photo).
- Make a 45° miter cut in the corner to the 1-inch line for the folds.
- Iron the fold that will be facing the front and backside of the box.
- The other fold doesn't need to be ironed because it will be glued behind the ironed fold.
Mitered Bottom Corners
- For the bottom fabric, mark a box corner with chalk on all four corners much like you did in the previous step.
- Except for this time the first box needs to be 1 3/4-inches square and the second box corner should be 1 1/2-inches square.
- Cut it out and make a 45° miter cut in the corner to the 1 3/4-inch line.
- Again, fold just one side 1/2-inches and iron flat.
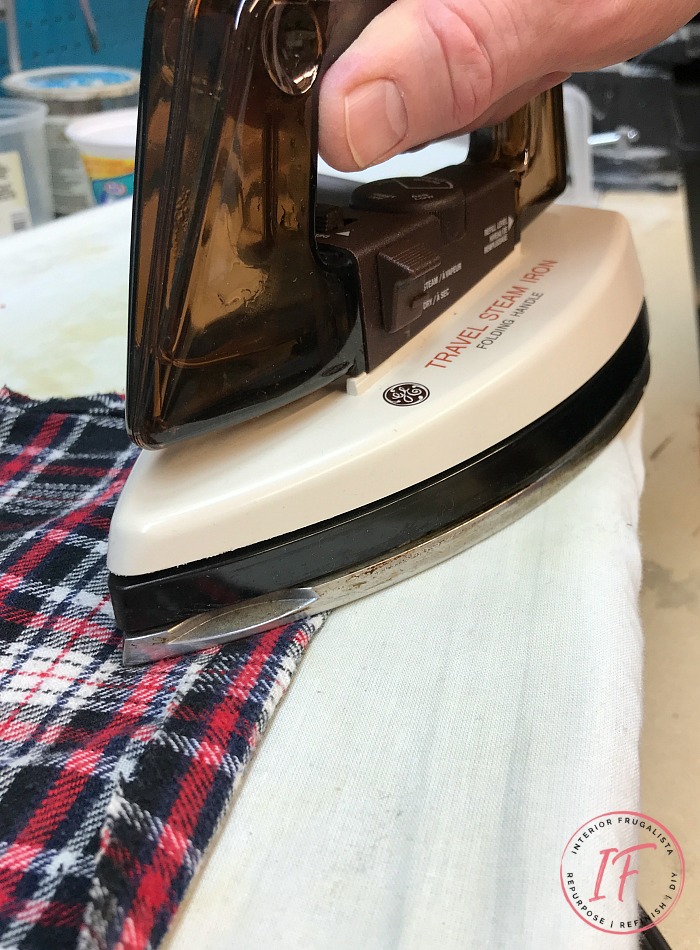
- Iron all the 1/2-inch folds on all sides of both the lid and bottom fabric.
- I keep a tabletop ironing board and travel iron at the ready for crafting.
Attach Flannel Lining
Spring clamps and Mod Podge will be your best friend during this step. I swore I took photos but evidently I was too engrossed in what I was doing yet again.
Glue Hinged Fabric
Start with the small hinge piece and brush Mod Podge (or thinned white glue) over the cloth hinge on the box and set the flannel hinge piece in place, making sure the two ends are folded.
Glue Bottom Fabric
- Place the back of the shirt inside the bottom of the box.
- Line up the folds along the top edge of the box and use spring clamps to hold them in place as you work.
- Make sure the unfolded miter corners are on the inside and line up the folded miter corner over top and hold in place with a clamp.
- Once you have everything lined up nice and straight, remove the clamps on one side and brush a generous amount of Mod Podge on the bottom and sides of the box.
- Lay your fabric back down and use your fingers to rub out any wrinkles.
- Unclamp the other side and repeat the previous step.
Glue Lid Fabric
Flip the box over so the top of the box is laying open on your work surface. Now you're ready to do it all again on the top of the box with the front of the shirt.
Last but not least, glue the pocket onto the left side of the buttonholes. If this all seems a little overwhelming I have another option for lining a box in my flannel shirt-lined wooden trunk table post.
Here are a couple more flannel shirt ideas for the holidays that you may like. One is DIY Flannel Christmas Ornaments and the other is adorable flannel gift tags.
Thanks for stopping by the Interior Frugalista today! I hope you enjoyed and were inspired by my silly idea for a Santa post-delivery survival box.
Almost all of our DIY ideas have step-by-step tutorials so why not get your budget DIY on and subscribe. You can also find us on Pinterest, Facebook, Instagram, and YouTube.
If you have any questions, please leave them in the comment section below or the Contact Me tab at the top to drop me an email. I love hearing from you!
If you enjoyed this upcycled flannel shirt-lined Christmas box, I'd be so thankful if you shared it with a friend and pinned it to your favorite board on Pinterest.
Now let's see my talented friends' ideas for the flannel challenge by clicking the links below.
Be Cozy Flannel Style Printables | Northern Feeling
Flip Flop Flannel Elf Slippers | A Crafty Mix
Flannel DIY Christmas Ornaments | Faeries & Fauna
How To Make A Dog Bandanna | Unique Creations By Anita
How To Make A Giant Christmas Bauble Using Flannel | Raggedy Bits
Upcycled Flannel Lined Christmas Box | Interior Frugalista (that's me)
I share my projects at these inspiring link parties.








:D Just perfect Marie and forget Santa, I could do with a survival box like that after a long day at the office. What a novel and fun idea. I hope he brings you lots of pressies and goodies for Christmas to say thank you for thinking of him.
ReplyDeleteI think most of us could use a Santa survival box, Michelle. Hopefully "Santa" enjoys it over the holidays but I think Mrs. Claus could use one too *wink* *wink*
DeleteI just love the interior of your survival box, Marie! How clever using the shirt front and pocket! Seeing the buttons along with the pocket takes this to a whole new design level! What a lovely transformation!
ReplyDeleteThank you very much, Gail! I was determined to get the buttons and pocket on that lid. I attempted to use the collar too but wasn't happy with the results. I'll use it for another project later.
DeleteOh so much fun Marie, I think this is the best idea ever!!! Santa's survival box is amazing, and ditto what Michelle said, I need one too!
ReplyDeleteI'm glad you like it Katrin! I think most of us could use a Santa's survival box. LOL Mine would have a Christmas mug, coffee beans and Bailey's Irish Cream. Oh, and a pair of Michelle's flannel elf slippers 😉
DeleteHaha!! This is just too adorable Marie. Santa will need it after a trip like that.
ReplyDeleteThanks Mary, I think "Santa" will enjoy the survival box over the holidays. I think Mrs. Claus needs her own survival box too 😉
DeleteThis is such a fun idea, Marie!! Love that you can adapt it to all different sorts of ideas throughout the Christmas period!So cute!!!
ReplyDeleteThanks Sam! I think once "Santa" finishes the survival kit, I'll use it on our coffee table during the holidays to put the remotes and holiday coasters. There may be a few chocolates hidden in there too from time to time. LOL
DeleteGreat box, absolutely love the contents you put a lot of thought into it. I would not mind being Santa at your house.
ReplyDeleteHa ha ha Thanks Anita! Although Santa at our house prefers Grand Marnier, so I didn't but enough thought into it. I do think that Mrs. Claus needs a Christmas survival box too.
DeleteThis was so clever! I love flannel so I have to find a box too to line with a flannel shirt!
ReplyDeleteHappy fall,
Kippi
Glad you like it Kippi, thank you! Good luck on your flatware box search - they come a dime a dozen around here.
DeleteNice job Marie!
ReplyDeleteThe flannel shirt seems to be the perfect fit for your repurposed silverware box! I love how it turned out!
gail
ps pinning!
Hi Gail, thank you so much! It was fun one to put together and I'm glad to finally put that old flatware box to good use. Thanks for the pin and the visit 😊
DeleteThis is really great, Marie! Love the novel idea entirely!
ReplyDeleteThanks Ceyla! I think Mrs. Claus needs a "special" Christmas box too 😉
Deletethis is adorable!!
ReplyDeleteThank you so much, I'm glad you like it 😊
DeleteOh my goodness... this is adorable Marie! Love how you left the shirt intact. That pocket is everything!
ReplyDeleteI've featured this project in this weekend's Party Junk. Thanks for bringing it over!
I'm so glad you like the Christmas Box, Donna and a BIG thank you for featuring it! xo
DeleteA really cute idea! I loved the story you put together about why Santa needed each item in the kit. LOL!
ReplyDeleteAw, thank you Michelle! It was such a fun project to work on.
DeleteMarie,
ReplyDeleteI love your flannel lined suitcase. What a great idea. Gail,
I love how you transformed this container. Black and white check is so great.
Congratulations, you are my feature at Over The Moon Linky Party. Hope you stop by. https://www.eclecticredbarn.com/2019/11/over-moon-linky-party.html
Hugs,
Bev
Thank you very much, Bev 😊 I'm glad you like my Christmas Box!
DeleteThanks for the pin and share, Marilyn, always appreciate that! xo
ReplyDeleteOh how cute and creative!
ReplyDeleteThanks Amber, it was a fun project to work on!
Delete