Curvy Blushing Bombshell Sofa Table Makeover
When your paint stockist is closing their doors and you buy a can of paint on clearance, sight unseen solely because of the name. Then you find a curvy French Provincial sofa table at Goodwill and well, the two just belonged together. That's the story behind this feminine blushing bombshell sofa table makeover with Hollywood glam.
I know somewhere out there is a blushing bombshell just waiting for this sofa table! It may take longer to find her but I'm willing to take the risk.
Today is one of my favorite days of the month because it is Furniture Fixer Upper Day. Six talented furniture upcycling friends come together on the fourth Thursday every month to breathe new life into a piece of furniture. But it's not the fourth Thursday you might be thinking. With American Thanksgiving next weekend (four members of our group are from the USA) we pushed it up a week.
I've included links to the furniture makeovers from the talented ladies in the group at the bottom of the post. Last month, I did a bold mustard yellow repurposed mid-century modern media cabinet makeover for my daughter's home.
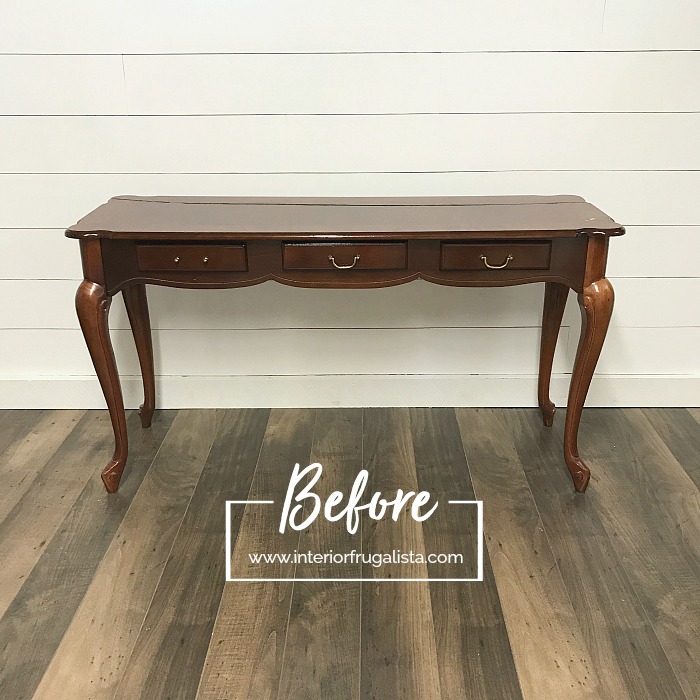
Here's where we started with this French Provincial sofa table found at our local Goodwill.
Ready to see the curvy bold blushing sofa table now? In-person it has more pink undertones but in the photos, it reads more like coral. Depending on the light it goes either way.
The color, the curves, the metallic silver detail, and the pretty pearl knobs from Hobby Lobby gave this table such lovely feminine glam.
The drawers on each side are faux but the middle drawer was also painted the coral color and lined with pretty vintage-style scrapbook paper.
Paired with an upholstered faux fur vanity chair, the glam sofa table could be used as a makeup dressing table too.
If you're wondering about the trees on the table, they are also a DIY and you can find them here in my DIY Beaded Christmas Cone Trees post.
This sofa table has a dark shiny finish and the paint needs something to give it some bite. Option A is roughing the glossy surface with sandpaper BUT with that dark red finish, it is guaranteed the tannins in the wood will bleed under the paint (turn it yellow or pink). Which means the table would need to be primed after.
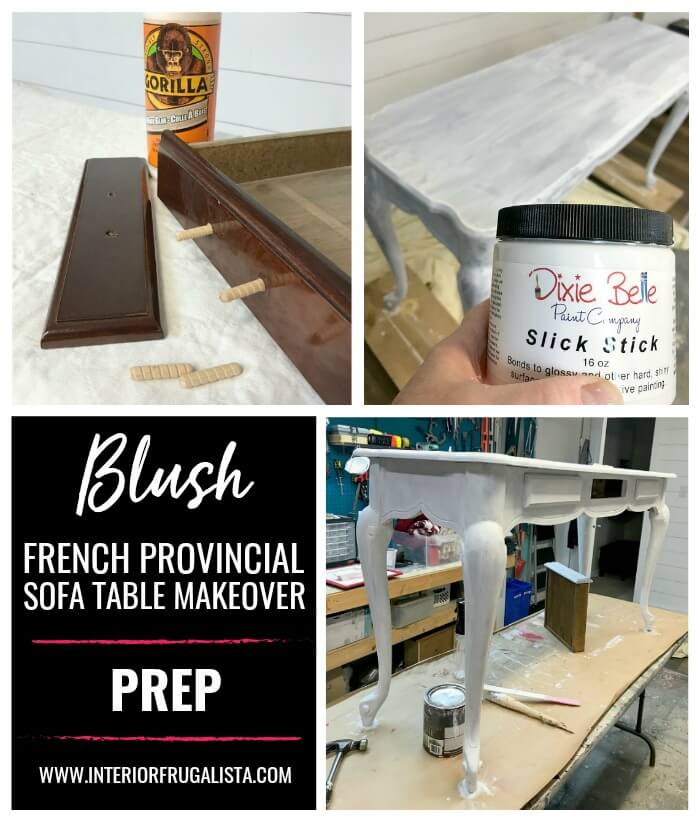
I choose the easier no-sand option using two coats of Slick Stick (link in the supply list) that does both, it bonds to glossy surfaces and gives the paint some bite.
I chose not to use the original pulls on the drawer fronts and replaced them with those pretty knobs shown earlier. Unfortunately, the two screw holes need to be filled because the new knobs will go in the center of each drawer (more about that step later).
I always use wood dowel pins to fill the holes and glue them in place with wood glue (pictured above). Once the glue sets, cut the dowels flush with the drawers. Fill any gaps with wood filler and sand smooth before priming.
Another tip when painting with chalk-style paint is always having a wet brush. I keep a mist spray bottle at my side like hairdressers use (in fact I got mine from my hairdresser). I always spray my brush to get it damp first before dipping it into the paint. I repeat this about every second or third dip into the paint.
Also to help the paint move better and cover more area, I will lightly mist directly on the fresh paint and work the brush from the center outwards.
In the photo below you can see this gorgeous blush paint color in the can and what it looks like after the first and second coat.
I debated whether to use a clear coat on the painted table or clear wax. I opted for a wax finish instead applied with a round wax brush and buffed with my favorite wax detailing sponge (link in the supply list).
Thrilled with how the silver added a little more glam, I couldn't just leave well alone.
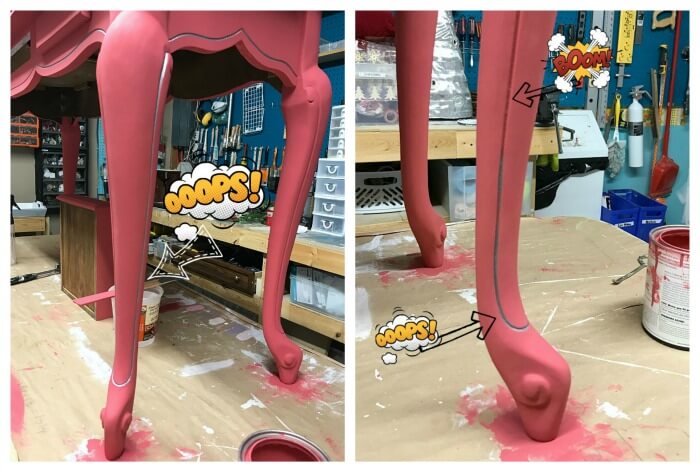
Deciding the grooves on the legs also needed silver metallic paint I got to work on the first leg. After finishing I took a step back and decided it was bordering on kitschy and changed my mind.
No need to panic. Just wait for the oops paint to dry and then paint right over it! Really, it's that simple. You can see in the photo above on the right how the silver paint on the top half of the leg was easily covered with more blush paint and one would never know there was an oops.
The other two drawers are faux and attached to the table. This means the thickness of the drawer plus the frame of the table is too deep to accommodate the length of the thread on the new knobs. To remedy this, use a countersink drill bit on the backside of the table.
Sterling Silver Metallic Multi-Surface Paint
Slick Stick Primer
Clear Wax
Round Wax Brush
Wax Microfibre Detailing Applicator
Mist Spray Bottle
Zibra Round Paintbrush
Number 3 Scriptliner Art Brush
Wood Dowel Pins
Wood Glue
Filler Compound
Mouse Sander
Power Drill, Drill Bit, Countersink Drill Bit
Now that this bold blushing bombshell thrift store French Provincial table is finished, time to keep my fingers crossed that it sells. What do you think of the paint color?
If you have any questions about this furniture makeover, please leave them in the comment section below or press the Contact Me button at the top of the blog to drop me an email. I love hearing from you!
If you enjoyed this coral sofa table upcycle, I'd be so thankful if you shared it with a friend and pinned it to your upcycled furniture board on Pinterest.

Please join me by pressing the links below to see what my talented friends did with these furniture pieces.
I share my projects at these inspiring link parties.
Curvy Blushing Bombshell Sofa Table Makeover
My practical side said, "girl, it's going to be a hard sell" but my sassy color-loving self said, "go for it!"
I know somewhere out there is a blushing bombshell just waiting for this sofa table! It may take longer to find her but I'm willing to take the risk.
Today is one of my favorite days of the month because it is Furniture Fixer Upper Day. Six talented furniture upcycling friends come together on the fourth Thursday every month to breathe new life into a piece of furniture. But it's not the fourth Thursday you might be thinking. With American Thanksgiving next weekend (four members of our group are from the USA) we pushed it up a week.
I've included links to the furniture makeovers from the talented ladies in the group at the bottom of the post. Last month, I did a bold mustard yellow repurposed mid-century modern media cabinet makeover for my daughter's home.
Here's where we started with this French Provincial sofa table found at our local Goodwill.
Ready to see the curvy bold blushing sofa table now? In-person it has more pink undertones but in the photos, it reads more like coral. Depending on the light it goes either way.
The color, the curves, the metallic silver detail, and the pretty pearl knobs from Hobby Lobby gave this table such lovely feminine glam.
The drawers on each side are faux but the middle drawer was also painted the coral color and lined with pretty vintage-style scrapbook paper.
Paired with an upholstered faux fur vanity chair, the glam sofa table could be used as a makeup dressing table too.
If you're wondering about the trees on the table, they are also a DIY and you can find them here in my DIY Beaded Christmas Cone Trees post.
Here are the sofa table makeover details
No-Sand prep for the original shiny finish
At the risk of repeating myself, this admittedly tedious step is the most important. If you don't spend time prepping a piece, you risk that lovely new paint not lasting.This sofa table has a dark shiny finish and the paint needs something to give it some bite. Option A is roughing the glossy surface with sandpaper BUT with that dark red finish, it is guaranteed the tannins in the wood will bleed under the paint (turn it yellow or pink). Which means the table would need to be primed after.
I choose the easier no-sand option using two coats of Slick Stick (link in the supply list) that does both, it bonds to glossy surfaces and gives the paint some bite.
I chose not to use the original pulls on the drawer fronts and replaced them with those pretty knobs shown earlier. Unfortunately, the two screw holes need to be filled because the new knobs will go in the center of each drawer (more about that step later).
I always use wood dowel pins to fill the holes and glue them in place with wood glue (pictured above). Once the glue sets, cut the dowels flush with the drawers. Fill any gaps with wood filler and sand smooth before priming.
Bold and beautiful paint color and a few painting tips
Now it's time for the fun part, making the table pretty. It took three coats of pretty Blushing Bombshell FAT Chalk-Style paint to get full coverage. Everyone has that favorite paintbrush and mine happens to be the Zibra Grip-n-Glide round brush. I never get brush strokes with this brush and its super easy to paint those curvy legs.Another tip when painting with chalk-style paint is always having a wet brush. I keep a mist spray bottle at my side like hairdressers use (in fact I got mine from my hairdresser). I always spray my brush to get it damp first before dipping it into the paint. I repeat this about every second or third dip into the paint.
Also to help the paint move better and cover more area, I will lightly mist directly on the fresh paint and work the brush from the center outwards.
In the photo below you can see this gorgeous blush paint color in the can and what it looks like after the first and second coat.
I debated whether to use a clear coat on the painted table or clear wax. I opted for a wax finish instead applied with a round wax brush and buffed with my favorite wax detailing sponge (link in the supply list).
A small example of how you can't ruin furniture with paint
I painted the grooves along the edge of the sofa table with sterling silver multi-surface metallic paint and a number 3 Scriptliner Art brush. To keep the paint inside those tiny grooves rest your wrist on the surface of the table as you paint to keep a steady hand.Thrilled with how the silver added a little more glam, I couldn't just leave well alone.
Deciding the grooves on the legs also needed silver metallic paint I got to work on the first leg. After finishing I took a step back and decided it was bordering on kitschy and changed my mind.
No need to panic. Just wait for the oops paint to dry and then paint right over it! Really, it's that simple. You can see in the photo above on the right how the silver paint on the top half of the leg was easily covered with more blush paint and one would never know there was an oops.
Last but not least, drilling holes for the new knobs
Measure and mark with a pencil the center of each drawer front. Use a power drill with a drill bit the same diameter as the thread on the new knobs. It's easy to drill a hole on the "real" drawer front and screw on the new knob.The other two drawers are faux and attached to the table. This means the thickness of the drawer plus the frame of the table is too deep to accommodate the length of the thread on the new knobs. To remedy this, use a countersink drill bit on the backside of the table.
What you'll need to make it
This post contains affiliate links so you can see what products I used or recommend for this project. As an Amazon Associate, I earn a small commission from qualifying purchases at no extra cost to you.Supply List
Blush Pink Paint (alternative)Sterling Silver Metallic Multi-Surface Paint
Slick Stick Primer
Clear Wax
Round Wax Brush
Wax Microfibre Detailing Applicator
Mist Spray Bottle
Zibra Round Paintbrush
Number 3 Scriptliner Art Brush
Wood Dowel Pins
Wood Glue
Filler Compound
Mouse Sander
Power Drill, Drill Bit, Countersink Drill Bit
Now that this bold blushing bombshell thrift store French Provincial table is finished, time to keep my fingers crossed that it sells. What do you think of the paint color?
If you have any questions about this furniture makeover, please leave them in the comment section below or press the Contact Me button at the top of the blog to drop me an email. I love hearing from you!
If you enjoyed this coral sofa table upcycle, I'd be so thankful if you shared it with a friend and pinned it to your upcycled furniture board on Pinterest.

Please join me by pressing the links below to see what my talented friends did with these furniture pieces.
- Girl In The Garage
- Petticoat Junktion
- Just The Woods
- Salvaged Inspirations
- Interior Frugalista (that's me)
- Confessions Of A Serial DIYer (not pictured above)
I share my projects at these inspiring link parties.


Oh wow Marie, that color is definitely the bomb!! It really makes a statement now. And the Christmas things look great on it too.
ReplyDeleteThank you Mary, I'm glad you like the bold color!
Deleteoh snap! it looks so glamorous Marie! love it
ReplyDeleteThank you so much, Kandice! I was stunned by how pretty the color was when I opened the surprise can of clearance paint.
DeleteHi Marie, oh wow I too love the way that you refinished this piece of furniture. You are so talented this way and I'd love to try it sometime with a small book shelf I have.
ReplyDeleteThanks for the visit to my blog and your sweet comment on the crochet angel I made. I hope you have a wonderful Thanksgiving.
Julie
Thank you so much, Julie, for your sweet comment and visit! Happy Thanksgiving 😊
DeleteIt looks fabulous! So fun all glammed up. I know the right person will fall madly in love with it and snatch it up!
ReplyDeleteThank you so much, Jen, I hope you're right. Listing it this weekend (finger's crossed).
DeleteThe sofa turned out gorgeous. The Christmas trees are beautiful!
ReplyDeleteHappy Thanksgiving,
Kippi
Thank you very much, Kippi! The Christmas trees were a fun DIY several years ago (as evidenced by the crappy photos in that blog post). LOL
DeleteIt's always nice to see where you made a mistake and corrected it. I think a lot of us when we start out feel quite stressed to get everything right. It's nice to know that there are many things that you can mess up, and then mess right back down again, so to speak!
ReplyDeleteExactly Andrea! That's why I decided writing about the oops might be helpful. Thanks for for stopping by for a visit 😊
DeleteHi Marie, you know how much I love pink. I love the feminine drawer pulls, but the silver detailing outlines the gorgeous curves of this sofa table, making is oh la la. Pinned
ReplyDeleteYes you do my friend and thank you so much for the pin! Don't you wish we had a Hobby Lobby here? I shopped with Mr. Frugalista via Facetime one evening while on a business trip in the Niagara region. When I saw the bin of those pretty pearl knobs I just had to have some.
DeleteMarie, that table is to die for! Now if it were only in a light shade of purple! Lol! And I love, love, love those knobs! You did glam-fabulous (new word)on this one!
ReplyDelete"Glam-fabulous" - I like it! Thank you for your sweet comments and visit Gail! xo Happy Thanksgiving 🤗
DeleteThis is GORGEOUS, and quite elegant!
ReplyDeleteAlexandra
EyeLoveKnots.com
Thank you so much, Alexandra, I'm glad you like it!
DeleteYou will be featured at this week's Snickerdoodle Create Bake Make party, which goes live Saturday at 5pm EST.
DeleteAlexandra
EyeLoveKnots.com
So excited about the feature, Alexandra, thank you so much! xo
DeleteWell I think your blushing bombshell table with her silver lining will most definitely find the right home. She's glorious Marie
ReplyDeleteThank you so much, Michelle, I hope you're right. I'm waiting for the wax to cure before she's listed. 🤞🏻
DeleteI LOVE this! If I were young, single and in my first place, I would SO want this! ;-)
ReplyDeleteJulie, you have described my target market perfectly! Finger's crossed she's out there when I list this table.
DeleteBeautiful makeover and love the color. Thanks for sharing with To Grandma's House We Go, I'll be featuring you next week.
ReplyDeleteWoot woot, thank you so much for the feature, Chas and Happy Thanksgiving weekend! xo
DeleteThat color is beautiful! And I love the knobs!
ReplyDeleteThank you so much, T'onna! I did the happy dance when finding the knobs.
DeleteThanks so much for sharing with us at the To Grandma's house we go link party - I'll be featuring you this week - happy August!
ReplyDeleteYou're the best, thank you so much Tarahlynn! xo
DeleteThis is really beautiful, Marie! I'll be featuring it at TFT tomorrow. :)
ReplyDeleteI'm thrilled it'll be featured - thanks so much!
Delete