Rae Dunn Ornaments With Farmhouse Style
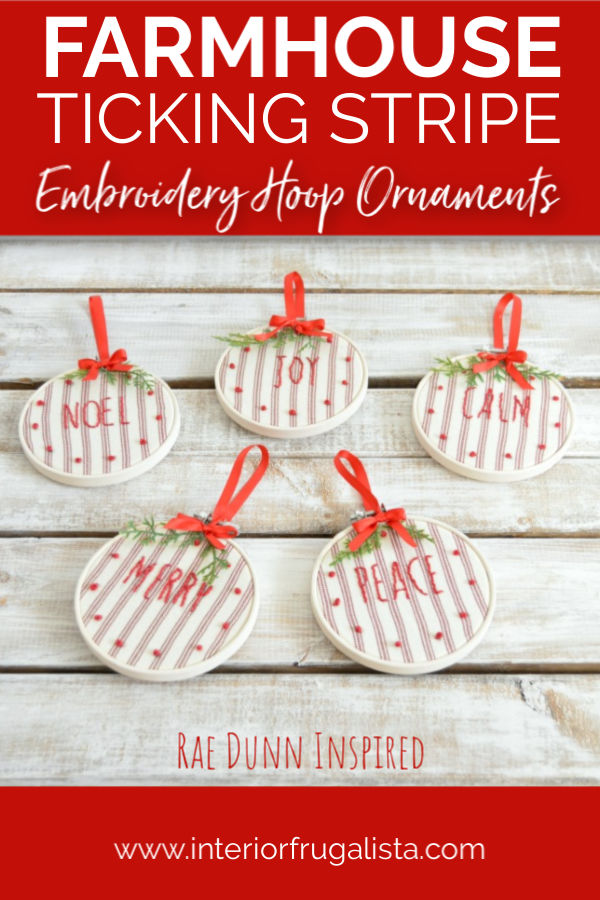
How to make Rae Dunn inspired embroidery hoop Christmas ornaments with farmhouse style from recycled fabric.
I'm happy to finally find a use for an old red ticking stripe armchair slipcover we are no longer using. These embroidery hoop ornaments are so easy to make and are embellished with simple embroidery stitches that anyone can do.
Welcome to the 5th annual 12 Days of Holiday Ideas event, hosted by Shirley of Intelligent Domestications and Erlene of My Pinterventures. Between Nov. 11th and December 6th there will be hundreds of new ideas shared by over 55 Co-host bloggers!
Go here to see our kick-off collection of Holiday ideas as well as all of this year's talented participating DIY and Foodie Blogs.
Farmhouse Style Embroidery Hoop Ornaments
While the ticking stripe fabric gives the Christmas ornaments a country feel, the Rae Dunn-inspired words give them that modern farmhouse charm. I haven't picked up an embroidery needle in years but just like riding a bike, the simple stitches came right back.
I still have a lot of slipcover fabric leftover even after using it to make several ticking stripe pumpkins, a ticking fabric office chair pillow, an upholstered ticking fabric IKEA stool makeover, and a ticking fabric heart wreath.
Our home is decorated in traditional red and our tree is an eclectic mix of vintage style ornaments so these DIY farmhouse ornaments fit right into our holiday decor. You can see them hanging on our eclectic Christmas tree in the tour links further down in the post.
What You'll Need To Make The Farmhouse Ornaments
This post contains affiliate links so you can see what products I used or recommend for this project. As an Amazon Associate, I earn a small commission from any qualifying purchases at no extra cost to you. Thank you for your support!
Supply List
4-inch Embroidery Hoops
Red Ticking Stripe Fabric
Red Embroidery Floss
Large Eye Embroidery Needle
Faux Cedar Evergreen Pick
1/4-inch Red Ribbon
Hot Glue Gun
How To Make Rae Dunn Inspired Farmhouse Ornaments
Step 1 - Paint The Embroidery Hoops
The first step (not pictured above) is to paint the outer embroidery hoop a warm white. I used chalk paint that I had on hand but acrylic craft paint is fine too.
Step 2 - Transfer Words Onto Ticking Fabric
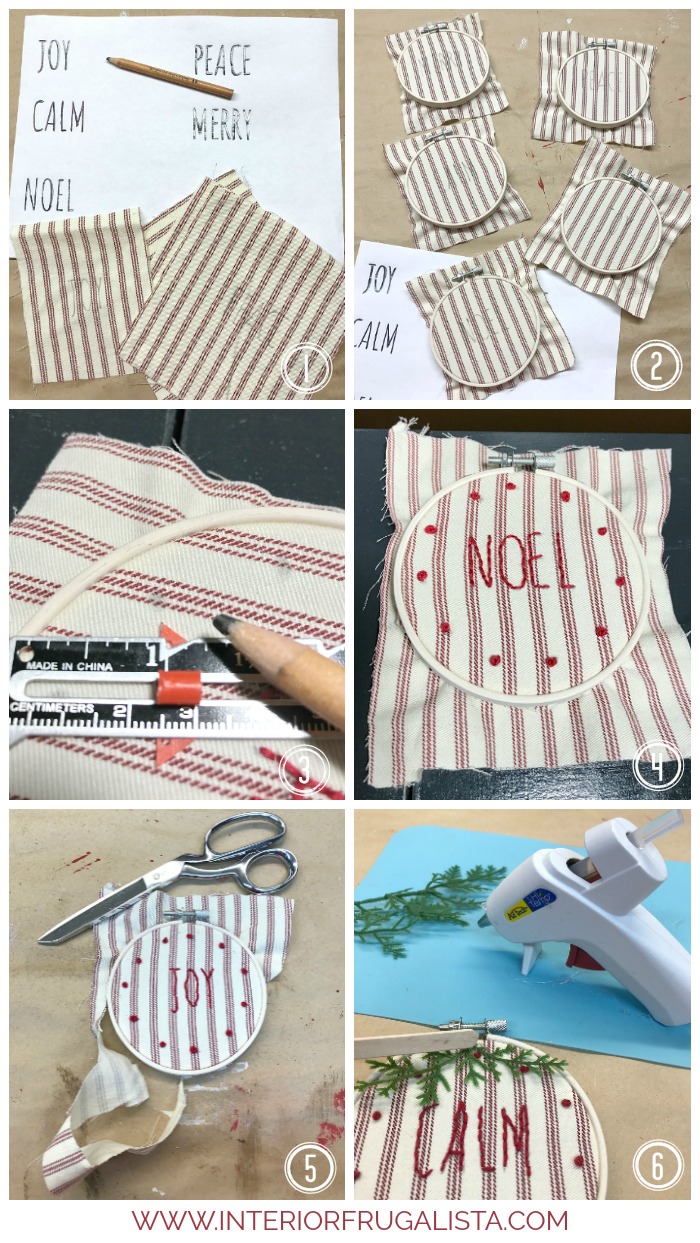
My ornaments are made with five 4-inch embroidery hoops and so I cut the red ticking stripe fabric into 7-inch squares.
Next, I made a printable with Rae Dunn-inspired words for the holidays using an Amatic font in PicMonkey and printed it in landscape orientation on letter-sized bond paper.
I've included a free printable download that you're welcome to use. Click your mouse on the graphic below for your unwatermarked printable.
Once printed, cut each word out to fit over the fabric pieces. To transfer the words onto the fabric, rub the backside of the paper behind each word with a pencil (I used a graphite pencil).
Center the paper with the good side facing towards you over the fabric. Press firmly while tracing each letter so the graphite transfers onto the fabric (pictured above).
Step 3 - Set Fabric Into Embroidery Hoop
Center the fabric over the inner rings of the embroidery hoops and stretch the outer ring over the fabric and tighten the screws to hold in place.
Step 4 - Embroidery Stitch Detail
With 4 strands of Colonial Red embroidery thread and a large-eyed embroidery needle, I used a simple backstitch over each letter. If you've never done embroidery before there are several video tutorials on YouTube that are very helpful. If I can do it, you definitely can!
The red dots resembling red berries were made with a French Knot embroidery stitch. But first I measured and spaced the dots evenly around the hoop using my handy multi-mark measure tool.
I included links to that sweet tool in my 20 Gift Ideas For The Beginner DIYer post.
Step 5 - Trim Excess Fabric
Trim the excess fabric along the back of the embroidery hoop. You can leave it long enough to wrap inside the back of the hoop and hot glue in place OR just trim it flush with the back of the hoop like I did.
Step 6 - Embellish Embroidery Hoop Ornaments
Add a couple sprigs from a faux cedar evergreen pick and hot glue it in place at the top of each ornament.
Cut 1/4-inch red ribbon 14-16 inches long. Loop it through the screw on the embroidery hoop and make a 6-inch loop and tie a knot to make the ornament hanger. With the ribbon tails tie a small bow and secure it over the evergreen with the hot glue gun.
Bow TIP
When tieing a small bow lay the ornament down so the top is closest to you (facing upside down). Tie the bow basically upside down and when you turn the ornament around the two tails will be facing downward perfectly. I hope this makes sense.
If you have any questions about these modern farmhouse ornaments, please leave them in the comment section below or press the Contact Me button at the top of the blog to drop me an email. I love hearing from you!
If you enjoyed this DIY Ornament idea, I'd be so thankful if you shared it with a friend and pinned it to your Christmas Ornament Ideas or DIY Holiday Decor board on Pinterest.

I share my projects at these inspiring link parties.
12 Days Of Holiday Ideas Tour
Day 1 - Gift Guides
Day 2 - Survival Guides
Day 3 - Holiday Kid Activities
Day 4 - Party Games
Day 5 - Holiday Advent Calendar
Day 6 - DIY Wreath
Day 7 - DIY Ornament (you are here)
Day 8 - Holiday Printables
Day 9 - Christmas Potluck Recipes
Day 10 - Holiday Desserts & Treats
Day 11 - Christmas Breakfast Recipes
Day 12 - Christmas Tree Tour
For more DIY Christmas ornament inspiration, here are several more ideas from our talented co-hosts on this leg of the 12 Days Of Holiday Ideas Tour.


Ohhhh so pretty! I have some of those annoying sofa arm slip covers too that I keep tucking back in. LOVE the ticking fabric and the adorable vintage look ornaments you made. Now I want to go back to embroidery also. I have everything except the time but maybe I will make it happen.
ReplyDeleteThanks Shirley! I did the embroidery while watching sappy predictable Hallmark Christmas movies. Those dang movies are addictive!
DeleteI love these, Marie! They are so festive. The stitching is lovely!
ReplyDeleteThank you so much, Bev! It was kind of fun getting back to embroidery again. It's been many decades!
DeleteSo cute!
ReplyDeleteThanks Virginia and Happy Thanksgiving!
DeleteI love your beautiful and adorable ornaments! Pinning! Happy holidays!
ReplyDeleteThank you so much both for your sweet comments and the pin. Happy Holidays back to you!
DeleteThese are adorable, that ticking stripe is just perfect for these
ReplyDeleteThank you Rachel! I was happy to put more of the slipcover fabric to good use.
DeleteYour embroidered ornaments are so cute, Marie! I might have to go dig out my embroidery hoop, too :) And I love the little bit of evergreen on the top.
ReplyDeleteThank you Wanda, it was fun playing with the embroidery stitches again and I was thrilled that I actually remembered them.
DeleteRae Dunn is my favorite & I thought of her pieces as soon as I saw these. The slipcover is perfect for these ornaments and your embroidery is beautiful.
ReplyDeleteThat makes me happy that you thought of Rae Dunn as soon as your saw these, Jenny! I was concerned with the letters being embroidered that it might take away from the look.
DeleteHow pretty these turned out!
ReplyDeleteI took up embroidery again about 10 years ago after a 30 year break and rediscovered how much I enjoyed it.
That gives me hope because it's been about that long since I embroidered too. It really was fun and I hope to find more projects to use it on. Thank you 😊
DeleteWhat absolutely beautiful ornaments! That little sprig of evergreen is the perfect compliment to the red and white of the embroidery and fabric. And I love that it's a recycled project, too!
ReplyDeleteThank you very much, Nicole! I was so glad to put more of the slipcover remnant to good use.
DeleteThese are really pretty, the stripes are so classy.
ReplyDeleteThank you very much, Maria, I'm glad you like them!
DeleteOh my goodness, Marie! Those are so cute!
ReplyDeleteTania
Thanks a bunch, Tania, they look great on my tree and now I want to make five more. Happy Thanksgiving!
DeleteThese are beautiful! They would look perfect on my tree!
ReplyDeleteThank you Roseann! They look so pretty on mine that I've decided to make more.
DeleteThese ornaments are so detailed! I love the embroidery.
ReplyDeleteThanks Jessa! They were easy to make and didn't take long at all.
DeleteLove them adorable farmhouse hoop ornaments.
ReplyDeleteNow, if only I could do embroidery.
ColleenB.~Tx.
Thank you Colleen! Trust me, if I could do these embroidery stitches, you definitely could. Super easy and lots of YouTube videos tutorials out there too.
DeleteMarie,
ReplyDeleteI love these hoop ornaments. Congratulations, you are being featured on Over The Moon Linky Party. I hope you stop by. https://www.eclecticredbarn.com/2019/12/over-moon-linky-party_68.html
Hugs,
Bev
Thank you very much for the feature, Bev, much appreciated! xo
DeleteThese ornaments are just beautiful! I've never embroidered before, but I'm willing to give it a try :)
ReplyDeleteThank you so much, Erin! Believe me, if I can do the embroidery stitches, you definitely can. YouTube has some great video tutorials and you'll be surprised how easy they are!
DeleteI'm a total sucker for a great ornament idea and I would love a whole tree done up with these!
ReplyDeleteAw, thank you so much Sarah, I'm glad you like them! Funny thing is that when I hung them on our tree I realized I definitely need to make several more because they look so pretty. Merry Christmas!
DeleteI love these ornaments so much. They would make great gifts to give to friends and family for Christmas.
ReplyDeleteThank you so much, Paula! They were so easy and fun to make and one of my favorites. Merry Christmas to you and your family! xo
Delete