Unique Rust Activated Stacked Pumpkin Topiaries
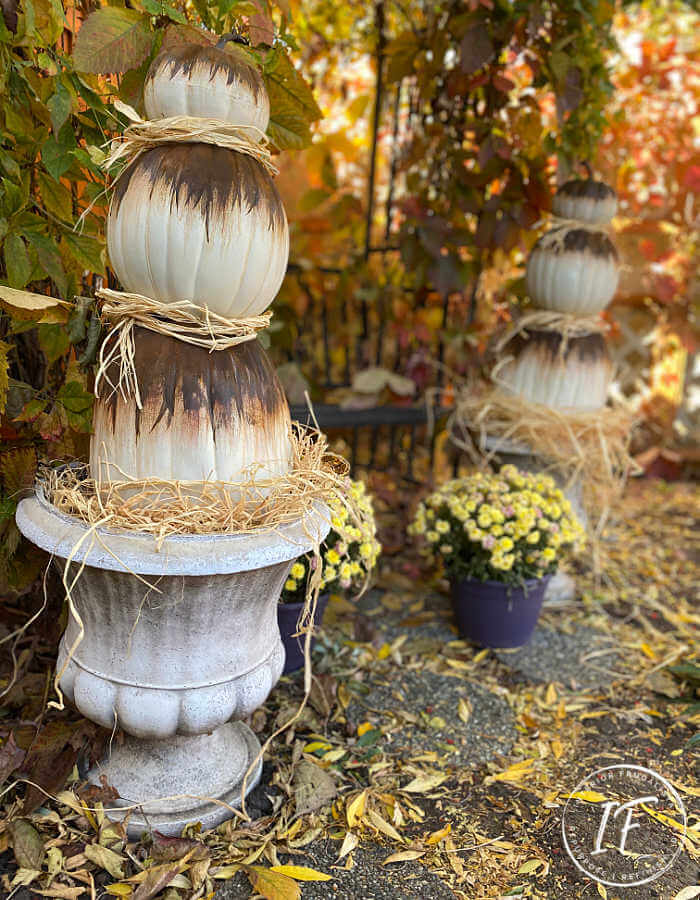
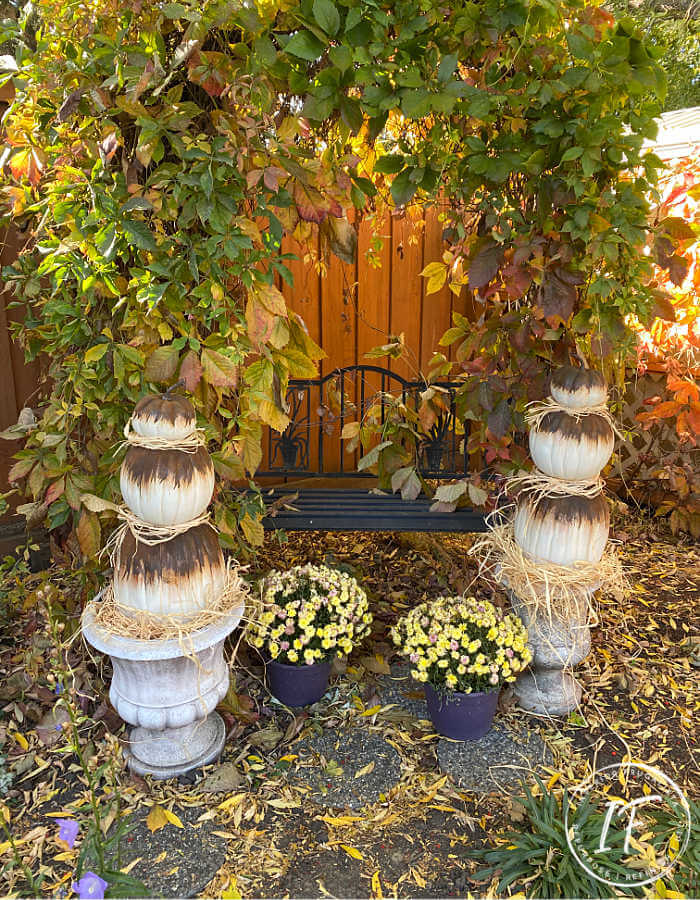
Do you prefer a unique non-traditional twist for fall decorating? If so, these unique rust-activated pumpkin topiaries are just that. They definitely are not your run-of-the-mill stacked pumpkins with their rusty paint patina.
The unique rust paint dripped artificial stacked pumpkins will have your neighbors doing a double-take. They are easy to make and the best part of this pumpkin craft is watching the rusty goodness magically happen.
Rust Paint Dripped Pumpkin Topiaries
This is the third topiary incarnation for these faux pumpkins and they are holding up well. Like I often say; if you no longer like the look, change it with paint!
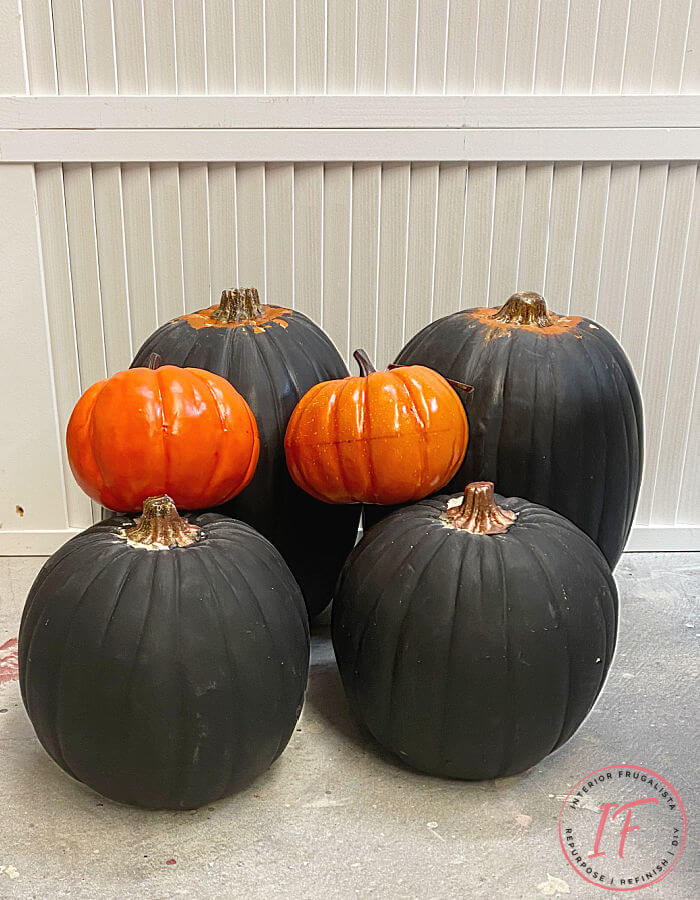
They were originally very traditional fall topiaries in autumn colors. But when we replaced our front door a few years later I changed the look to less traditional black and copper stacked pumpkins.
Now here we are again with pumpkin topiary makeover number three, except this time I added a third pumpkin and like the look so much better.
What You'll Need To Make Them
This post contains affiliate links so you can see what products I used or recommend for this project. As an Amazon Associate, I earn a small commission from qualifying purchases at no extra cost to you.
Supply List
2 Sets of Three Artificial Pumpkins
Warm White Chalk-Style Paint
Burnt Umber Acrylic Craft Paint
Modern Masters Rust Kit
natural raffia ribbon
Large Wooden Dowel
Spade Drill Bit
Utility Knife
You will need three pumpkins per topiary in various sizes. If you can find them each with different shapes, even better. I used two from the former topiary incarnations and added a third smaller foam pumpkin from the dollar store.
Paint Artificial Pumpkins
Paint all three pumpkins a warm white color. You can use a chalky-type paint or multi-surface paint. Whatever you use, it should be able to bond to plastic. I used the color Drop Cloth by Dixie Belle Paint Company that I had on hand.
You can see in the photo above that I removed the plastic stems from the smallest pumpkins. To make them look less fake, paint them a burnt umber color with acrylic craft paint. Set them aside to dry while moving onto the next step.
Holes For Wooden Dowels
To prevent your pumpkin topiaries from blowing away and ending up in the neighbor's yard, we'll be using wooden dowels. When I took the photos of the topiaries it was very windy outside so I can attest that they work!
For this, you'll need either a sharp utility knife or a spade drill bit. I'm all about the quickest way to do things so I tend to grab the power tools to get the job done.
You'll need to make rather large holes on the bottom of the middle and top pumpkins to accommodate the stem of the pumpkin beneath. If your pumpkins have removable stems then bonus, you just need a small hole to fit the diameter of a wooden dowel.
On the bottom pumpkin, you'll only need a small hole the same diameter as the round or square (doesn't matter) wooden dowel.
Dripped Iron Rust Paint Patina
Now we're at the fun step of this fall craft, watching the rusty goodness magically happen. To add the rust patina we'll be using the Modern Masters Rust Kit.
If you've never tried these kits then you're in for a treat. It's a three-step process and the hardest part is waiting for it to dry.
Step 1 - Primer Paint
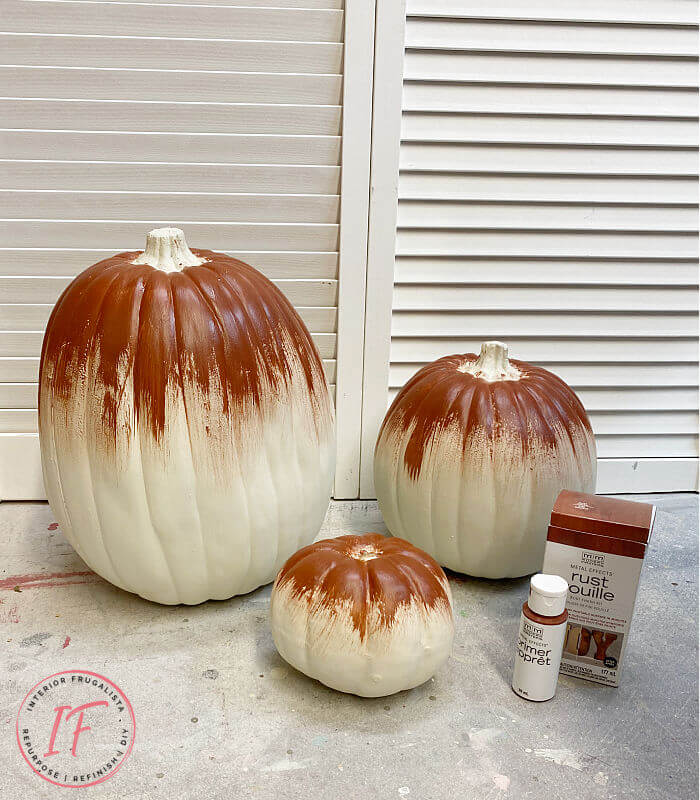
The first step of the rusting process is to prime the pumpkins with two coats of the primer included in the kit. We're going to give the pumpkins a unique abstract wispy dripped paint appearance.
Pro Tips
- The trick to getting the wisps is using a crappy paintbrush. You read that right. Grab the most worn-out paintbrush you've got or an inexpensive chip brush. The more uneven the bristles, the better.
- The goal here is for visible brushstrokes that end in an uneven random fashion.
- Try not to load too much primer on the brush. We're going for more of a dry brush technique here so less is more.
- Don't go over the same area twice.
With light pressure, apply the primer in one long brushstroke until there is little to no paint left on the brush. Start at the stem and end each brushstroke at different points around the pumpkin, about a third of the way down (pictured below).
Let the first coat of primer dry thirty minutes and brush the second coat much the same way as you did the first. Don't fret if you don't get the paint in exactly the same spot. Wait two hours for the second coat to dry before moving onto the next step.
Step 2 - Iron Paint
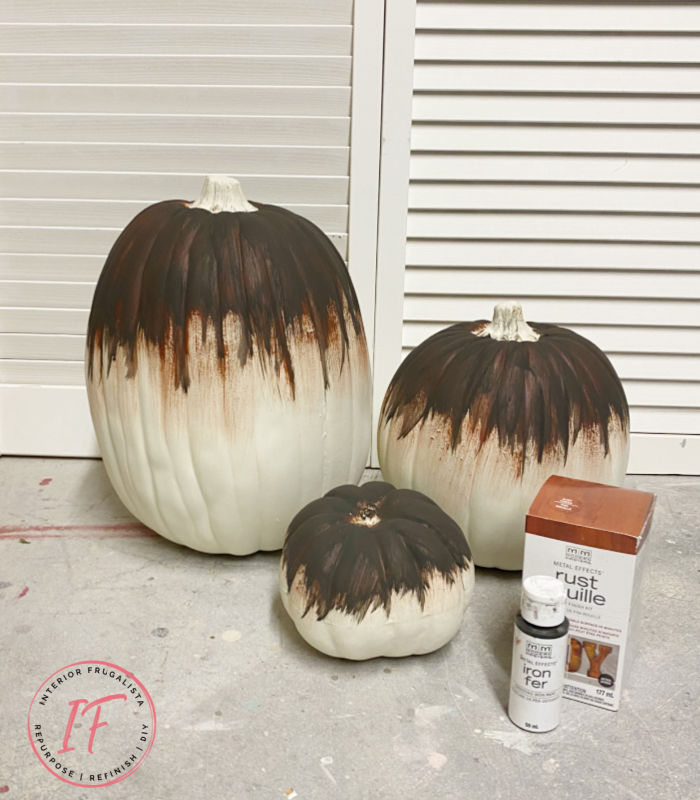
The second step is painting the primed surface with two coats of iron paint that came with the kit. Give the bottle a good shake first before opening it. Beware, this stuff smells just like raw iron.
Apply it just like you did the primer in the previous step and don't worry if you don't get it exactly the same. As long as you pretty much cover the primer as best you can you're just fine.
Just like the primer, let the first coat dry for thirty minutes and only one hour this time for the second coat.
Step 3 - Rust Activator
Now we're ready to watch the magic happen! You will want to protect your work surface from being damaged from overspray.
Spray a light coating of the rust activator that came with the kit over the iron paint. Wait five minutes and then spray a second light coat. Pictured below is after approximately 10-15 minutes.
This next photo is after forty-five minutes. Can you see the lovely blue and green colors under the rusty goodness?
Let the pumpkins completely dry (overnight) before moving onto the next step, stacking the pumpkins.
Stacking The Pumpkins
With the largest pumpkin on the bottom, line up the hole cut on the bottom of the second pumpkin and glue the pumpkins together with a hot glue gun. Do the same with the smallest pumpkin.
While you have the hot glue gun plugged in, glue the stems that we painted earlier onto the top pumpkins.
Now that the topiaries are put together, it's time to protect the rusty patina. But whatever you do, DON'T DO WHAT I DID. It had me reduced to tears. 😭
What To Do Differently
Please do not make the same mistake we did! I asked Mr. Frugalista to spray the pumpkins with a couple coats of an outdoor rated protective matte clear spray.
The following morning when I walked into the workshop all those beautiful textured layers of blue, green, and rust were GONE. 😲 DISAPPEARED.😩
Nothing but a dark brown color remained on the pumpkins. 😱 A chemical reaction to the rust activated paint.
What I didn't know is that the larger Modern Masters Rust Kit comes with a bottle of Permacoat Xtreme, a clear coat specifically formulated to not cause a chemical reaction.
I urge you to make sure your kit includes it and I've put a link in the supply list towards the top of the post.
How I Redeemed The Rust Activated Patina
Feeling totally defeated I declared the rust activated pumpkins an epic fail and abandoned the project.
I went back three days later, when I could stomach looking at them again, to take a closer look. While they no longer had that gorgeous textured rusty patina, they did still have a cool and unique I abstract look that was worth redeeming.
Decorating The Stacked Pumpkins
So I set out to put the finishing touches on the pumpkin topiaries with simple natural raffia ribbon. Wrap the raffia around the neck of the middle and bottom pumpkins and dab a little hot glue here and there to hold it in place.
Last but not least, take the stacked pumpkins outsides. Set a generous amount of raffia ribbon on top the soil of two matching flower pots. Slip the wooden dowel through all three pumpkins and then push it deep into the soil.
Now that you know what not to do, unlike mine, enjoy that gorgeous textured rusty iron patina on your unique pumpkin topiaries for fall.
For more pumpkin inspiration you may like these 12 DIY pumpkin ideas that are easy on the wallet. Thanks for stopping by the Interior Frugalista today! I hope you were inspired by this idea for unique abstract pumpkin topiaries for fall.
Almost all of our DIY ideas have step-by-step tutorials so why not get your budget DIY on and subscribe. You can also find us on Pinterest, Facebook, Instagram, and YouTube.
If you have any questions, please leave them in the comment section below or the Contact Me tab at the top to drop me an email. I love hearing from you!
If you enjoyed this rust paint dripped stacked pumpkin idea, I'd be so thankful if you shared it with a friend and pinned it to your Pumpkin Craft Ideas or DIY Fall Decor Ideas board on Pinterest.
I share my projects at these inspiring link parties.









Very fun tutorial, Marie! They look great and I love the setting you placed them in. Perfect!
ReplyDeleteThank you Kim! Funny story about the setting. The intention was to have them flank our front door but at the last minute I decided to take the photos in the backyard. I love how they look in front of our arbor so much that we've decided to keep them there!
DeleteOh no Marie, your heart must have sunk right down into your little toe when that rust disappeared. Thanks so much for keeping it real though and saving me from making the same mistake. The pumpkin topiaries are still very eye catching though.
ReplyDeleteYup, it was definitely down at my toes and my mouth went totally potty! LOL I'm glad you think they still look good, Michelle. I'm slowly embracing the mishap.
DeleteThese look fabulous in front of your arbor. Perfect for fall decor!
ReplyDeleteThank you so much, Paula! The plan was to have them flank our front door but I think they look so pretty flanking the arbor instead surrounded by the beautiful fall foliage.
DeleteBeautifully done Marie! So sorry about the chemical reaction, but I think they’re lovely and unique. Pinned!
ReplyDeleteThank you Debbee, I learning to embrace them without the gorgeous rusty patina. Knowing me, I'll redo them next year WITH the right clear coat. LOL
DeleteThese look amazing Marie! So 'perfectly' FALL! Happy Thanksgiving my friend. XOXO
ReplyDeleteThank you very much, Denise! Another new Fall look for a few years. LOL Happy Thanksgiving to you as well. xo
DeleteSo Cute! I can see myself sitting there and relaxing.
ReplyDeleteThanks, it's a nice little spot for relaxing indeed!
DeleteOh, Marie, I share your disappointment! Something similar happened when I was making my stencilled pumpkins and the paint flaked off! I managed to rescue them though so it wasn't so bad. That green finish was gorgeous but honestly, your pumpkins still look fabulous! I love your tip about the crappy paintbrush, that made me a laugh! Hope you have a great weekend!
ReplyDeleteYes, I remember reading on your blog what happened to your pumpkins and I remember your tip for preventing it from happening. I'm glad you think the pumpkins still look good, I'm slowly embracing the mishap. Wishing you a great weekend too!
DeleteHow cool, Marie! I never even knew things such as rust kits existed! Who would have ever thought we would want to purposely put rust on our decor, but this is SUPER cute!!
ReplyDeleteThanks for sharing it with us at our Embracing Home and Family link up party!
-Cherelle
Right! I remember the days of scrubbing with a wire brush to get rid of rust and now we're painting it on. LOL Glad you like the topiaries, Cherelle!
DeleteMarie these are so original and cool at the same time. I can see them in a home owned by a junker such as ourselves or an industrial type!!
ReplyDeleteHey Mary, nice to see you! xo Right! They are definitely suited for anyone with a modern, rustic, or industrial vibe home. Glad you like them my friend. ♡
Deletei'm with you, Marie - paint is the best decorating tool ever!
ReplyDeletei hadn't seen this product yet, so thank you for not only sharing the fact that it exists but that it works so WELL! really impressive results, and i just love the elegant look of your rusty pumpkin topiaries.
Hi Deb, so glad my pumpkins introduced you to the magic of the metal effects kits. They are so much fun! I've used the oxidized copper one as well and the patina is so pretty. Have fun!
DeleteWishing you a lovely week too, Marilyn, and thanks a bunch for the pin and share. xo
ReplyDeleteThanks for sharing with us at the To Grandma's house we go link party - I'll be featuring you!
ReplyDeleteSweet! Thank you so much Tarahlynn. xo
DeleteThis is such a unique and cool idea!! Thanks for the idea and the tutorial! I'm featuring you this week at Charming Homes & Gardens! ~ Kristin | White Arrows Home
ReplyDeleteGlad you like the rust effects idea, Kristin, and thanks so much for featuring my stacked pumpkins! xo
DeleteWhat a fun DIY Marie! Pinned for next year. Thank you for sharing at Charming Homes and Gardens, where you are featured tomorrow.
ReplyDeleteHi Kim, I'm glad you like them and thanks for the pin!
DeleteThese are amazing, Marie! I can not wait to give this rust painting kit a try!
ReplyDeleteThank you! You will have so much fun with the rust kit. They also have other patinas too like oxidized copper. Have fun!
DeleteI just adore these Marie! Thanks so much for sharing this with us at Farmhouse Friday!
ReplyDeleteThanks Michelle, I'm glad you like them! The dang magpies have decided they need the raffia ribbon more.
DeleteVERY striking!
ReplyDeleteThank you so much Michele!
DeleteMarie,
ReplyDeleteOMG, these are the best pumpkins ever. Love them.
Congratulations, you are being featured on Thursday Favorite Things. https://www.eclecticredbarn.com/2021/09/thursday-favorite-things-party_0230960557.html
Hugs,
Bev
You made my morning with your sweet comment, Bev! Thank you so much for the feature. xo
DeleteI love your rust pumpkin topiaries.
ReplyDeleteHappy Fall,
Kippi
Thank you very much, Kippi, and happy Fall back to you! xo
Delete