Homemade Ramekin Dish Soy Candles For The Holidays
Do you enjoy the ambiance of lighting festive candles during the holidays? Unfortunately, those all-natural festive candles can come with a hefty price tag. If you're like me and looking for a budget-friendly option, then you'll love these homemade ramekin dish soy candles for the holidays.
Easy DIY Ramekin Dish Christmas Candles
Even more cost-effective is how I made replacement candles using the same ramekin dishes as molds! So for the price of one good quality Christmas candle, I was able to make four star-shaped ramekin dish soy candles.
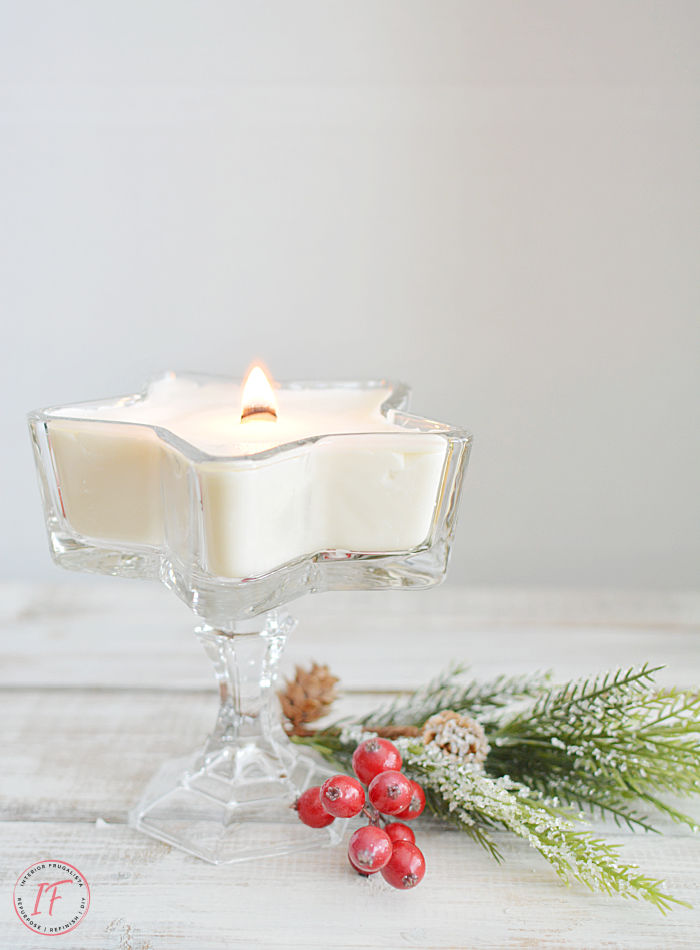
Plus, a large star-shaped soy candle in a DIY glass pedestal base. I'll show you how easy it is to make the glass candle holder with dollar store finds further down in the post.
The candles are made with all-natural soy wax and wood wicks. I have sensitivities to a lot of scents and so I made these candles unscented. However, you could add essential oils to your candles if you'd prefer scented candles.
I love the crackling sound of a wood wick during the holidays and cold winter months. It's like a cozy bonfire in a jar!
This post contains affiliate links so you can see what products I used or recommend for this project. As an Amazon Associate, I earn a small commission from any qualifying purchases at no extra cost to you. Thank you for your support!
Other Ramekin Dish Ideas For Christmas Soy Candles
I found the red star-shaped President's Choice ramekin dishes at our local Canadian Superstore a couple of years ago. I'm not sure if they still carry them but they came in multiple sizes.
Alternatively, I found these cute red ramekins on Amazon. Whatever dishes you decide to use, make sure they are oven safe so they can withstand the heat of the poured wax.
What You'll Need To Make The Soy Candles
Supply List
Oven Safe Ramekin Dishes
Natural Soy Wax (2 lb bag)
Wood Candle Wicks
Candle Making Pitcher (optional)
Saucepan or Electric Frying Pan
How To Make Ramekin Dish Soy Candles
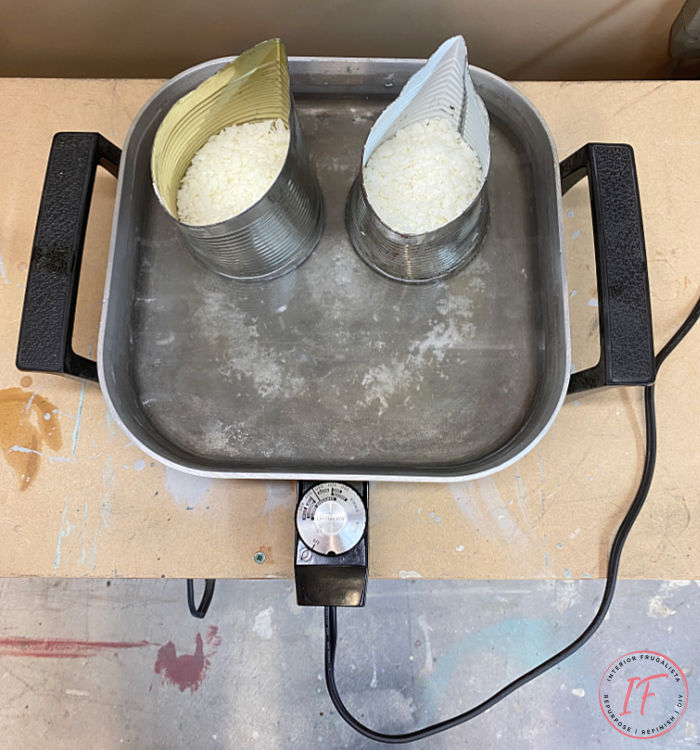
You can use a candle-making pitcher or a makeshift pitcher like I did with a large food can to melt the soy wax. For the latter, pinch the top of the can to form a spout. Keep in mind without a handle, the tin can version can be hot to the touch so you'll also need an oven mitt.
- Fill a large saucepan or an electric frying pan half full with water and bring the water to a boil. I've had this electric frying pan since 1978 and use it just for crafting.
- Turn the heat to simmer and fill each pitcher with 1-pound of soy wax flakes and let them melt.
- Set the wood wicks into the iron stand sustainers that come with the wicks. When the wax starts to melt dip the bottom of the wicks into the melted wax and set in the center of the ramekin dishes.
- Once the wax is melted, if you want to scent your candles, add up to 1 oz of essential oils per pound of wax. If your oil has a strong scent you may want to cut back on the amount of oil.
- Carefully pour the melted wax into the ramekin dishes. Don't be alarmed if the wax looks yellow, it will solidify a white color.
Let the wax cool until solidified (approximately 15-30 minutes depending on the size of the candle) before moving on to the next step. For now, turn the heat off on the stove or electric frying pan.
With the remaining wax, we're going to make extra candle molds with the same dishes. This way when your candles burn all the way down, you'll have replacements to pop into the ramekin dishes.
How To Make Soy Candle Replacement Molds
Pop the solidified ramekin soy candles in the freezer for 15 minutes.
"To remove wax inside candleholders freeze them for 15 minutes and the wax will come flying out like Grandma's teeth when she sneezes!"
Set the empty ramekin dishes aside to warm up to room temperature. In the meantime, bring the water in the saucepan or electric frying pan to a boil again and replenish the water if needed.
Reduce the temperature to a simmer and set the cans of now solidified soy wax back into the water to melt. Repeat the previous steps right up to the freezer point.
You now have extra soy candles! Once the candles have cooled around 24-hours, trim the wood wicks to 1/8-inch high. It's recommended you use a wood wick trimmer rather than scissors for an even cut.
How To Store The Extra Soy Candles
You can store the extra soy candle molds in the freezer protected with freezer bags or plastic wrap until you need them.
Tips For How To Burn Soy Candles With Wood Wicks
- Keep the wood wick trimmed to 1/8-inch high.
- Trim the wick between burns by pinching off the charred part with your fingers.
- For the first burn especially, burn the soy candle until it melts evenly all the way to the outer edges of the candle. This will prevent the wax from tunneling around the wick.
How To Make A Glass Pedestal Candle Holder
It's super easy to make the glass pedestal candle holder. You'll need a thick glass candy dish or bowl that can withstand the heat of the melted candle wax. You'll also need a glass candlestick. I found both at the dollar store.
Wash them with clean soapy water first and dry completely. Wipe the top of the candlestick and the bottom of the candy dish with rubbing alcohol. Once dry glue the candlestick onto the center of the glass dish with E6000 glue. Let the glue cure for a minimum of 48-hours before making soy candles.
Thanks for stopping by the Interior Frugalista today! I hope you were inspired by these homemade Christmas candles.
Almost all of our DIY ideas have step-by-step tutorials so why not get your budget DIY on and subscribe. You can also find us on Pinterest, Facebook, Instagram, and YouTube.
If you have any questions, please leave them in the comment section below or the Contact Me tab at the top to drop me an email. I love hearing from you!
If you enjoyed this homemade ramekin dish soy candle idea, I'd be so thankful if you shared it with a friend and pinned it to your favorite board on Pinterest.
I share my projects at these inspiring link parties.


I love these! I have always wanted to try candle making but haven't done it yet. You make it look so easy! I love the wood wicks too! Pinned!
ReplyDeleteTania
Tania, if I could do it, you certainly can! This was my first attempt at making soy candles and it was really easy. Not sure if scented ones are a little trickier.
DeleteHey, this Grama's teeth don't fly yet lol. Soy candles are ridiculously expensive, and these look really easy to make. Pinning.
ReplyDeleteThey really are, Leanna, I couldn't believe how fast I had them made too. P.S. This grandma's teeth don't fly yet either. LOL
DeleteCreative idea and I absolutely love the one in the glass! 🤗
ReplyDeleteThank you, Denise, that one is definitely the more popular of the two and the one I've been burning most this holiday season.
DeleteHow sweet are these Marie. I love the pedestal too. You crack me up with how you tell a story. Super fun. Happy Sunday. xoxo Kris
ReplyDeleteThe pedestal one is definitely a favorite among readers and in all honesty, the one that gets lit the most. Happy Sunday back to you, Kris. xo xo
DeleteSoy candles are on my list of things to try. I love the idea of using little ramekins to make them in! So easy to find a variety of them about, and fairly inexpensive too.
ReplyDeleteExactly, these cost so little to make. I'm enjoying them so much this holiday season.
DeleteI love this so much! I'm sensitive to scented candles, too!! This is a great option. I've already tagged your Amazon links for order. Thanks for sharing and great directions.
ReplyDeleteThank you so much Susie for the tags. You will have so much fun making them - easy peasy! I'm enjoying lighting all three of these candles every night this holiday season. Have fun making yours!
DeleteLove this! I've been wanting to make my own candles and this is just the tutorial I needed to do so! Pinned!
ReplyDeleteAwesome, Candice, have fun making your candles!
DeleteLove this tutorial Marie! I am pinning this and will make them during the winter months that follow Christmas. I'm always looking for things to make the time pass quickly when we are stuck inside. Especially this year! Thanks so much!
ReplyDeleteSo glad you enjoyed the tutorial, Denise, and have fun making your candles!
DeleteThese are great, Marie! I have a candle making kit with the pot that I enjoy using, but I've never even thought of using ramekin dishes for the holders. Thanks for the idea! Your candles are beautiful.
ReplyDeleteThat's awesome Bev! Nowadays Ramekins come in so many different colors, shapes, and sizes that they are perfect for candle making year round.
DeleteThank you for the pin and share, Marilyn, always appreciated! xo
ReplyDeleteThese are so beautiful. And, your tutorial is excellent. I think I might actually be able to do it with them.
ReplyDeleteThank you, Janet, I'm glad you found the tutorial easy to follow. Have fun making candles!
DeleteThese are so pretty Marie! I pinned it for later, I definitely want to try this one :)
ReplyDeleteThank you Susan, I'm glad you like them and that they inspired you to make some soy candles of your own. Add a few drops of essential oils if you'd like them scented and have fun making your candles!
DeleteI love the cute ramekins and the wood wicks! Just darling Marie and I'm excited to feature your post this week at our Tuesday Turn About Link Party!
ReplyDeleteI'm so glad you like this idea for scent free holiday candles. I'm thrilled you'll be featuring them this week, Michelle! Thank you so much. xo
DeleteThe glass one is my favorite! So simple yet so festive! Pinned this because I am going to make my own candles one of these day! Thanks for sharing1
ReplyDeleteI did the happy dance when I saw the star shaped candy dish at the dollar store and grabbed a glass candlestick while I was at it with the intention of making a festive candy dish. I love it much better as a candleholder. Happy candle making Cindy!
DeleteIs there a different wick cutter for the wooden wicks? I’ve searched for “wood wick cutters” but I only find the regular ones.
ReplyDeleteNot that I'm aware of. The link included in the post are the only ones I could find.
Delete