An $8K Bathroom Reno For Under $4K By Doing It Ourselves
An $8K bathroom reno for under $4K by doing it ourselves. Today I'm finally sharing our DIY small bathroom renovation reveal. I say finally because I've been talking about this reno on Instagram stories and my weekly newsletter since March.
I'll be sharing the remodel steps, reno hiccups, and things we learned along the way. You may want to grab a beverage because this is a long post and I've included a lot of before and after photos.
Small DIY Bathroom Remodel For Under $4K
The only thing original left in our small 40 square foot bathroom is the two people who use it, the sink taps, and the light fixture! I've included a product list and where we found them further down in the post.
Since March 2020 we have been slowly working our way through every room on the main floor of our home. Each got a budget-friendly makeover with a maximum budget of $400 per room. Some came in right on budget and others well below.
We started our 1960s humble abode facelift with the grandkid's guest room. Then we moved to my multi-purpose home office where we built a space-saving floating double desk. Next was the dining room where we reinstalled a board and batten feature wall.
We made a few tweaks in the living room and moved to the front entry where we designed a feature gallery wall with thrift store finds. The last room we finished just before the holidays was our affordable kitchen refresh. Our main floor bathroom is our big splurge and we saved it for last.
It's the most expensive and labor-intensive room and was long overdue. Had we contracted the bathroom remodel it would have cost at least double. So I think it qualifies as a bathroom reno on a budget, considering how much money we saved by doing it ourselves.
DIY Small Bathroom Remodel Before and After
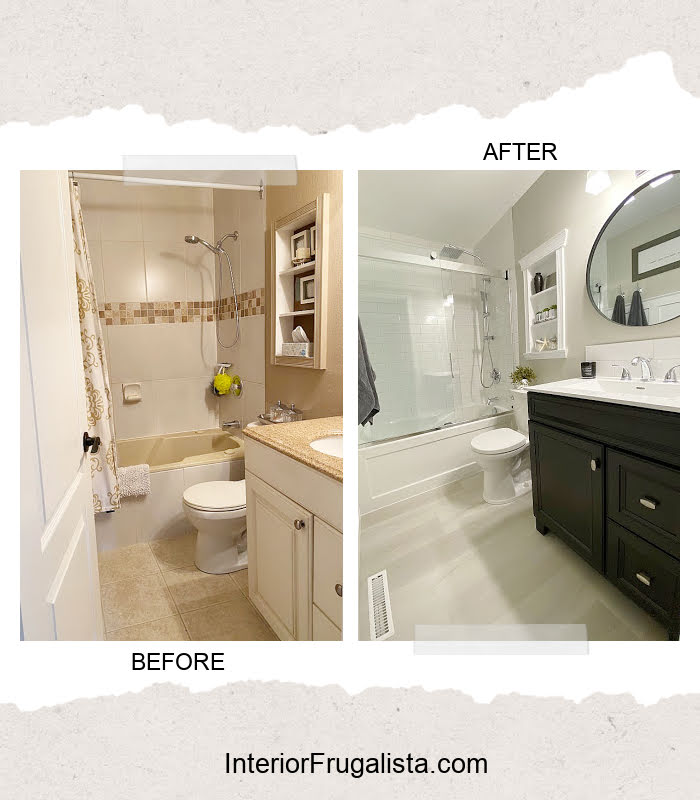
This is what our bathroom looked like before. I waited over twenty long years to have that ugly yellow jet tub outta here! It was stained, most of the jets no longer worked, and the timer switch was on a wall across the bathroom. Then there's the whole bacterial factor, yuck.
This is what our small main floor bathroom looks like after the reno and we couldn't be happier with the results.
Before we get into the nitty-gritty of the room makeover I should mention that we are self-taught DIYers and not trained professionals. This bathroom gut is based on our building knowledge and advice from experts.
Power tools, tiling, and minor plumbing are not new to us as we've completed a few bathroom makeovers over the years.
Almost all of the DIY projects shared here at Interior Frugalista have step-by-step tutorials so why not get your budget DIY on and subscribe. You can also follow us on Pinterest, Facebook, Instagram, and YouTube.
Helpful Checklist For A Full Bathroom Remodel
If you have plans for a bathroom renovation, I've included a checklist and tips below that made this major remodel much easier.
- Spend more time in the planning stage than the actual reno putting together a mood board. I scoured Google images and Pinterest for several months. Create a Pinterest board with your wish list ideas and bookmark searches in your browser.
- Come up with a budget and add a ten percent buffer for any surprises.
- Write a checklist of what things are Must-Haves and bank on some of them eating up more of your budget.
- Write a Wish List of the others and be willing to compromise on those items to stay within budget.
- Measure EVERYTHING and save the measurements in the notes feature on your cell phone. Things like the width of the vanity, the height and depth of the toilet, the square footage of the floor, the square footage of the walls surrounding the tub and/or shower stall, and the length of the tub.
- Spend time browsing retailer websites to look at all the options available for each item on your list. I was shocked and sometimes overwhelmed at how many options are available.
- Shop around. We couldn't believe the difference in price for identical products between retailers.
- Always carry a tape measure when you shop in person and use your phone camera to take pictures of both the products and the price markers.
- Look for the best available features within your price range. For example; when buying a toilet do you want the seat to be self-closing? Do you want a two-piece or one-piece, single or dual flush, slim/elongated/round shape, and what height? All of these considerations affect the price.
- Take serious thought into the height of the bathtub too. We couldn't believe how many different heights bathtubs come in. Our bathroom is a shower/tub combination and it's the only shower on our main floor so it's used daily. We wanted a soaker-style tub so serious consideration had to be taken into the height of the tub for us seasoned folks to safely step over the side.
- Shop months ahead of time. Anticipate having to order some items either yourself or with the retailer. Bank on those items not coming for weeks or in some cases months.
- Save money by buying your items when they are on sale if at all possible. Also, have a place to store them in the meantime. We had a bathtub standing upright in our grandkid's guest room for weeks!
- Check with family and friends for a recommended licensed plumber and electrician and have them scheduled ahead of time should you need them.
- Order a rental dumpster bin for your driveway ahead of time for all the reno debris. Home Depot offers fairly inexpensive 1500 kg capacity waste management bagsters.
DIY Bathroom Renovation Steps
Demo Day
This day could not happen fast enough. I squealed with delight at every swing of the sledgehammer on that ugly bathtub. It looks like an almond color in the photo below but it is actually yellow.
What shoes not to wear on bathroom demo day! This is what Mr. Frugalista considered to be construction boots - DON'T DO THAT.
Minor Plumbing Upgrades
Before the new tub could be installed some plumbing needed to be upgraded to accommodate the Glacier Bay Handheld Shower & Rain Showerhead Kit. We chose this model because it has a hand wand connected to the rain showerhead and both are controlled by one switch.
In order to make that all work, we had to purchase a Delta rough-in plumbing valve for a bath/shower combination from Bartle & Gibson, a local plumbing supplier. We also purchased a Delta Tub & Shower Combo Kit that includes a bath spout, valve, and controls. This particular style has a separate control for temperature.
Tub Installation
Next, we installed the new Mirolin Acrylic Alcove Soaker Tub. It stands 20-inches high and doesn't require any additional framing or insulation. It is light and easy to set in place and is screwed into the wall studs with drywall screws.
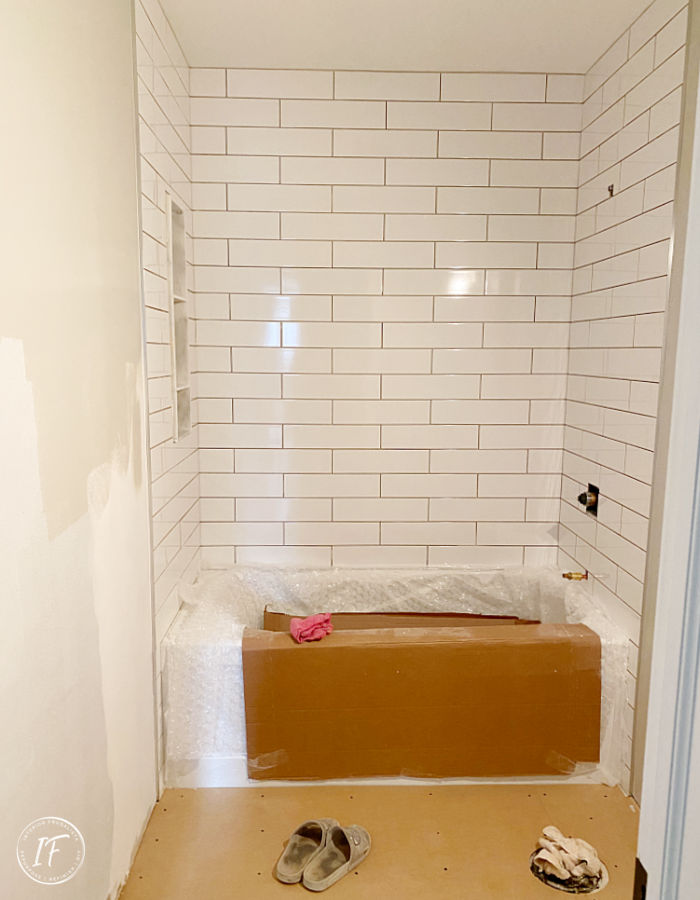
Once the tub was installed then the walls surrounding the shower were covered with 32" x 60" sheets of waterproof DensShield Fiberglass Tile Backer with Backer-On 1 5/8-inch serrated head cement board screws.
As you can see in the photo above, we also framed in a recessed 10" x 30" shower wall niche. New drywall was hung on the adjacent walls as well.
Subway Tile Installation
Because this is such a small bathroom, our goal was to make the room feel light and airy by using simple high gloss reflective finishes. We chose a larger 4" x 16" Enigma Metro Gloss White ceramic subway tile. I love how the glossy white bounces the light and makes the room feel bigger.
We splurged and used a more expensive stain-proof Fusion Pro Single Component Grout. It was so worth the extra money because it dries much quicker, is easier to work with but the best part is that it doesn't require sealing.
We wrapped the shower wall niche in marble tile with two 12-inch openings and one 6-inch opening on the bottom for a soap dish. We used marble instead of the subway tiles both because of the finished edges and to echo the gray color in the room.
At this point, we also painted the walls Behr Toasty Gray (N320-2) and only painted the upper half of the wall on the left (more about that wall later).
Vinyl Plank Flooring
Next up is the gorgeous and easy-to-install Home Decorators waterproof solid core vinyl plank flooring in a Gray Fig color.
Vanity and Toilet Installation
We found the Diamond NOW Goslin 30-inch bathroom vanity at Home Depot. The color is Storm Gray but it looks almost black. We got it on clearance because it was being discontinued.
Unfortunately, it didn't come with a sink and more about that saga further down in the post. Ultimately you want to find a vanity that comes with the sink because as you'll read later, it is not an easy task to purchase them separately.
The high-efficiency 2-piece single flush 12.8 GPF (gallons per flush) American Standard toilet is the Champion model and stands 16 1/2" high with a soft close seat.
Glass Sliding Shower Door Installation
I think this is my favorite feature of the bathroom renovation. I hated how dark the shower felt with a shower curtain plus it chopped up the bathroom, making it appear even smaller. In keeping with a clean and light-filled space, the plan was to install a stationary glass panel on two-thirds of the tub. Until I saw this...
These Kohler Levity Sliding Shower & Bath Doors were a splurge. They have a seamless contemporary design without the bulky trim typical of traditional shower doors. I love the on-trend and innovative barn door style roller system. The glass has a coating that repels water so you don't get water spots. They were worth every single penny!
Bathroom Board Batten Feature Wall
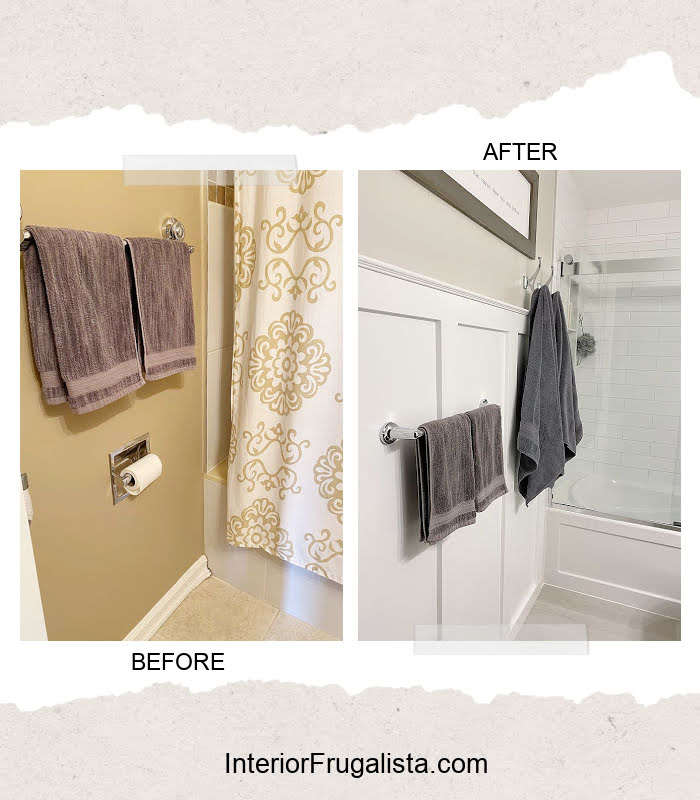
On the longest wall in the bathroom, we installed a board and batten wainscotting feature exactly the same way we did our dining room feature wall.
Bathroom Wall Niche
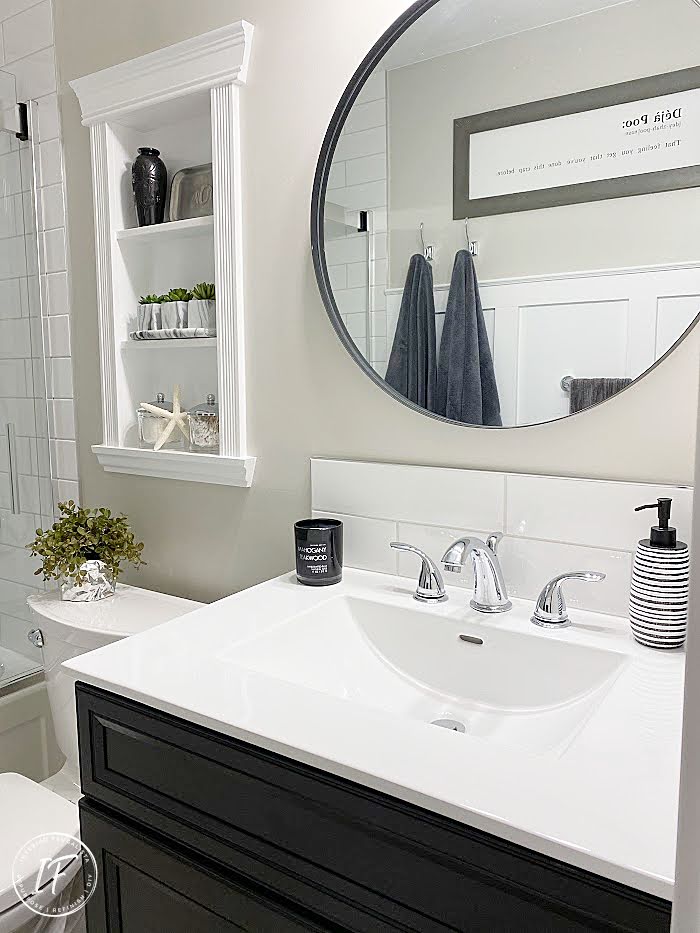
The original wall niche above the toilet used to be a medicine cabinet that we simply removed the doors and painted the inside. I loved having the space-saving recessed shelving for bath essentials and decor and didn't want to give that up.
This time we removed the old unit and built a brand new one with 3/8-inch MDF and dressed it up with crown molding. We kept it clean and simple by painting it white and the decorative trim makes it look so much bigger now.
What Delayed Our Reno Completion Date By Two Months
This is the part of the renovation where we ran into some hiccups and learned the lesson about ordering fixtures far in advance. We both took time off to complete the reno from start to finish in two weeks, starting on March 27th.
We had received all the fixtures before starting the makeover except for the vanity sink. The marble vanity top with a round sink from Home Depot was due to arrive towards the end of the two weeks...or so we thought.
The bathroom was finished on time but without a vanity countertop and sink thanks to shipping delays. It finally arrived on April 23rd but what we found wrapped haphazardly in bubble wrap inside a mirror box was a brown granite countertop.
By this point, they were out of stock of the marble one we originally ordered so back to square one.
Bathroom Vanity Sink Installation
After several days of searching online, we settled for the 31" x 22" Avanity Vitreous China Top With Integrated Rectangular Bowl and ordered it through Home Depot. With fingers crossed it FINALLY arrived on May 8th and at long last, we finished the bathroom remodel.
Other than being almost two months behind schedule, the vanity top saga ended up being a blessing in disguise. We love the clean white porcelain and large rectangular sink much more!
I've included a product list below so you can see at a glance what we used for our small bathroom renovation. Please note that the links, for the most part, are from Canadian retailer websites and the prices are in Canadian dollars.
Product List
- Mirolin Acrylic Alcove Soaker Bathtub (Model #PS6031L/R) - Lowes $374
- DensShield Fiberglass Tile Backer - Home Depot
- Backer-On 1 5/8-inch serrated head cement board screws - Home Depot
- Kohler Sliding Shower & Bath Doors (Model 1381418-2-C) - Lowes $460
- Glacier Bay Handheld Shower and Rain Showerhead Kit (Model HD58101-5101) - Home Depot $145
- Delta Rough In Valve - Bartle & Gibson Edmonton $60
- Delta Tub & Shower Combo Kit - Bartle & Gibson Edmonton $200
- American Standard Champion Toilet - Home Depot $270
- Diamond NOW Goslin 30" Storm Gray Bathroom Vanity - Home Depot $250
- Avanity Vitreous China Top With Integrated Rectangular Bowl (Model CUT31WT) - Home Depot $345
- Enigma Metro Gloss White 4" x 16" Ceramic Subway Tiles - Home Depot $30 (11 sq ft per box)
- Marble 1' x 2' sheets - Home Depot $14 each
- Fusion Pro Single Component Grout - Home Depot $65
- Home Decorators Solid Core Vinyl Plank Flooring Gray Fig (Model S03917) Home Depot $68 (25 sq ft per case)
- Behr Semi-Gloss Premium Plus Paint & Primer In One Interior Paint Pure White
- Behr Eggshell Premium Plus Paint & Primer In One Interior Paint Toasty Gray (N320-2)
- Marius Round 27.6-inch Black Wall Mirror (Model 329-19-1060) - JYSK $69.99
Thanks for stopping by the Interior Frugalista today! I hope you were inspired by our DIY bathroom remodel before and after. If you have any questions, please leave them in the comment section below or the Contact Me tab at the top to drop me an email. I love hearing from you!
If you enjoyed this DIY bathroom remodel, I'd be so thankful if you shared it with a friend and pinned it to your DIY Bathroom Ideas or Small Bathroom Makeovers board on Pinterest.

I share my projects at these inspiring link parties.


You did a beautiful job with the remolding renovation of your bathroom! I love the color theme, the flooring and the vanity. I hope you enjoy your new bathroom Marie.
ReplyDeleteThank you very much, Julie! A lot of hard work but we are thrilled with our bright and airy new bathroom.
DeleteMarie. I am blown away. It's just perfect. We remodeled our bathroom on our own two summers ago, so I know how much work it was. You must be exhausted and overjoyed. It's stunning! Enjoy!!
ReplyDeleteThank you very much, Kim! We are thrilled with the results and even more thrilled to FINALLY have the reno finished. After using the basement bathroom for two months we are so glad to finally have our main floor bathroom back.
DeleteWow, Marie! The transformation is remarkable! What a gorgeous job you did--I love it! xo
ReplyDeleteThank you so much, Kristi! It was a lot of work for a couple of old farts but we got it done and couldn't be happier with the results. LOL
DeleteGirrrrrlll...I'm headed north for a day of pampering in your new spa! That is an amazing makeover on an incredible budget. Yay for DIY!! Enjoy, Marie.
ReplyDeleteYay for DIY indeed! Had we hired out for this project we wouldn't have been able to chose some of these higher end features. I'm thrilled with the spa look of our new bathroom and proud that us "seasoned folks" were able to accomplish this task.
DeleteSuperbe renovation Marie. Kudos to both
ReplyDeleteThank you very much, Christine!
DeleteIt’s a stunning makeover Marie! So fresh and modern looking and I can’t believe you did it on such a tight budget! Bravo my friend! 😍
ReplyDeleteThank you so much, Denise! The last bathroom reno we did we were much younger and boy did we feel it this time, it nearly did us in. LOL We couldn't be happier with the results so it was worth every ache and pain.
DeleteOh Marie how beautiful your end results are. I know you are not professionals but you really should be with all you tackled. It seems there are always going to be hiccups and unforeseen things no matter what you remodel. It is just fabulous. Congrats to you to have such a beautiful new bathroom. What a savings too. xoxo Kris
ReplyDeleteThank you very much, Kris, we are thrilled with our new bathroom. I'm amazed at how going all white and light gray made the room feel so much bigger.
DeleteAbsolutely beautiful! I have a bathroom that looks exactly like your before pictures. I'm so inspired by you! Thank you for sharing!
ReplyDeleteThank you so much for your sweet comment! I'm thrilled that you found inspiration in our bathroom reno.
DeleteA lot of work but well worth it! Huge difference! I’ve wanted a niche like that behind the toilet for a long time but my H is too intimidated by the wall! Me, I’d cut that thing out in a heartbeat! Lol Beautifully done Marie! I know you and the hubby did a lot of work on this and I know too that it’s not an easy task to take on.
ReplyDeleteIt sure was a lot of work and an ambitious task to take on for us "seasoned folk" but the aches and pains were so well worth the outcome. As long as you open the wall between the studs (a stud finder is your friend), you're good to go for that wall niche.
DeleteIt's just gorgeous. I know you're proud of it!!
ReplyDeleteThank you, Luana, we sure are!
DeleteYou did a fantastic job! All of the finishes are great. I'm glad you went with shower doors over a curtain. It looks so clean and modern.
ReplyDeleteThanks Lizzy, I'm glad you like the clean modern look! Removing the shower curtain was on my Must Happen list. We love our new sliding shower doors!
DeleteWow Marie, that looks so great! I love how light and airy everything feels now!
ReplyDeleteTania
Thank you, Tania! I'm thrilled with how light and airy the bathroom is now and how much bigger the room feels now too.
DeleteBeautiful, I love it. Great job!!
ReplyDeleteThank you so much, Terri, we couldn't be happier with the results!
DeleteMarie, this looks fabulous! You two did an amazing job with the reno. It definitely looks professionally done.
ReplyDeleteYou made my day that you think it looks professionally done, Bev, thank you so much!
DeleteWOW!! What an amazing renovation. Love it from top to bottom and impressed to the max with your DIY skills. It looks like you rolled in the pros. Super congrats on a great makeover. Enjoy Enjoy Enjoy!! XOXO
ReplyDeleteThank you so much, Susie, that means a lot coming from the ORC Room Makeover Queen! Especially your comment about looking like we rolled in the pros. We really felt our age on this one. LOL So worth the aches and pains - we love our new bathroom.
DeleteThat is a stunning transformation!
ReplyDeleteThank you very much, Joanne!
DeleteYour bathroom looks gorgeous, Marie! Question... how did you decide which way to lay the flooring? I'm getting ready to lay my vinyl in the bathroom, and not sure which way would look best.
ReplyDeleteThank you Julie, I'm glad you like it! We chose to lay the vinyl plank flooring in the bathroom horizontally for a seamless transition between it and the hardwood flooring in our hallway so they would interlock with each other.
DeleteMarie, I think your bathroom is just stunning!! I adore the white tile & countertop, the contrasting color of the vanity, and your floors are fantastic!!! I LOVE my LVT I put in my new house - all over! You'll love how easy it is to take care of. I know you had to wait due to shipping issues, wrong product when you got it, but, (& this is easy for me to say lol) it was well worth the wait!
ReplyDeleteThank you so much! Good to hear you find the vanity easy to take care of. It definitely was a blessing in disguise that we ended up with this model in the end. We are very pleased with our final choice.
DeleteWow, I am so jealous Marie. Your bathroom before looked quite nice, but the makeover is stunning. I love all the modern finishes, its so bright and fresh. Spectacular work girl. Tell Mr. Frugalista he needs to be cloned. lol Congrats.
ReplyDeleteThanks Leanna! Ha ha ha, Mr. Frugalista and I wished we were about ten years younger when doing this project. But all the aches and pains were worth it in the end. We love our new bathroom!
DeleteWOW!!!!!! What a huge difference. I'd be camping in that bathroom day in and day out. It looks like a luxury spa. It's beautiful, Marie. But I have to ask..... when did the world change and decide to offer so many different versions of a toilet and can you test them out before buying :D
ReplyDeleteMichelle, every time I have a shower or relaxing bath, I have to pinch myself because I can hardly believe it is our bathroom. Oh my gosh, the toilet was just one fixture with a gazillion options; picking a tub was even more overwhelming. And those were hanging way on a top rack at the stores so customers like me wouldn't lay inside to test them out. LOL
DeleteStunning makeover. You did a great job on this project. I have two bathrooms with old blue fixtures that are on my future renovations list as well. Enjoy it! #HomeMattersParty
ReplyDeleteThank you Donna, we sure are enjoying our new bathroom. Sometimes I have to pinch myself because I can't believe we have such a nice spa like bathroom in our home after all these years.
DeleteBeautiful job Marie! Really love that floor!!!
ReplyDeleteThank you so much, Anne! We are so glad we went with the vinyl plank rather than ceramic tiles like we had originally planned on doing. They even feel just like real wood plank flooring!
DeleteSoo happy I happened upon this post! Our *only* bathroom is the exact same layout and I've been planning an update for a while now. Do you know the measurements of your room? I think it may be a bit longer than ours based on the dimensions of the items used, but sooo close. It's beautiful and exactly what I've been looking for! Thank you :)
ReplyDeleteI'm so glad you found inspiration from our small bathroom reno. Our bathroom measurement is roughly 5' x 8'. Wishing you the best with your bathroom renovations!
DeleteWhat a lovely serene bathroom. Regarding the toilet did you choose a round or elongated bowl & do you have a picture of your light fixture.
ReplyDeleteThank you 🙂 We didn't go with an elongated toilet because it would stick out too far into the small bathroom. The light fixture is visible in some of the photos above. We purchased it at Home Depot if that helps.
DeleteLovely & serene bathroom. Did you choose a round or elongated toilet bowl & do you have a photo of the mirror?
ReplyDeleteThank you! No we didn't go with an elongated toilet bowl because of the footprint of this small bathroom. The mirror is visible in some of the photos above. It is a very popular style with a metal frame and can be found online and at most retailers. We found ours at JYSK, a Canadian retailer. I hope this helps!
Delete