Dollhouse Kitchen Appliances From Recycled Materials
How to make dollhouse miniature kitchen appliances from recycled and repurposed materials.
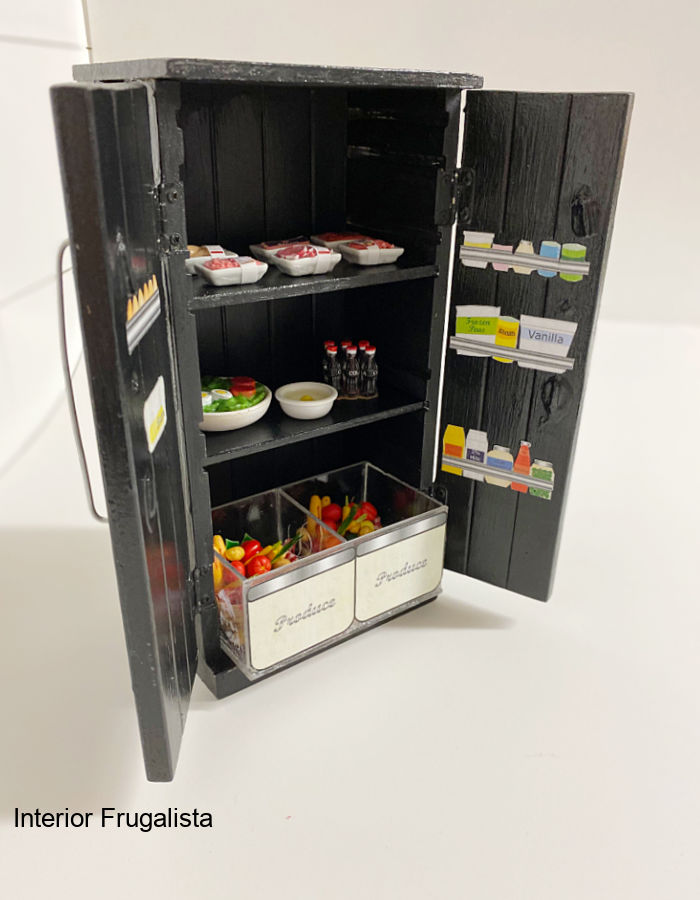
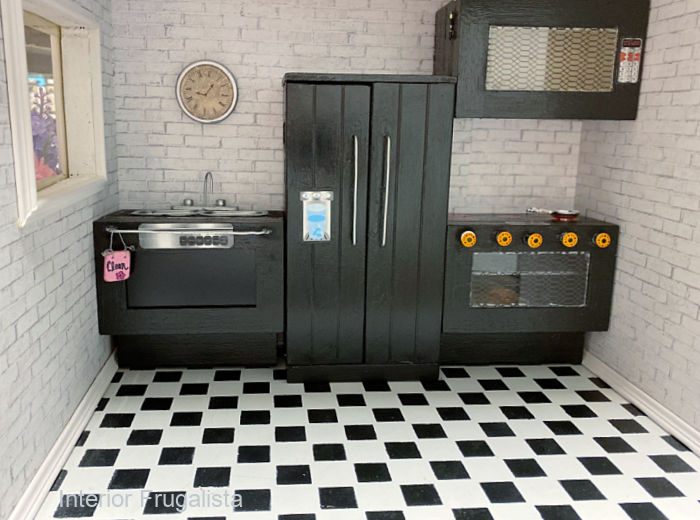
I am having way too much fun with our fixer-upper dollhouse! Today I'm sharing how to turn a figurine display shelf into a dollhouse refrigerator plus how to repurpose small hinged wooden trinket boxes into dollhouse kitchen appliances.
Repurposed Dollhouse Miniature Kitchen Appliances
If you are new to our dollhouse series, we have been working on a dollhouse to gift our granddaughter. Everything about this dollhouse is either recycled, repurposed, or handmade. Even the dollhouse is a secondhand IKEA Billy bookcase that has been repurposed.
I should point out we're not going for perfectly scaled miniature replicas here. Our dollhouse is about finding creative recycled and repurposed materials for all the fixtures and furnishings.
There is so much inspiration in the challenge of looking at EVERYTHING through the lens of dollhouse miniature potential. Plus it feels good knowing that we're ultimately saving materials from ending up in the landfill.
Last month I shared how a metal bathroom soap dispenser caddy was turned into a rustic industrial dollhouse coffee table. The previous month I shared how to make a plaster dollhouse fireplace with a realistic flickering flame.
You may want to grab a favorite beverage because there are a lot of photos. I've broken each appliance into its own separate category, each with a step-by-step tutorial. We'll begin with the dollhouse refrigerator.
This post contains affiliate links so you can see what products I used or recommend for this project. As an Amazon Associate, I earn a small commission from qualifying purchases at no extra cost to you.
How To Make A Dollhouse Refrigerator
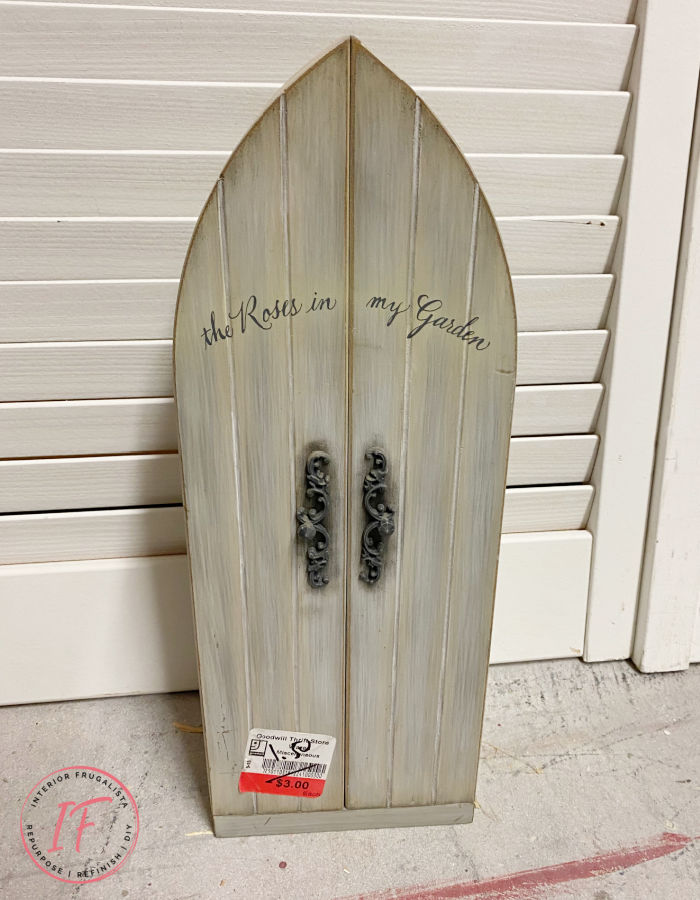
For the dollhouse fridge, I'm repurposing a Willow Tree The Roses In My Garden figurine display shelf from Goodwill. It may look familiar because last year I turned it into a spooktacular Halloween diorama.
When I turned it into the skeleton diorama I had full intentions of repurposing it again after Halloween into this dollhouse refrigerator.
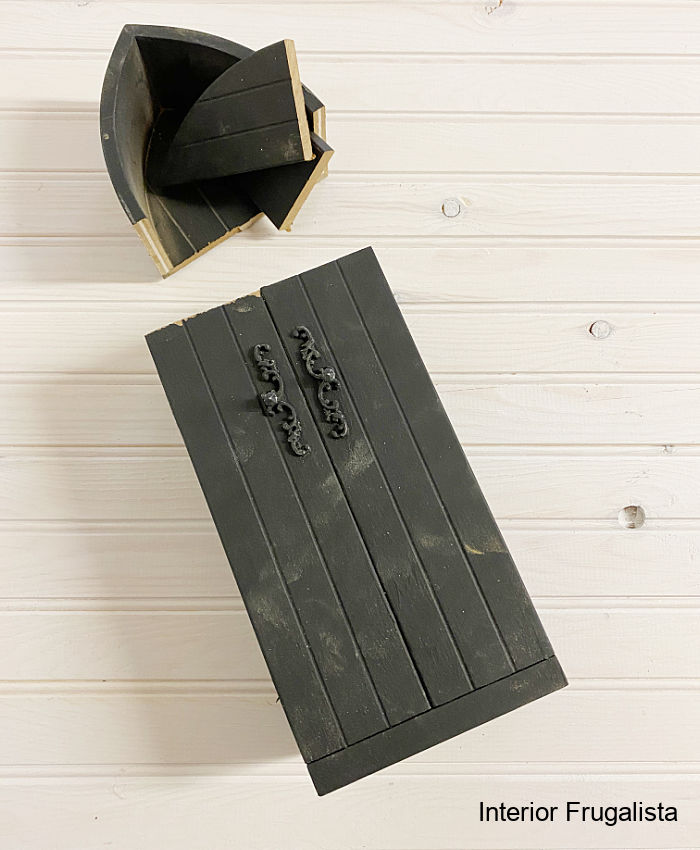
But first, the arched top needed to be walloped off. I put the cut piece and the handles aside for future project potential because nothing goes to waste around here.
Mr. Frugalista removed the top with a table saw but it would have been easier (and safer) using a band saw, but we don't have one of those.😢
A new top was made with a piece of scrap hardboard cut with a utility knife and a straight edge. Then it was attached to the top of the fridge with wood glue and a small bar clamp.
The top is painted the same Raven black color from FAT Paint Company. Once dry, the interior and exterior of the fridge are protected with two coats of gloss water-based clear coat.
Dollhouse Fridge Handle
To make a handle for the dollhouse fridge we used 14 gauge galvanized wire. The wire is bent to shape with pliers and a bench vice. Bending the wire with blocks of wood and dowels also works well to shape wire.
Pilot holes are drilled through the front of each door with a 1/16-inch drill bit and the wire is thread through and bent onto the back of the doors.
What We'd Do Differently
In hindsight, there really is no need to bend the wire onto the back of the fridge doors. A much cleaner look is to cut the wire to fit just inside the predrilled holes. Add a dab of Gorilla Super Glue Gel inside the hole to secure the wire instead.
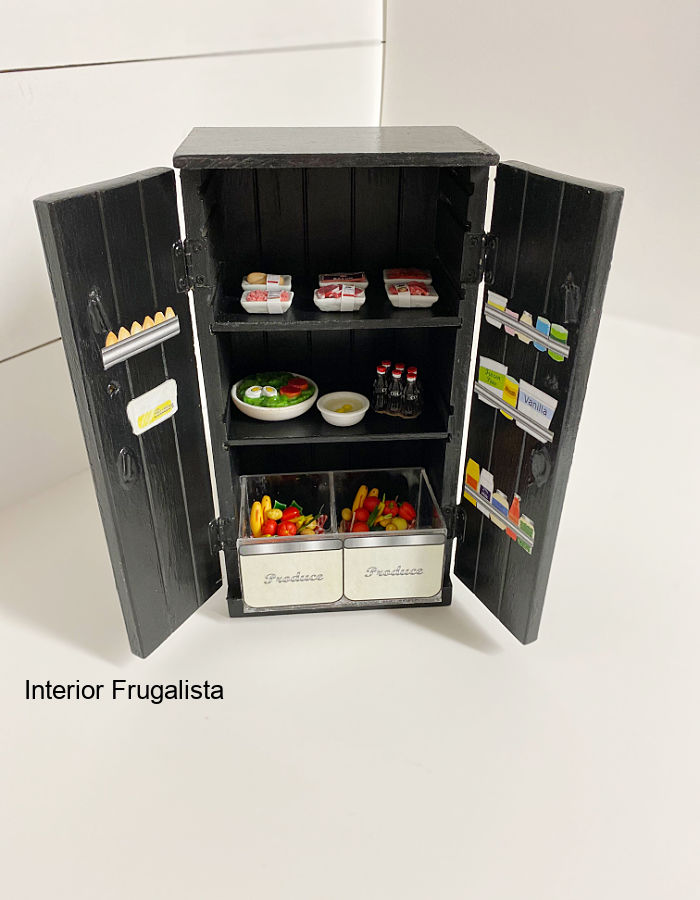
Plexi-Glass Dollhouse Fridge Crisper
For the bottom of the fridge, we made a crisper with 1/8-inch plexiglass. All the pieces are carefully cut with a utility knife and a straight edge. We found out later that there is a plexiglass cutter tool that has been added to our must-have list.
Crisper Plexiglass Cut Dimensions
You'll need six pieces of plexiglass (like pictured above) to make a crisper.
- The bottom piece is cut slightly shorter than the depth and width of the fridge interior.
- Cut a front and back piece the same length as the bottom piece.
- Cut three smaller pieces for the sides and center divider slightly shorter than the width of the bottom piece. As these pieces will fit in between the front and back pieces.
- As for the height of all six pieces, we used a crisper decal (more about that later) as our gauge.
Our miniature crisper isn't perfect because we discovered gluing plexiglass can be challenging. Let's just say a few fingers were glued together in the making of this crisper!
Glue Recommendation For Plexiglass
You'll want to use strong, fasting setting clear glue with a precision tip. I tried three different types of glue before settling for Gorilla Super Glue Gel. You'll notice I use this glue often for all the dollhouse appliances.
First I tried using a hot glue gun and it instantly held the pieces together but it didn't produce enough strong bond. Then I tried using E6000 glue but it wasn't fast setting and without a precision nozzle, the glue easily smeared on the plexiglass.
Dollhouse Fridge Decals
I found a fantastic digital download of play kitchen decals on Etsy. They are meant for a child's play kitchen but I had no problem reducing the print ratio for dollhouse appliances. They are printed with a color laser printer on regular bond paper.
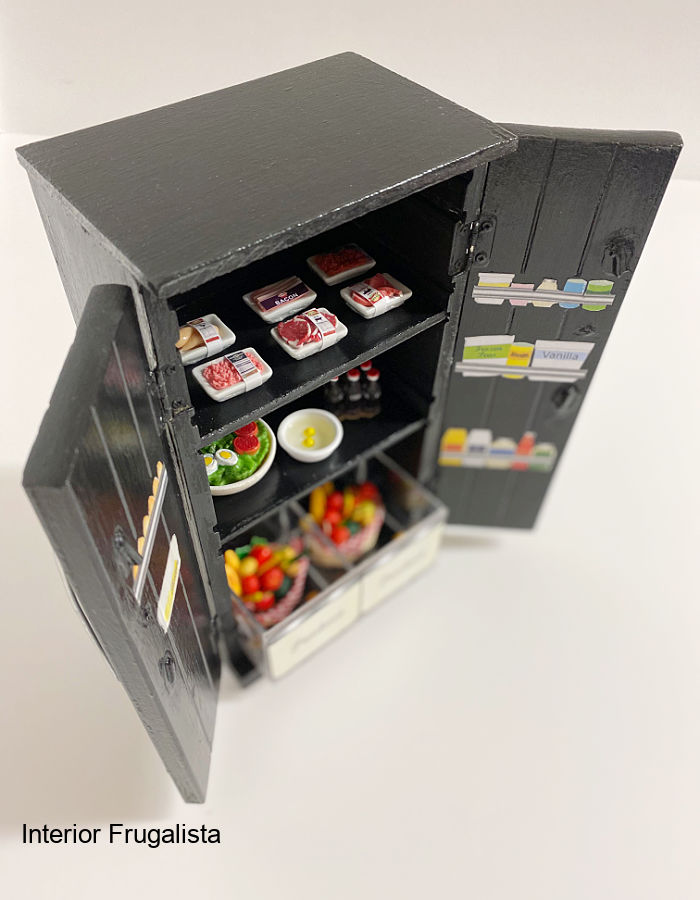
After carefully cutting the decals, Gloss Mod Podge is used to decoupage the water dispenser to the front of the fridge. I did the same with the interior door storage rack decals and the front of the plexiglass crisper doors.
How adorable are the realistic miniature packages of meat and miniature vegetables from Etsy?
Repurposed Materials For Dollhouse Appliances
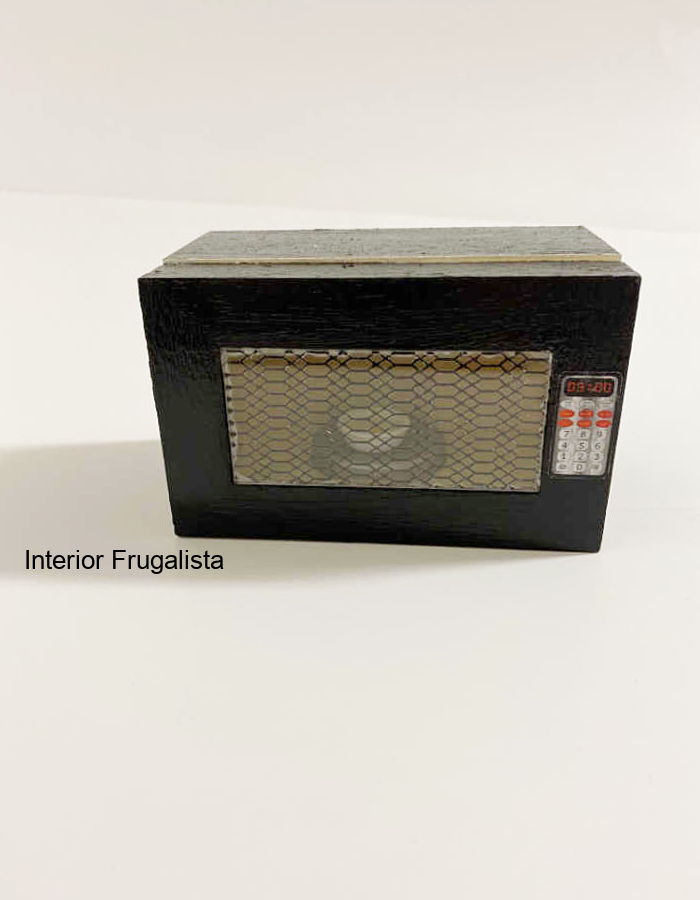
The dollhouse range, dishwasher, and microwave are made with small repurposed hinged 5.3" x 3.3" x 2.8" wooden trinket boxes.
Paint Finishes For Dollhouse Appliances
The exterior of all three repurposed wooden trinket box dollhouse appliances is painted the same Raven black color as the dollhouse refrigerator. They are also protected with two coats of a gloss acrylic clear coat.
The interior of the dollhouse appliances is painted in different colors.
- On the left in the photo below, the inside of the range is painted with a base coat of raven black.
- The inside of the microwave pictured in the middle is painted with two coats of Buttercream from Dixie Belle Paint Company that I had on hand.
- The inside of the dishwasher on the right is painted with a base coat of a medium gray custom color that I had on hand.
Another layer of silver metallic paint is added to the interior of the dollhouse range and dishwasher only.
- To resemble stainless steel, the inside of the dollhouse dishwasher pictured below on the left is painted with a thin coat of silver so the gray underneath is still showing.
- To resemble porcelain enamel, the inside of the dollhouse oven is painted with a dry-brushed layer of silver.
- To do this offload most of the paint by dabbing the brush on a paper towel. With little pressure on the brush, paint with random brush strokes so more of the black paint underneath still peeks through the silver paint.
Dollhouse Appliance Hinged Doors
The hinged lids on all three wooden boxes are positioned so they become the appliance doors. For the dollhouse range and dishwasher only, situate the lids on their side so they are facing towards you with the hinges on the bottom.
Now we'll address the issue of the height of the wooden trinket boxes.
Dollhouse Appliance Kick Plates
The small trinket boxes are too short to be used as dollhouse appliances BUT that is easily rectified by adding kick plates to the dishwasher and range only.
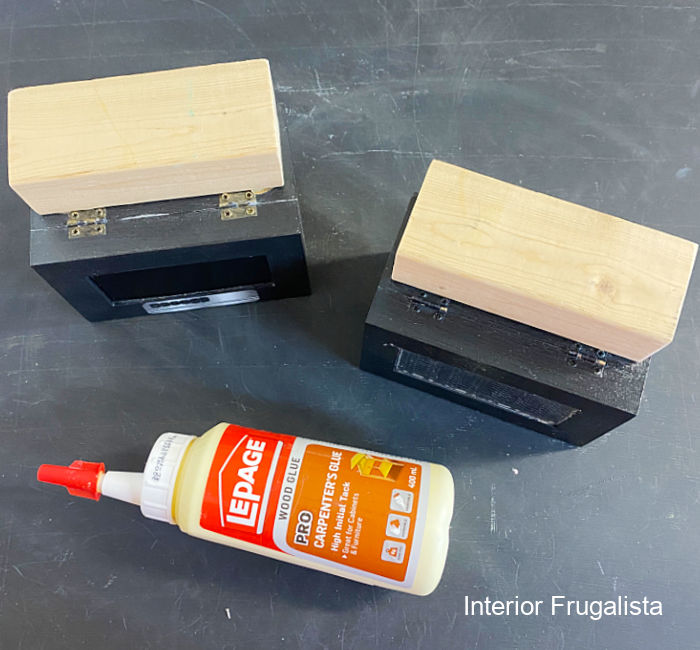
- To do that we trimmed one inch off a piece of 1" x 3" lumber on the table saw. If you're wondering why we didn't just use a piece of 1" x 2" lumber it's because it isn't a true 2-inches.
- Situate the kick plate blocks on the bottom of the wooden boxes behind the hinged doors.
- Attach the wood kick plate blocks with wood glue, bar clamps, and let the glue cure overnight.
Now that the interior and exterior of the appliances are painted and kick plates installed, let's get to the nitty-gritty of how each appliance is made.
How To Make A Dollhouse Range From Recycled Materials
We'll begin with the dollhouse range from repurposed hinged trinket boxes.
Dollhouse Oven Door
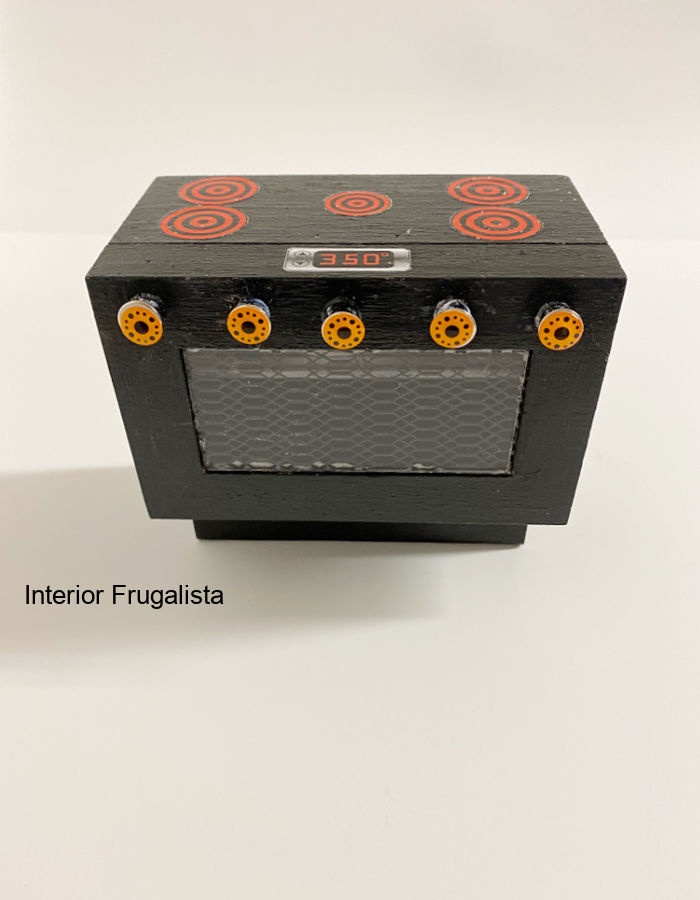
For the dollhouse oven door, the mesh on the opening is left in place to resemble an oven door grid.
A piece of plexiglass leftover from the dollhouse fridge crisper is cut to size with a utility knife and straight edge to fit the opening. It's glued onto the exterior side of the oven door with Gorilla Super Glue Gel.
Dollhouse Oven Rack
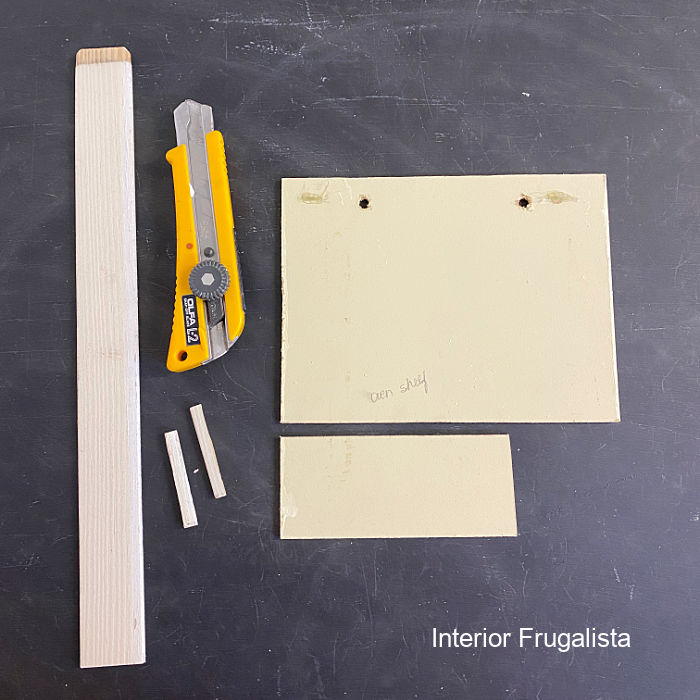
The oven rack is made with a piece of salvaged hardboard and cut with a utility knife and straight edge the width and depth of the oven interior.
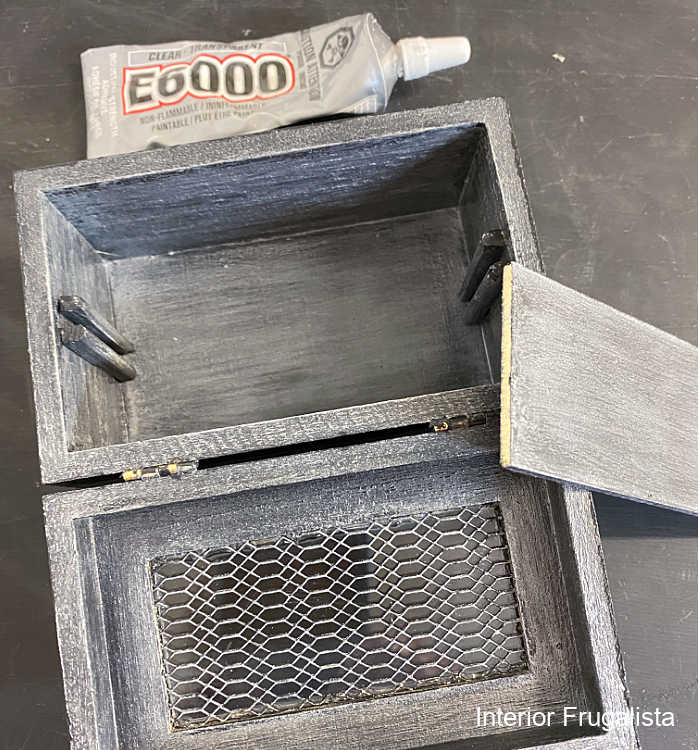
Four oven rack supports are made from a salvaged louvered door slat cut the depth of the oven with a utility knife (pictured above).
Next, measure the center of the oven and mark it with a pencil on both sides. Glue the oven rack supports on either side of the pencil mark with E6000 glue. Use the oven rack as a guide for spacing them properly and to ensure the oven rack sits level.
Remove the oven rack and wait about ten minutes for the glue to set before painting the rack supports with a small artist brush. This is a good time to paint the oven rack as well.
DIY Dollhouse Stove Burners
Included with the digital play kitchen decals (see dollhouse fridge for a link) are electric range burners, a digital temperature gauge, and an oven rack printable.
Like the fridge decals, I printed them with a color laser printer on regular bond paper. After they are cut use Gloss Mod Podge to decoupage them onto the top of the range and on the top of the wood oven rack.
DIY Dollhouse Stove Knobs
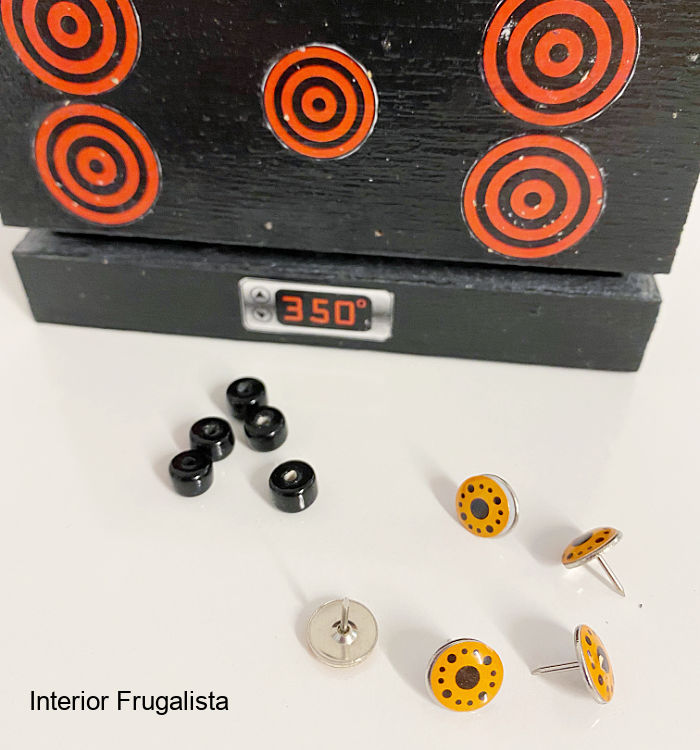
For the dollhouse stove knobs, they are made with dollar store thumbtacks and black pony beads. The polka dot pattern on the thumbtacks resembles a dial and the orange color adds a fun element to the dollhouse range.
To make the knobs glue a thumbtack onto a pony bead with Gorilla Super Glue Gel. Glue the opposite side of the pony beads across the front of the oven door.
To hold the oven door closed, I glued small round magnets that I had on hand to the inside of the oven door.
How cute is this dollhouse stove!
How to Make A Dollhouse Dishwasher From Recycled Materials
We'll begin the dollhouse dishwasher with the door.
Dollhouse Dishwasher Door
Unlike the dollhouse range, the mesh on the hinged lid is removed and replaced with a piece of painted aluminum leftover from the engraved sunflower wall decor. You could also use a piece of thin balsa wood to cover the opening.
DIY Dollhouse Dishwasher Handle
Just like the dollhouse fridge, the dishwasher handle is made with 14 gauge galvanized wire. Pilot holes are drilled through the front of the dishwasher door with a 1/16-inch drill bit.
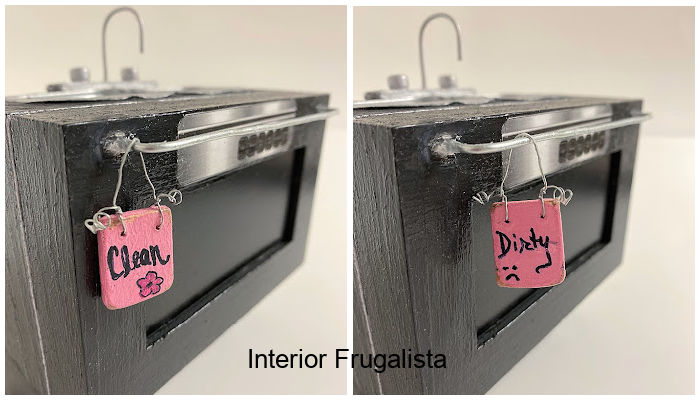
A dab of Gorilla Super Glue Gel is placed in the hole and the wire handle is set in place. But before the wire handle is set in place, I slipped an adorable miniature clean/dirty dishwasher sign on the handle.
DIY Miniature Dishwasher Sign
Making a miniature clean/dirty dishwasher sign is so quick and easy.
- Cut a small piece of balsa wood and paint it pink.
- Carefully poke two holes on the top with a thumbtack.
- Feed craft wire through the holes for the hanger and twist them closed.
- Distress the edges of the sign with an emery board nail file.
- With fine point Sharpie markers, freehand the clean and dirty typography onto the front and back of the sign. Easy peasy!
DIY Dollhouse Dishwasher Rack
I considered using square grid chicken wire to make realistic-looking racks for the dishwasher. Because little hands will be playing with this dollhouse kitchen, I opted to make a wooden rack instead. It's made exactly the same way as the dollhouse oven rack (see dollhouse range section).
DIY Dollhouse Double Sink
Unlike realistic dishwashers, this one has a double sink on the top. Two plastic mustard sauce containers from McDonald's are recycled to make the double sink basins. They would make great dollhouse plastic totes too!
First, they are glued together with superglue and then painted on the right side only with silver metallic spray paint.
Once dry, the bottom of the plastic containers is traced with a pencil onto the top of the dishwasher. Drill holes inside the pencil marks on the corners with a 3/8-inch drill bit like pictured below. Ignore the Forstner bit hole in the center, it was a test.
With a Dremel tool and a cutting disc, carefully cut the sink opening on the inside of the pencil mark. Cleaned up the rough cut with a sanding disc until the opening is large enough for the sink basins (like pictured below).
Run a bead of Gorilla Super Glue Gel around the underside lip of the plastic containers and set the dollhouse sink in the opening. While the glue is curing, let's move on to making a kitchen faucet.
DIY Dollhouse Kitchen Faucet
The kitchen faucet is made with the same 14 gauge galvanized wire used to make the oven and dishwasher door handles.
- Cut a small piece of wood about three inches long.
- Mark the center and poke a hole through it with an Awl for the faucet.
- Bend the wire around a wooden dowel and trim it to size with wire cutters.
- Put a dab of superglue inside the hole and set the faucet in place.
- Glue two pony beads (the same beads used for the stove knobs) an inch on either side of the faucet liked pictured below.
- Trim the base and round the edges with an emery board nail file.
- Once the glue is cured, paint the kitchen faucet with silver metallic spray paint.
- Attach the faucet with Gorilla Super Glue Gel behind the kitchen sink.
DIY Dollhouse Dishwasher Control Panel
Like the dollhouse fridge and range decals, I printed the dishwasher control panel with a color laser printer on regular bond paper.
Then I used Gloss Mod Podge to decoupage the decal onto the front of the dishwasher door. I also printed the oven rack decal for the top of the wooden dishwasher rack.
To hold the dishwasher door closed, I glued small round magnets that I had on hand to the inside of the dishwasher door.
How cute is this dollhouse dishwasher with a double sink!
How To Make A Dollhouse Microwave From Recycled Materials
The dollhouse microwave is the easiest of the four appliances to make.
DIY Dollhouse Microwave Door
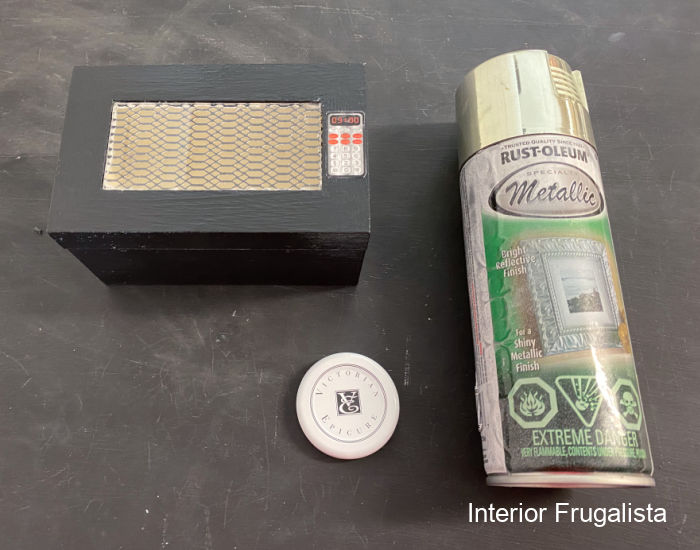
First, the hinges on the wooden trinket box lid need to be moved to the left side of the lid. Like the dollhouse range, the mesh on the lid is kept and a piece of plexiglass is glued to the front side of the microwave door with Gorilla Super Glue Gel.
DIY Dollhouse Microwave Turntable
Next, the lid of an Epicure spice jar is recycled for the microwave turntable. It is painted with silver metallic spray paint on the top side only. Once dry, attach it to the inside of the microwave with superglue.
DIY Dollhouse Microwave Control Panel
Like the dollhouse fridge, range, and dishwasher, I printed the microwave control panel with a color laser printer on regular bond paper. Then I used Gloss Mod Podge to decoupage the decal to the front of the microwave door.
To hold the microwave door closed, I glued small round magnets that I had on hand to the inside of the microwave door.
How cute is this dollhouse microwave!
Note: the microwave is attached to the dollhouse kitchen wall with 3M velcro strips so it can easily be taken down for whatever reason without damaging the wallpaper.
I can't wait to see the look on our grandkid's faces when they see the new appliances. My grandson has been telling me for over a year how Barbie needs a kitchen.
Next, I'll add floating shelves, a working roman shade window treatment, and lighting to the kitchen. My hope is to have the dollhouse finished and under my granddaughter's tree on Christmas morning 2022.
Thanks for stopping by the Interior Frugalista today! I hope you were inspired by these handmade dollhouse miniature appliances.
Almost all of our DIY ideas have step-by-step tutorials so why not get your budget DIY on and subscribe. You can also find us on Pinterest, Facebook, Instagram, and YouTube.
If you have any questions, please leave them in the comment section below or the Contact Me tab at the top to drop me an email. I love hearing from you!
If you enjoyed these dollhouse appliances from recycled materials, I'd be so thankful if you shared it with a friend and pinned it to your handmade miniatures or dollhouse ideas board on Pinterest.
I share my projects at these inspiring link parties.













Hi, Marie...I think you have officially fallen down the rabbit hole...LOL. So cute, mini's are so much fun and easier on the body than working on bigger pieces---and they don't take up nearly as much room, LOL. Hugs, and keep on--yes those little boxes, I always have a stash of for multiple projects!
ReplyDeleteYes, the miniatures sure are easier on the body than the big pieces. Although building this miniature kitchen took the same amount of time as it did painting all the cabinets in my big kitchen. LOL My granddaughter went crazy over the kitchen when she saw it yesterday. "Grandma, you made this?"
DeleteAwwwwwwwwwwww, I love it, Marie. Those crisper drawers are the best and I can only imagine how fiddly it was to glue the pieces together :D Everything is just so perfect. Please take a video when your grand daughter gets to play with all the little creations. Oh and I bet your hubby has a whole new appreciation for why we loved playing with doll's houses as kids ;-)
ReplyDeleteThank you Michelle, it means a lot coming from you, the amazing miniature creation artist! I am kicking myself for not taking a video of my three year old granddaughter when she saw the new kitchen. She was so excited and kept saying "Grandma, you made this?" Then she went to every person in the room and said, "come see, Grandma painted it for me!" So adorable!
DeleteI can't believe this Marie... everything is SO adorable and SO detailed! Your grandkids are the luckiest kids ever to have such a creator in the family.💙 Hugs from Toronto
ReplyDeleteAw thank you Denise! My granddaughter was so excited when she saw her new dollhouse kitchen. She kept coming to me and saying "you made this for me!" I think I'm having way more fun with her dollhouse. LOL Hugs backatcha from Edmonton. xo
DeleteMarie!!!
ReplyDeleteLOVE this!! Great job!! I admire women who can use tools more than women who can cook!!! I need to share this!!!
Hugs,
Deb
Your sweet comments made my day Debbie! I'm glad you like the dollhouse kitchen and thrilled that you want to share it. Thank you so much! In all honesty, my shop apron gets worn far more often than my kitchen one. LOL Hugs right backatcha. xo
DeleteMarie, I'm so impressed. My daughter and I are oohing and ahhing over your creations. Amazing, my friend, totally amazing.
ReplyDeleteAw shucks you're making me blush. Thank you, thank you, thank you to both you and your daughter! I'm happy to report that my granddaughter loves her new dollhouse kitchen. Whew
DeleteThis is amazing Marie! I'm so mesmerized by the dishwasher; probably because I can't get Hubs to use it lol!
ReplyDeleteLOL Thanks Sara, it was such fun making this dollhouse kitchen for my granddaughter. Now I've moved onto building furniture for the living room.
DeleteYou must have the patience of a saint, Marie! I can't imagine creating such tiny replicas and with so many details. It looks like a dream dollhouse. Your granddaughter is one lucky girl! All my best, Suzanne.
ReplyDeleteThank you very much, Suzanne! I can't believe I created these tiny replicas either considering patience is definitely not one of my virtues. LOL But I had that adorable granddaughter of mine to provide the motivation.
DeleteOh my sweetness!! You have rocked it and then some. I have a special place for minis in my heart. ❤
ReplyDeleteThank you so much, Larissa! I have a special place in my heart for miniatures too whether they are handmade or touring miniature exhibits. But I'm having way too much fun with our granddaughter's dollhouse. tee hee
DeleteYou are just so creative with this doll house. Not sure I could envision these boxes to a kitchen. But you knocked it out of the park!
ReplyDeleteCarla from Kansas
Hi Carla, thank you very much! It's been such fun repurposing materials for our granddaughter's dollhouse. Next up is building a living room sofa and armchair. Yikes and finger's crossed.
DeleteWow! I am going to go back and read every post on this series. My granddaughter is just 5 months old but I have already been thinking about making a doll house for her - but the kits are just so expensive. This is a brilliant idea. Thanks so much for sharing the inspiration and linking up this week. #HomeMattersParty
ReplyDeleteThank you so much for featuring the dollhouse kitchen this week, I really appreciate it! I'm thrilled you're finding inspiration with our dollhouse to make one for your granddaughter. It's been so rewarding finding creative ways to make it amazing on a low budget. Have fun!
Delete