Upcycled Birdhouse Scandi-Style Christmas Houses
Sometimes you find inspiration when you least expect it. With Christmas being only ten days away, my focus has been on how to decorate our dining room table. I have a plaid table runner and an evergreen garland that match the one draped on our chandelier but I needed elements to add to the centerpiece.
My vision was to incorporate those adorable galvanized houses that I've been seeing all over Pinterest. But having left it to the last minute, there wasn't a galvanized house to be had anywhere. But I did manage to find a red metal house at Walmart, the very last on the shelf. But I wanted two more.
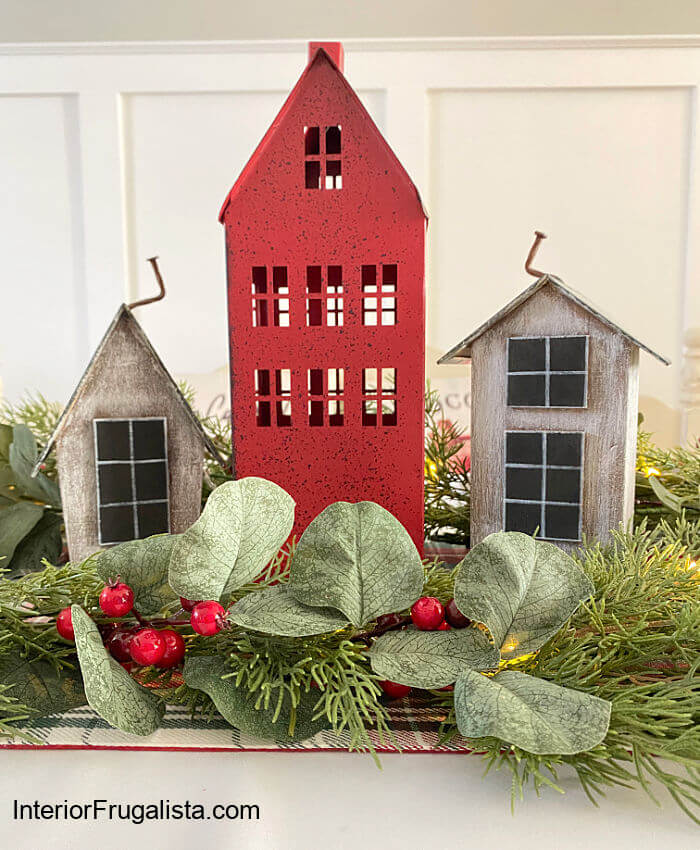
Feeling defeated my next stop was the dollar store and on a shelf were just two wooden birdhouses with tin roofs. Inspiration struck and home they came with me where I upcycled the dollar store birdhouses into rustic Scandi-style Christmas houses for my centerpiece.
5-Minute Christmas Centerpiece With Scandi Houses
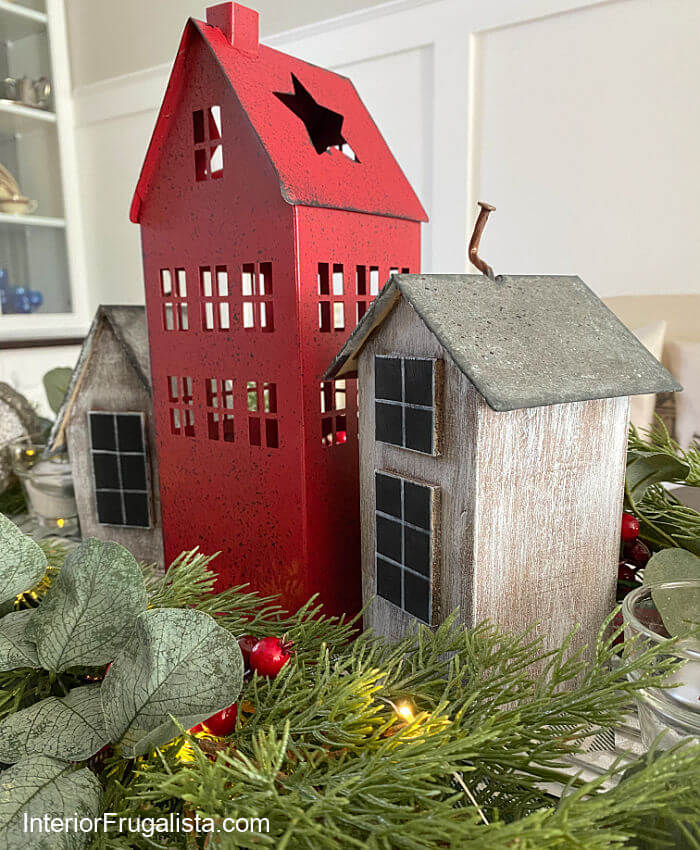
They may not be tin like I had hoped but the roofs are now sporting an aged galvanized patina that pairs perfectly with the red metal house. I can't wait to show you how easy it was, plus how to transform the birdhouses into rustic Christmas houses with Scandinavian style.
I'm also sharing how to create an easy five-minute Christmas centerpiece that incorporates the little house trio along with simple festive candles and mercury glass ornaments. Oh, and I'm also sharing how to rust nails and shape them into adorable crooked chimneys for the houses too, so let's get started.
What You'll Need To Make It
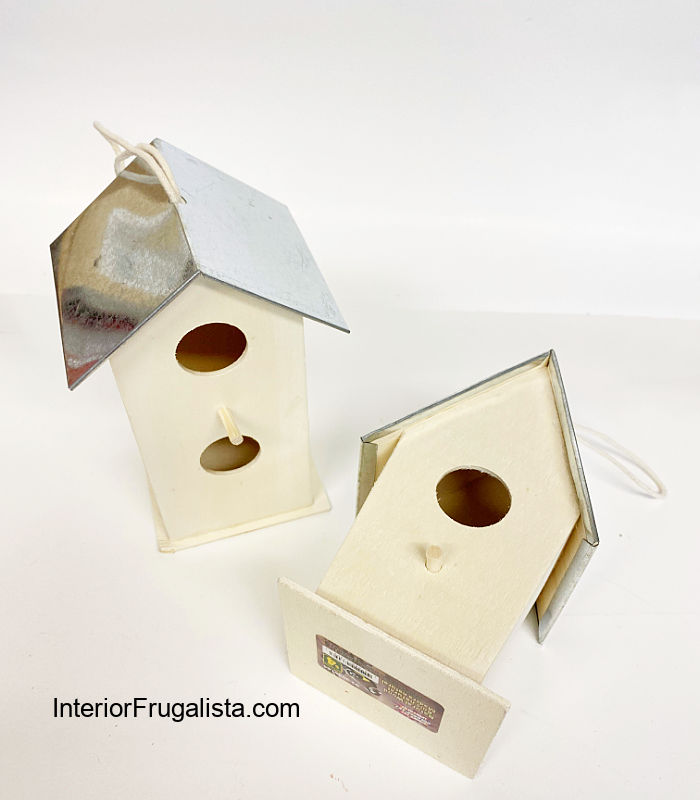
Pictured below are the unfinished wooden birdhouses with tin roofs that I found for $4 each at the dollar store. It was my lucky day because like I mentioned earlier, they only had two left. They are the perfect size for the Christmas table centerpiece.
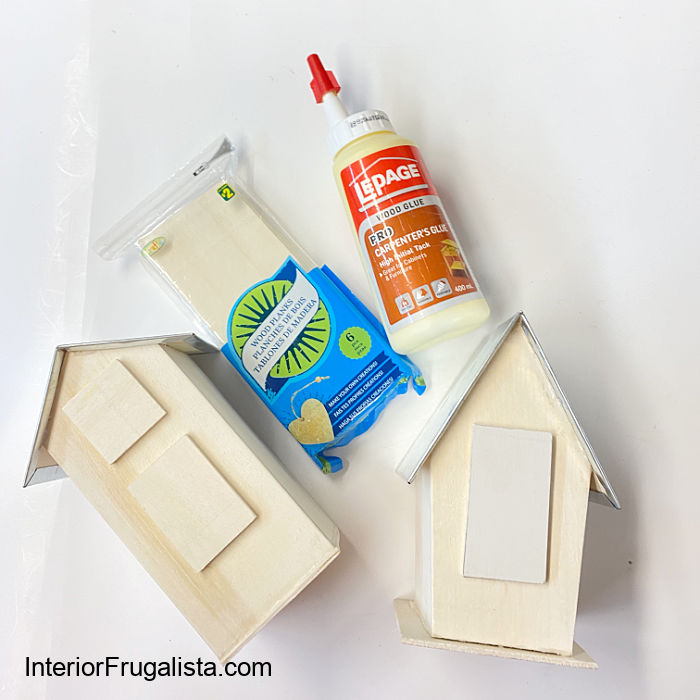
Inexpensive birdhouses they may be but not for long. These are the supplies I used to transform them into adorable rustic Scandinavian Christmas houses.
This post contains affiliate links so you can see what products I used or recommend for this project. As an Amazon Associate, I earn a small commission from any qualifying purchases at no extra cost to you. Thank you for your support!
Supply List
Wooden Birdhouses (dollar store)
Balsa Wood
Retractable Utility Knife
Straight Edge
Wood Glue
Black and White Craft Paint
White Oil Sharpie Marker
Brown Gel Stain
White Vinegar
Lint-Free Rags
Nails (chimney)
Here's How I Made It
I wanted the houses on our dining table to look similar to the scrap wood Scandinavian Christmas village I made last year that is displayed in our front entry.
Cover Birdhouse Holes With Balsa Wood
The first order of business is to make the birdhouses look less like a birdhouse and more like wooden Scandi Christmas houses. First, remove the birdhouse hanger cording. We'll deal with the gaping holes in the roof further down.
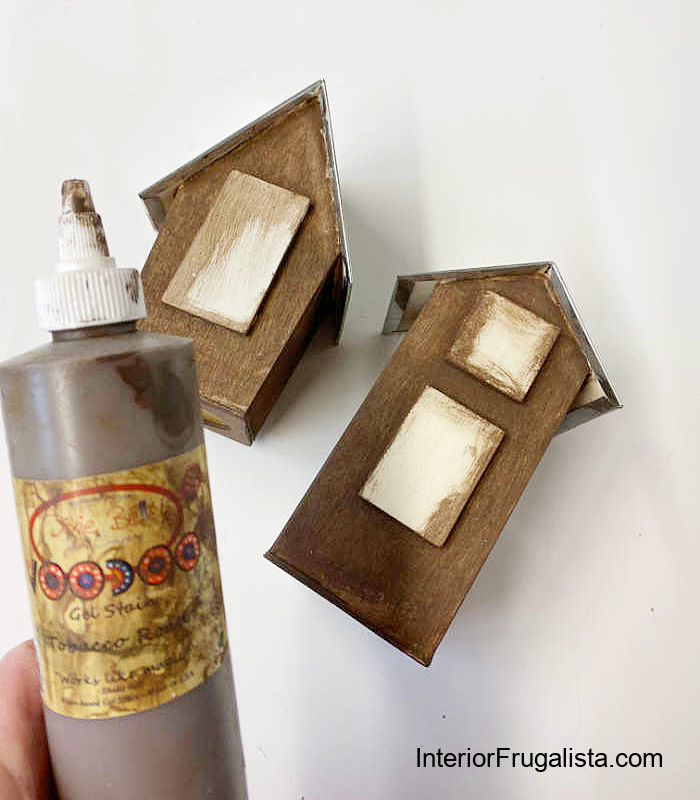
Next, we'll need to cover the birdhouse holes and turn them into paned windows. Cut pieces of thin balsa wood (also purchased at the dollar store) with a straight edge and retractable craft knife. Glue them onto the birdhouse with wood carpenter's glue, like pictured below.
If you look at the birdhouse on the left in the photo above, you'll see that I trimmed the base flush with the sides. This also makes the house look less like a birdhouse and I did the same to the other birdhouse as well.
Stain Birdhouses Brown
Once the glue cures, stain the birdhouses brown or paint them with brown acrylic craft paint. I stained mine with a tobacco road gel stain that I had on hand.
Drybrush Birdhouses White
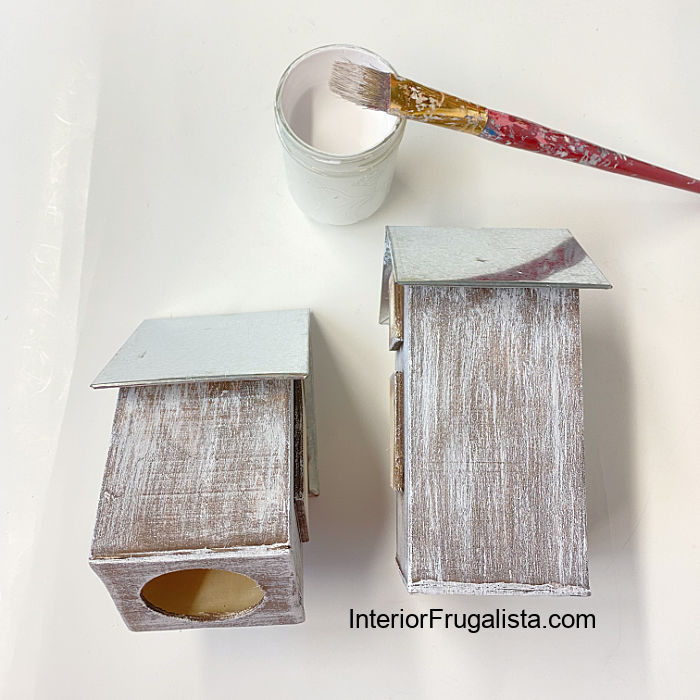
Once the stain is dry (mere minutes if you use water-based stain or paint), we'll add rustic charm to the small wooden houses. To do this dry brush a layer of white acrylic craft paint over the stain.
Dip the paintbrush in the paint and dab it onto a paper towel. The goal is to have very little paint left on the brush - hence the term dry brush. With light pressure, swipe the brush vertically with long brush strokes so the brown stain underneath is still showing underneath.
Ignore the hole on the bottom of the house in the photo above. For a fleeting moment, I thought I could illuminate the houses by drilling a hole in the bottom for battery-operated tealights and drilling small holes in the window panes for the light to cast through. Let's just say it was a fail.
Paint Balsa Wood Windows
Paint the balsa wood windows with black acrylic craft paint. Once the paint is dry, use a ruler and a white oil Sharpie pen to draw the window panes.
You'll notice the panes look slightly larger on the finished wood houses compared to the photo below. I changed my mind and decided to go with larger window panes instead.
How To Galvanize Shiny Tin Roof
The tin on the roof of the birdhouses is too shiny for my liking. As you'll see further down in the post, I've incorporated galvanized elements into my dining room holiday decor. So I set out to give the tin roofs an aged galvanized patina.
To galvanize the shiny tin, I saturated paper towels with white vinegar and set them on top of each roof.
Pro-Tip
What I quickly learned is that the pattern on the paper towels will imprint on the tin during the aging process. I switched the paper towels for saturated shop towels instead and that worked much better.
Leave the saturated towels on the tin for several hours. Check it after about four hours or so. If it still doesn't have the galvanized patina you'd like and the rags are dry, saturate them again with white vinegar.
Wait for another two to four hours or leave them overnight. Mine took approximately five hours without re-saturating the rags.
While I was at it, I also set a couple of nails inside a saturated paper towel so they would rust. They'll be used as crooked chimneys on the houses later.
To make the galvanized roofs look even more authentic, dip an old toothbrush in black acrylic craft paint and flick paint splatters randomly with your fingers. You may want to cover the walls of the birdhouse first...or not.
Next, with a small paintbrush lightly dab more black paint along the edges and roof peaks.
Crooked Chimneys
While waiting for the black paint to dry, place a rusty nail in a vice and bend it with a hammer to look like a crooked chimney. Gently tap the chimneys inside the holes where the birdhouse hangers were on the rooftops.
Mine look a little too long for the scale of the houses so I may play with the shape a little more so I can tap them deeper into the roof to shorten them.
No one will ever know that the cute little wooden Scandi houses were once dollar-store birdhouses! Now they are ready to be incorporated into my simple five-minute Christmas centerpiece.
Easy 5-Minute Christmas Centerpiece Idea
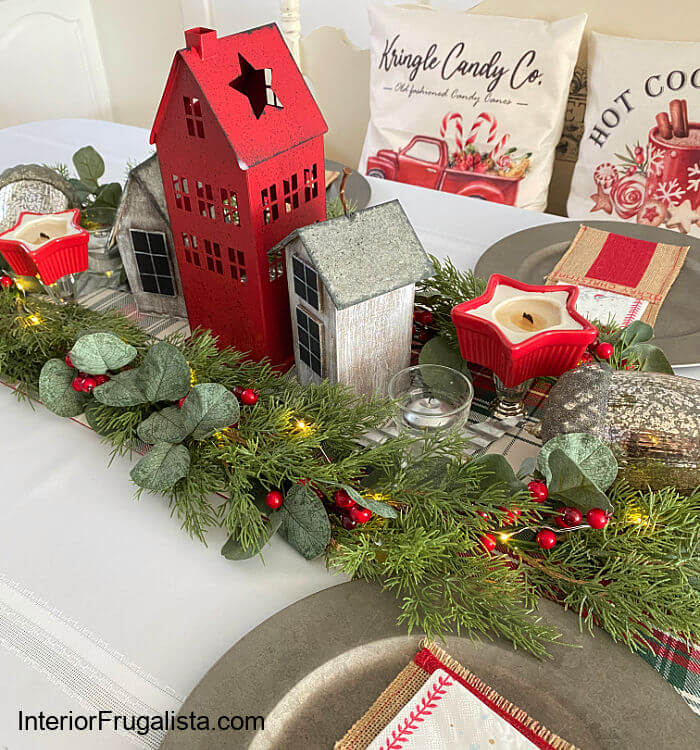
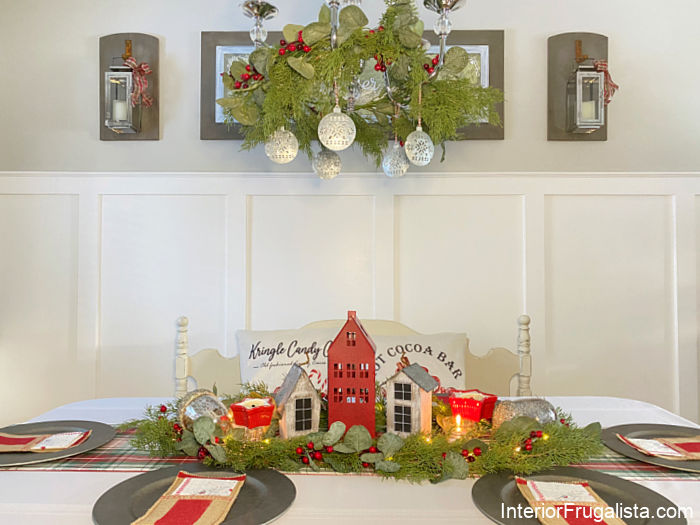
These are the elements I used to create the easy five-minute Christmas centerpiece for our dining room table.
- Starting with a simple white tablecloth that we had on hand.
- Next, I added a green and red plaid table runner (link to alternative on Amazon) from Real Canadian Superstore to the center of the table.
- I set an evergreen garland from Canadian Tire that matches the one on the dining room light fixture to the center of the table runner. It's so pretty and has sprigs of evergreen, eucalyptus leaves, and red berries.
- I added a strand of warm white fairy lights on a timer to the garland as well.
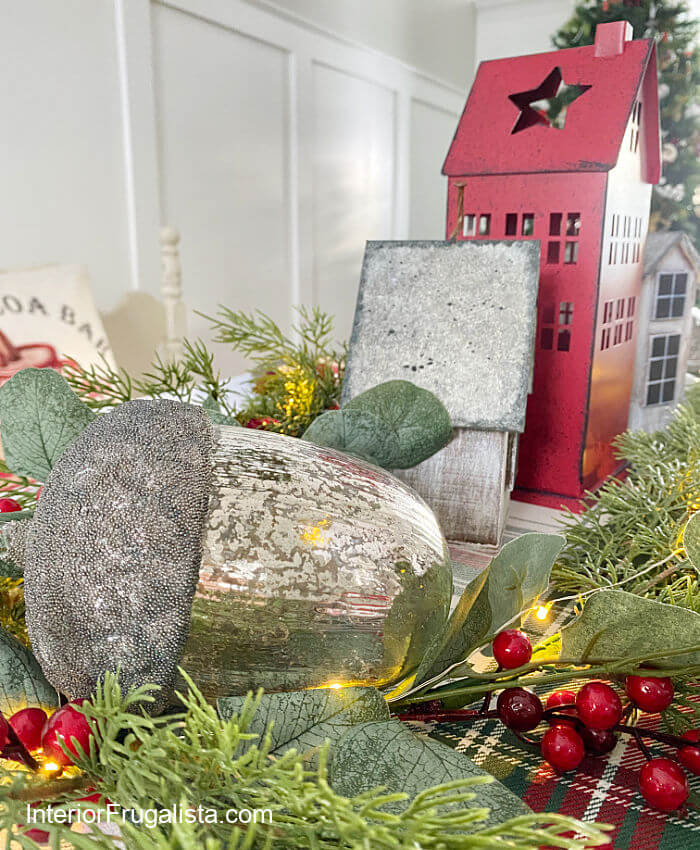
- I set the tallest element being the red galvanized house from Walmart in the center. Here's a link to a grey galvanized house alternative on Amazon should you prefer that color instead.
- I set a battery-operated votive candle inside and also tucked the battery pack for the garland fairy lights inside the galvanized house as well.
- On each end of the garland, I added large mercury glass acorn decorations (link to alternatives on Amazon) that I found at Greenland Garden Center, a local greenhouse, to reflect the light and add sparkle.
- I randomly placed small galvanized stars that I found at Dollar Tree for glass votive candleholders to sit on.
- I filled the glass votives 1/3 full with eucalyptus Epsom salts from the dollar store to resemble snow and set silver votive candles on top.
- I also incorporated the ramekin dish soy candles that I made last year into the mix for an added pop of red and candlelight ambiance.
For Christmas dinner, I'll be adding galvanized charger plates at each place setting along with these festive flatware pouches.
Thanks for stopping by the Interior Frugalista today! I hope you were inspired both by the upcycled dollar store Scandi houses and the five-minute Christmas centerpiece idea.
Almost all of our DIY ideas have step-by-step tutorials so why not get your budget DIY on and subscribe. You can also find us on Pinterest, Facebook, Instagram, and YouTube.
If you have any questions, please leave them in the comment section below or the Contact Me tab at the top to drop me an email. I love hearing from you!
If you enjoyed this dining room centerpiece idea, I'd be so thankful if you shared it with a friend and pinned it to your favorite board on Pinterest.
Now that the house is decorated, it's time to get busy baking Swedish Pepparkakor cookies, melt in your mouth walnut strudel cookies, and a few mini cranberry eggnog loaves.
Merry Christmas!
I share my projects at these inspiring link parties.






Oh my gosh, those are cute! I love the crooked nail chimney!!
ReplyDeleteThank you Tania, Dollarama and Walmart for the win! I'm so glad I was able to have the scandi houses I had envisioned for our centerpiece at the last minute. Wishing you and yours a Merry Christmas! xo
DeleteFirst of all, WOW! Love the way they turned out and paired with that red house...well, you know. Second, love that get stain. I just tried it and I adore it. I think I have all the supplies to try this one...and I just may! Merry Christmas!
ReplyDeleteThank you so much, Kim! I'm thrilled I was able to get the little Scandi houses I had envisioned for our Christmas centerpiece in the end. That's what I get for waiting until the last minute to decorate our dining room table for the holidays. Merry Christmas to you as well! xo
DeleteWow, Marie! I came right over after seeing the quick video of putting your lovely Sandi houses centerpiece together on FB! You are one amazing, creative lady! Now if you would only tell us how you made your awesome video! It was so cool!
ReplyDeleteAwe, you are so sweet, Gail, thank you, I'm glad you like it! I used a template in PicMonkey for each photo of the centerpiece progression and uploaded them into Lumen5 to turn it into a short mp4 video.
DeleteOk... as always I'm just sitting here amazed by you! These are adorable and just a great tutorial. But what amazes me are the ideas you come up with! I could look at those birdhouses all day long and they would still just be birdhouses. You've made them into the cutest little Scandi village! Merry Christmas to you Marie and thanks so much for the inspiration you bring us all year long! Pinned!
ReplyDeleteOh my goodness, you are so sweet Denise, and sure know how to make a gal's day! Thank you so much. Wishing you a joy filled Christmas. xo
DeleteDollar store birdhouses, huh? Well... ok then! Putting this one on the list because these are so stinkin' adorable! Those little crooked chimneys sure did it for me too.
ReplyDeleteThank you so very much for featuring them Donna! I hope you can find the same birdhouses at your local Dollarama store.
DeleteWhat a creative idea! I love it! And I love the whole tablescape too!
ReplyDeleteThank you so much Amy - Merry Christmas!
DeleteI would never have guessed what those little house were before you got hold of them Marie. So flippin' cute with their wonky chimney. And I love the whole centerpiece too. It's got the Christmas vibe without being over the top.
ReplyDeleteYay, I'm glad to hear my birdhouse disguise worked! I'm glad you like the centerpiece too. Our dining room is on the small side so keeping things simple makes the room look less like it threw up Christmas. LOL Happy Holidays Michelle!
DeleteYour houses are absolutely adorable Marie! I'm going to have to look for those birdhouses at the dollar store. I'd love to make a few of those.
ReplyDeleteThank you Tuula, I found them at Dollarama. Happy Holidays!
DeleteThanks for sharing with us every week, I'm featuring you when the next To Grandma's house we go party starts! Happy Holidays!!
ReplyDeleteThank you so very much for the many features in 2021, it is appreciated. Wishing you a fun filled Christmas, Tarahlynn. Happy Holidays!!
DeleteI just adore mini houses and Scandinavian style too. Perfect upcyle!
ReplyDeleteThanks Larissa, it's so pretty lit up at night too.
DeleteI love your houses, especially dry brush effect and the way you have changed metal roofs! Final effect is amazing!
ReplyDeleteThank you so much, I'm glad you like them! I love how I can continue to have them on display throughout the winter months too (without the Christmas bling).
DeleteOh my goodness, you totally transformed those birdhouses ~ impressive! Your Christmas centerpiece looks so pretty with your houses added. Thanks for sharing at the #HomeMattersParty.
ReplyDeleteThank you very much, Allyson, they were fun to transform for my holiday centerpiece!
DeleteNever would've guessed these were DT birdhouses! Love this! Thanks for sharing on Crafty Creators!
ReplyDeleteI'm glad you like them Niki, thank you 😊
DeleteWow is all I can say. Every time I go to the dollar store I look at the bird houses and wonder how the interior frugalista does it? Pinning even if its Feb. Love this
ReplyDeleteAwe, you made my day, thank you! 😄
DeleteI never look at a dollar store bird hous and Not think of you. How do you do it. Beautiful Pinned even if it is Feb
ReplyDeleteYou made me smile, Leanna, thank you! It gives me such joy to repurpose or beautify unfinished birdhouses.
Delete