How To Give Oak End Tables A Quick And Easy Update
Do you have wooden side tables that you love but are looking a bit tired and dated? Rather than replacing these well-made pieces with something new, I'm going to show you how easy it is to breathe new life into them so they look refreshed and like new.
If you've never given furniture a makeover and are nervous about where to begin, then this post is for you. Today I'm sharing how to give oak end tables a quick and easy update with both paint and stain. If it were not for waiting for the paint and stain to dry, this furniture update could be completed in an afternoon!
How To Easily Transform Tired Wooden End Tables
I'll be demonstrating with a lovely oak end table with a lead glass door that someone donated to Goodwill. Hopefully, after you read this tutorial, that won't be your story!
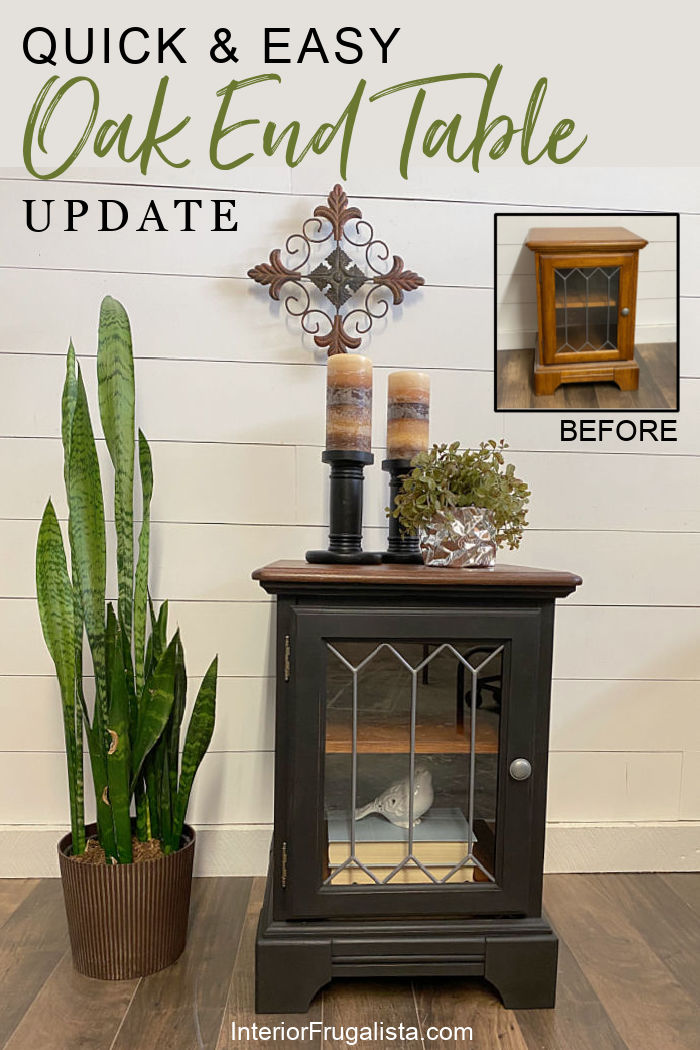
This is my end table before the makeover. The lead glass door and storage potential are what attracted me to this piece.
It's been a while since I've done a furniture makeover and the motivation to get back in the saddle is our Do It Over Designers Challenge. We are a group of bloggers who love to recycle, upcycle, and DIY and come together on the fourth Saturday of every other month to take something old or unused and do it over into something new.
The items we use can be found in closets, barns, garages, yard sales, thrift stores, or you name it. You'll find our talented group's projects at the bottom of the post. Please don't forget to check them out before you go.
Last time I gave a pine vintage doll cradle a makeover for my granddaughter. Thank you Ann from The Apple Street Cottage for hosting this event.
Deciding On A Paint Color
Before starting the makeover I asked for feedback on our iF Facebook page as to what color I should paint the narrow side table. The most popular suggestion was either pale or sage green and I agree it would be a pretty color choice having painted this antique hexagon accent table and this oak oval console table green.
Because I don't plan on keeping the table for my home, sadly I had to curb the urge to pull out the green paint can. I've never had much luck selling any shade of green-painted furniture. White and black on the other hand sell like hotcakes so I decided to go with Kim's suggestion of painting it black and I couldn't be happier with the results.
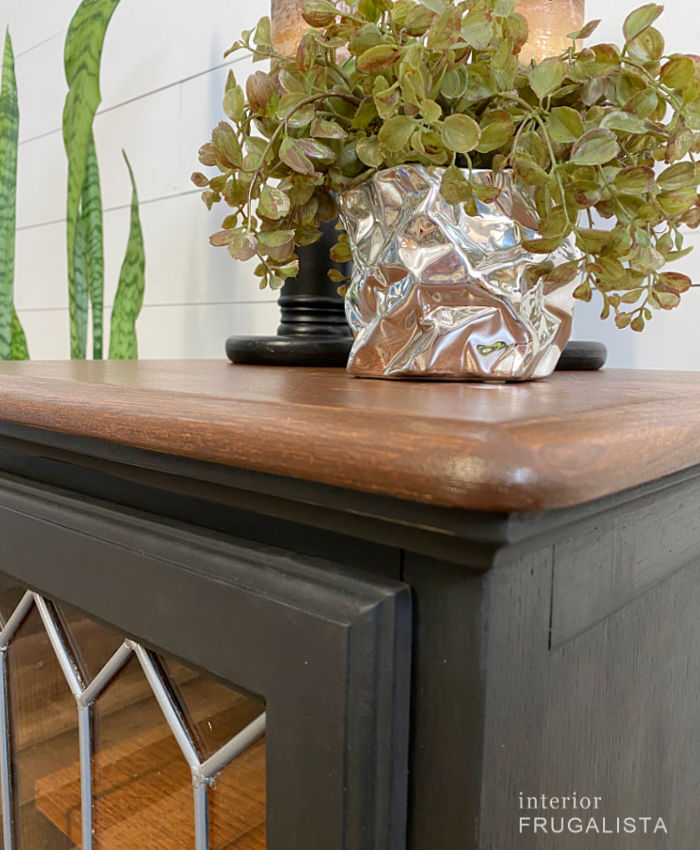
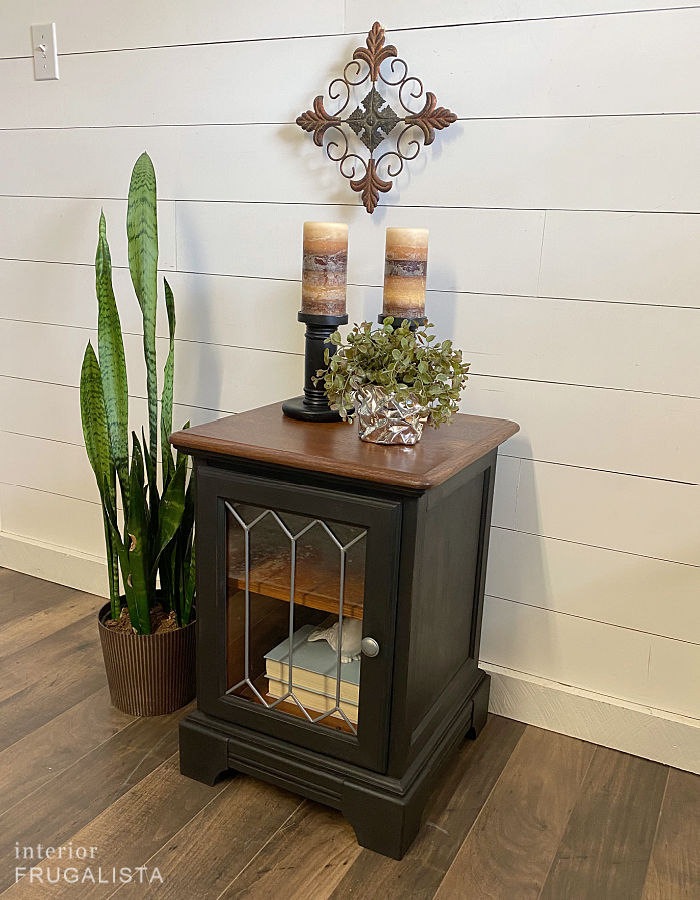
Keep the above in mind when choosing a paint color. The rich classic black with walnut stain combination pairs beautifully with the lead glass door and completely transformed and updated this piece.
What You'll Need To Make It
These are the supplies that you'll need for the end table makeover. You can find everything at your local Home Depot or other home improvement store. You'll see I mention HD a lot but this is not a sponsored post. I just want to point out the one-stop shopping potential for this makeover.
I have included some affiliate links in the supply list below so you can see what products I used or recommend for this project. As an Amazon Associate, I earn a small commission from any qualifying purchases at no extra cost to you. Thank you for your support!
Supply List
Oak End Table
Black Chalk Paint
Dark Walnut Gel Stain
Black Wax
Satin Clear Coat
Round Wax Brush
Foam Brush
Lint-Free Shop Rags
Here's How I Did It
We'll begin the tutorial with the most important step, prepping the end table for paint and stain.
How To Prep The Oak End Table For Paint
The first thing you want to do is remove any hardware and place them in a container for safekeeping. Remove the door, drawers, and shelving if yours comes with them. Raise the end table on blocks on each corner. Set the door and shelf on the worktable with some painter's pyramids.
I cannot say it enough but for a lasting finish, it's imperative that you take the time, as tedious as it may be, to prep the furniture first before applying paint. I outline the different ways you can do that here in my how-to prep furniture for chalk paint from A to Z tutorial.
For this oak table, all that is needed is to lightly sand the wood, inside and out, with 150-grit sandpaper to rough up the surface to give the paint and stain some bite. I also did this to the front and back of the door and shelf on both sides.
How To Prep The Oak End Table For Stain
I used to stain my pieces with traditional liquid stain until I tried gel stain for the first time. It has become my go-to stain because it is so much easier to apply. Unlike traditional stain that soaks into the wood, gel stain sits on top and gives it a consistent finish like paint that is very easy to blend.
What I also love about gel stain is that you can stain right over the previous stain (if you are doing a darker color) by simply scuffing the wood first just like when prepping for paint outlined in the previous step. This is how I prepped the interior of the end table and the shelf for stain.
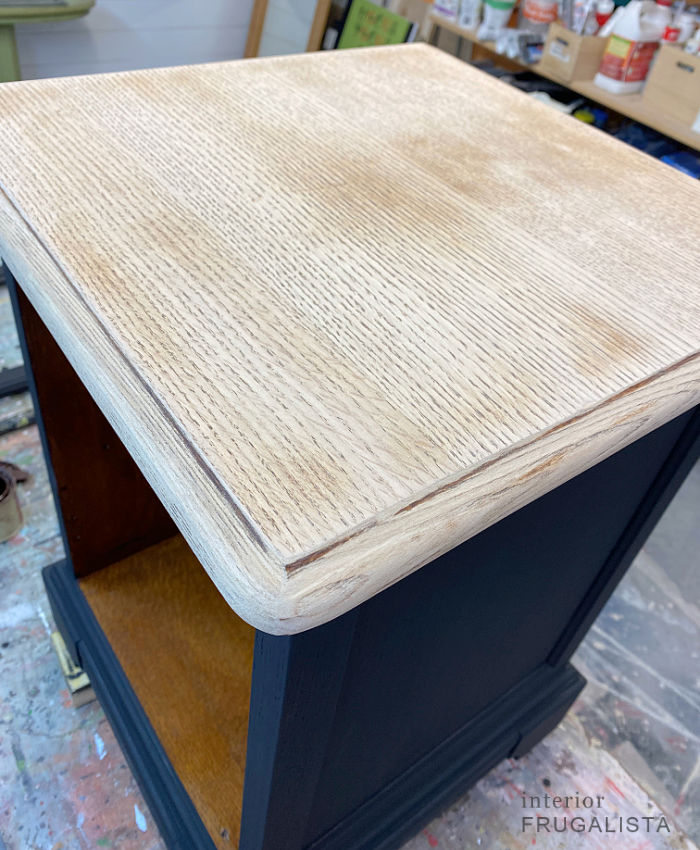
Unfortunately, the top wasn't so easy because it had a nasty water ring stain that would be visible through a stained finish. Determined to stain rather than paint the top of the end table, the only way to remove the water ring is sanding to the raw wood.
To do this use an orbital sander and a 120-grit sanding pad. If the top is a veneer rather than solid wood, then be very careful you don't over-sand through the veneer. Follow that up with a very light hand sanding with 220-grit sandpaper for a nice smooth finish. Next, wipe the end table with a damp rag followed by a tack cloth to remove any fine dust particles.
Hopefully, your table doesn't have any visible stains or water rings that require the top to be sanded. But if it does, now you'll know how to remove them.
How To Update The Oak End Table With Paint
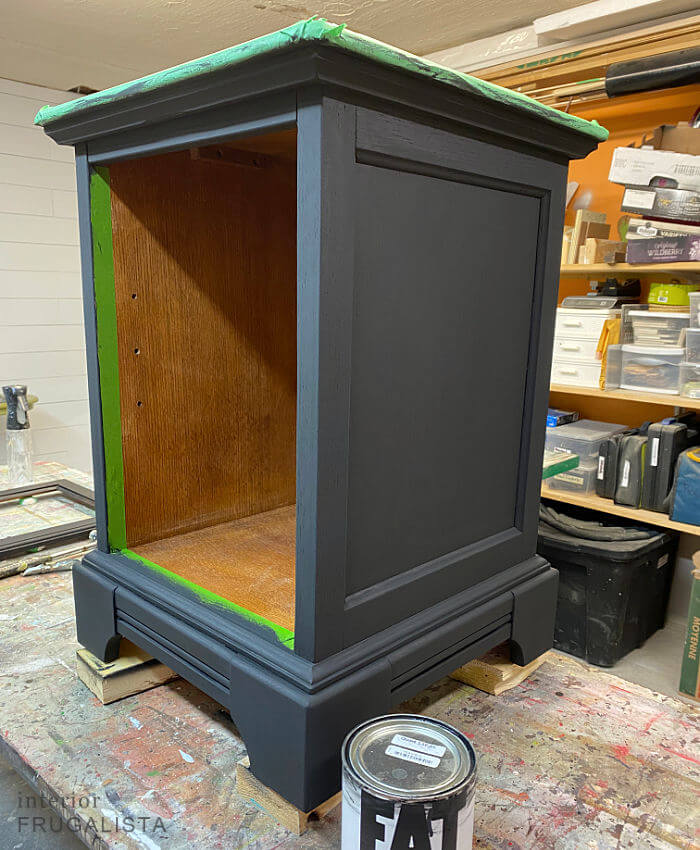
Now that the end table is prepped it's time for the fun part, paint! To be on the safe side, I like to run a bead of my favorite painter's tape along the edge of the sanded wood top to eliminate the possibility of any overbrushed paint. Then I run a bead along the bottom where the door meets the interior for a nice crisp edge between the paint and the stain.
Painting Tip
Less is more for a beautiful chalk paint finish and you'll want the thickness of the paint to be a milk-like consistency. For thicker paints instead of thinning with water (although that is an option), my preference is to use a misting bottle. Before dipping the brush into the paint, mist the brush to dampen it first.
I painted the exterior only and the front of the door with a raven black paint color that I had on hand. Home Depot sells Behr Chalk Decorative Paint that can be mixed in a classic noir or pretty much any color, including custom colors. The paint requires a minimum one-hour dry time between coats so I set the timer on my phone and relax with a good book between coats.
After it's dry lightly sand with 220-grit sandpaper between coats to smooth the painted finish. It took two coats of paint plus a light touch-up where the wood was still slightly visible in some areas.
While the last coat of paint is still wet, remove the painter's tape pulling toward you at a 45-degree angle and wait at least an hour before moving on to the next step.
How To Update End Table With Gel Stain
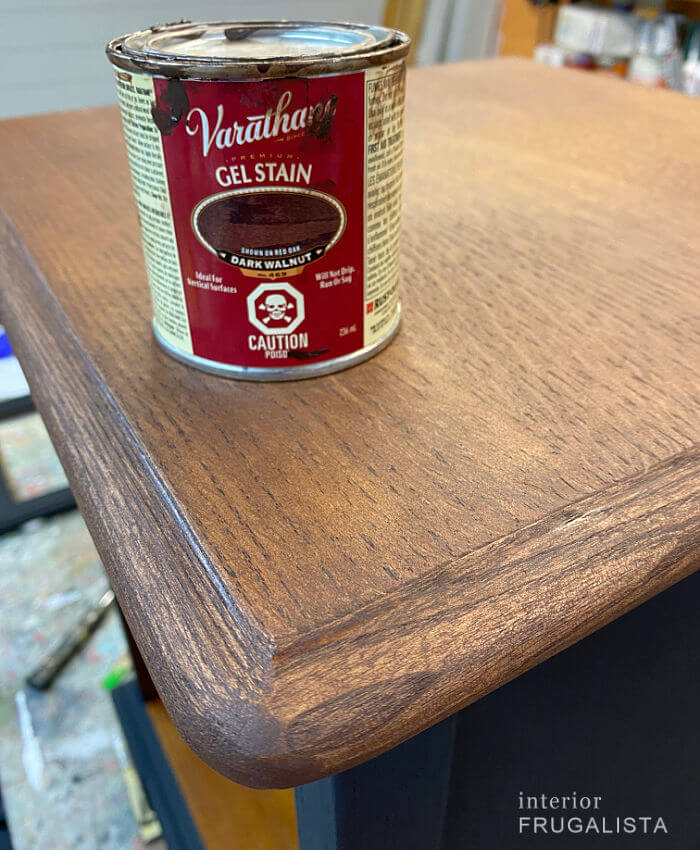
We'll begin by staining the inside of the end table, right over the original stain. I applied a dark walnut gel stain to darken the original color. Apply it with a foam brush working with the grain of the wood. Leave it on for a couple of minutes and blend the color with a lint-free rag.
Depending on the original stain color, you may need to apply more than one coat. If that's the case you'll need to allow a minimum two-hour dry time between coats. Thankfully I only needed one coat to get the perfect color.
To stain the natural wood top, apply the dark walnut gel stain much the same way but swipe the brush from end to end without stopping mid-way to eliminate any brush marks. Then immediately blend the stain with a lint-free rag with the grain.
After letting the stain dry for two hours, apply a second coat to deepen the color if need be. Please note that the gel stain requires a minimum eight-hour dry time before applying a top coat so I left mine to dry overnight.
How To Distress The End Table
You can distress the end table one of two ways.
- For heavier distressing sand along the edges and corners of the end table with 220-grit sandpaper before applying wax. Let the sandpaper be your guide as to where it naturally wants to distress.
- For lighter distressing sand the edges and corners of the end table after it's been waxed like I did with 220-grit sandpaper.
How To Protect Black Paint With Black Wax
When applying wax I recommend working in sections. I waxed the sides first and then the front and back of the end table. You'll want to use a wax brush as pictured below and black wax (Home Depot sells Behr black wax and brushes).
Dip just the tips of your brush into the black wax and work it into the painted wood with the grain, against the grain, and in a circular motion so it nestles into the grain. Wait about 10 minutes and then lightly buff the wax with a lint-free rag to remove the excess.
If the wax still feels sticky to the touch after several hours, lightly buff and blend some more. Note that it takes thirty days for the wax to completely cure so you'll want to be careful what you place on the table in the meantime.
How To Protect The Stained Finish
Remember, it's important that you wait at least eight hours after staining the tables before applying a clear topcoat. Apply two or three coats of a satin clear coat with a foam brush from end to end with the grain of the wood and a wet edge on each row. Allow it to dry a minimum of two hours between each coat.
As I mentioned earlier, the most time-consuming part of the end table update is waiting for the stain to dry. Otherwise, I would have had the end table makeover finished in an afternoon.
Thanks for stopping by the Interior Frugalista today! I hope you were inspired to either update some oak end tables you already have or head to your local thrift store to find suitable ones to give your first furniture makeover a try.
Almost all of our DIY ideas have step-by-step tutorials so why not get your budget DIY on and subscribe. You can also find us on Pinterest, Facebook, Instagram, and YouTube.
If you have any questions, please leave them in the comment section below or the Contact Me tab at the top to drop me an email. I love hearing from you!
If you enjoyed this quick and easy oak end table makeover with two-tone paint and stain, I'd be so thankful if you shared it with a friend and pinned it to your favorite board on Pinterest.
Now here's where I invite you to click on the links below to visit our talented group members' projects. If you don't have time to browse today, click the heart icon on the right to bookmark the page to come back later in the week to pick up where you left off.
Purple Hues & Me
Birdz Of A Feather
Unique Creations By Anita
Sum of Their Stories
Exquisitely Unremarkable
Little Vintage Cottage
Modern On Monticello
Pandora's Box
I share my projects at these inspiring link parties.









What a nice update - the color you chose is perfect as I can imagine this in any room!! This looks like such a high-end piece of furniture now!
ReplyDeleteMarie, that is beautiful!! It's so elegant and I love the paint color you chose. It really adds depth to the piece and makes the top and the glass pop!!
ReplyDeleteThank you so much, Kim, I'm so happy I decided to go with a neutral black that will work in any room. But dang, now that it's finished I don't want to sell it! LOL
DeleteBeautiful makeover Marie! I probably would have used green if I was keeping it too (it's my favourite colour). I'd love having an end table with closed storage to keep the dust at bay; I think it will be a quick seller!
ReplyDeleteThanks Sara, green definitely would've been gorgeous too. I'm so thrilled with the results that now I don't want to sell it. LOL
DeleteThis end table is absolutely beautiful, Marie! You have the skill and patience of a professional when it comes to refinishing furniture! Everything you do looks amazing! I'm so glad you chose black - it looks fabulous! And I don't know why green seems to be the favorite of many - I think because it's the color of the year - Yucky, yuck, yuck, lol!
ReplyDeleteOh goodness Gail, your very kind comment can give a girl a swollen head! You made me laugh out loud re: the color! I'm so glad that I decided to paint it a neutral black because it'll work in any room. So much so that I'm trying to figure out which room in our house it would work in. Shhhh don't tell Mr. Frugalista!
DeleteGreat find and a beautiful makeover, Marie. I love the look of wood with black paint. Now tell me, how did I miss the memo on black wax?
ReplyDeleteThank you so much Ann! Oh yes, black wax is wonderful. In fact I painted an oak cabinet charcoal grey with paint that I had on hand and turned it a black color by using black wax!
DeleteI love this makeover Marie. I like the color you chose too, I've got one I'm working on now that will be a similar color.
ReplyDeleteThank you Tania, I can't wait to see yours! I like the results of this makeover so much that now I want to keep the dam table. 😩
DeleteSupercool makeover Marie, I really over the colour. I still have a few pieces of wood furniture with lead window, I may give them this makeover. I have had them 20Years and this has inspired me to have a go.
ReplyDeleteMusic to my ears Anita, so glad you found inspiration for your lead glass tables!
DeleteIt's amazing how much more modern this piece looks now. I love the new look and really appreciate all the detail you go into on the different processes for the different parts of the end table. Pinning for future reference, thanks :-)
ReplyDeleteThank you so much Julie, and the pin. 🙂 Your appreciation for the detailed tutorial made my day because they are so much work to write!
DeleteWow! This proves that a little color can go a long way! It is gorgeous and so chic!
ReplyDeleteIt made my day that you think they are chic, Maya. Thank you!
DeleteSuch a great transformation Marie! I'm pretty sure we all have an old end table like that in our basements! Or... maybe the kid's first apartment. You're tutorials not only inspire but they are so easy to follow. Thanks so much!
ReplyDeleteThank you Denise, I'm thrilled to hear you find my tutorials inspiring and easy to follow! I think you're right that most of us have an old end table or coffee table in our basements or stored in the garage that could use an update.
DeleteMarie, I painted a hutch black with reddish stained doors and love the look. Your little side table comes close to the hutch, except I didn't have pretty glass doors like yours :(
ReplyDeleteGreat job!
Thanks for sharing at the FWF link party.
Hugs,
Rachelle
Me too Rachelle and my black hutch sold right away. I loved the look so much I decided to repeat it on this oak table and thrilled once again with the results. Thanks and hugs backatcha!
DeleteWOW, WOW, WOW is all I can say. Your refinish took this piece from looking so old fashioned & tired to a sleek, very modern looking piece of furniture & I LOVE IT!!! I have a couple of old Ethan Allen end tables in my studio & you have inspired me to try my hand at refinishing them to use in the sitting/taking a nap area of my studio. I love the black chalk paint with the walnut stain, it is so pleasing to my eye. I didn't know you could get black wax, but I'm on the hunt now!! You always do a fantastic job on whatever you do!! Thanks for sharing!
ReplyDeleteIt's music to my ears to hear this makeover inspired you to refinish your dated Ethan Allen tables! Wishing you the best with the makeover and if you have any questions along the way, don't hesitate to contact me by clicking the "contact me" button at the top of the blog.
DeleteAs I have said many times you are the furniture whisper! This piece is gorgeous. Love all the tips. Happy Sunday. Have a good weekend. xoxo Kris
ReplyDeleteYou made me smile, Kris, thank you for your sweet comment. Wishing you a fantastic first week of April! xoxo
Deletestunning makeover. I love the paint and stain combo! And I hope you're taking good care of yourself and feeling much better Marie! XOXO Hugs
ReplyDeleteThank you, it means a lot coming from you my friend and hugs right backatcha! xoxo
DeleteI enjoyed this post so much Marie, and I wanted you to know that this post will be featured on Tuesday Turn About Link Party this week! Thanks for sharing your makeover and I hope to see you at the party! 😊”
ReplyDeleteI'm so glad to hear you enjoyed this post, Cindy, and thrilled that it is going to be featured this week. Thank you so much and have a fabulous first week of April 🌷
DeleteWhat a perfectly suited update. The black is chic and truly sets off that leaded glass. Beautiful!
ReplyDeleteThanks Larissa and yes, I'm thrilled how the black sets off the leaded glass so beautifully. I sure would like to keep this piece but there is no room in the inn.
DeleteOh my, she's a graceful, stately, classy version of her previous self. Beautiful makeover, Marie. 10/10!!!
ReplyDeleteThank you so much Michelle for the 10/10 score, I'll take it! xo
Deleteyou are very talented and professional in updating furniture
ReplyDeleteYou are very kind, Carol, thank you so much!
DeleteI really love the look of wood just on the top. It give the end table just a little touch of wood grain instead of the big ugly wood square. Great makeover as always, you sure know you stuff.
ReplyDeleteThank you so much Leanna! I love the black and stained wood combination so much that I decided to keep the end table for our spare bedroom.
DeleteWhat state did you find this in lol I have the matching coffee table and we had this exact table and I don't know what happened to it and I saw this post and I was like hey we had that I should redo it and now I can't find it
ReplyDeleteIt needed some TLC but wasn't in terrible condition when I purchased it from Goodwill (Edmonton, Alberta store), could it be yours? I hope yours wasn't donated without your knowledge (although I'd be willing to sell this one if you're in my area). If not, at least now you have an idea on how to give your matching coffee table an update. LOL
Delete